Thursday, April 29, 2010

Windows XP Mode in Windows 7 – Knowing, Installing and Using

There is a cool feature provided by Microsoft for Windows 7 named Windows XP Mode. Simply this is an improved virtual machine which you can use to install applications that are not compatible with Windows 7.

Some advantages of this over Virtual PC are,

  • Use of virtually installed applications are faster and easy.
  • Virtual applications are performing faster.
  • Your Windows 7 start menu can be used to access all the applications that are installed on Windows XP Mode.
  • No need to start the virtual machine your self.
  • Application is run in normal Windows 7 not in another virtual environment.
  • Copy Paste is supported between applications without needing to install any other software addons.

To setup Windows XP Mode you need to download and install Windows XP Mode from Microsoft site. You can use the following link for that.

http://www.microsoft.com/windows/virtual-pc/download.aspx

There you need to download and install,

  1. Windows XP Mode (WXPM)
  2. Windows Virtual PC
  3. WXPM Update

Note - If you have installed Microsoft Virtual PC you need to uninstall that first, other wise WXPM will not work.

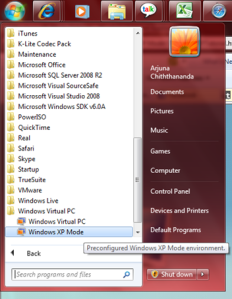
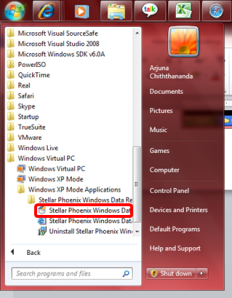
After you installed WXPM, it will be in your start menu.

Setting up Windows XP Mode

1. Start WXPM by clicking on the start menu item.

2. Select an appropriate path for the installation of WXPM and give a suitable password, this password will be the password used for the Virtual PC (VPC) user. If you needed to manually connect to the VPC then you need this.

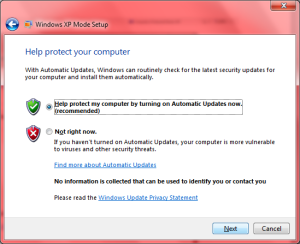
3. Use the next screen to enable the Windows Updates on the VPC.

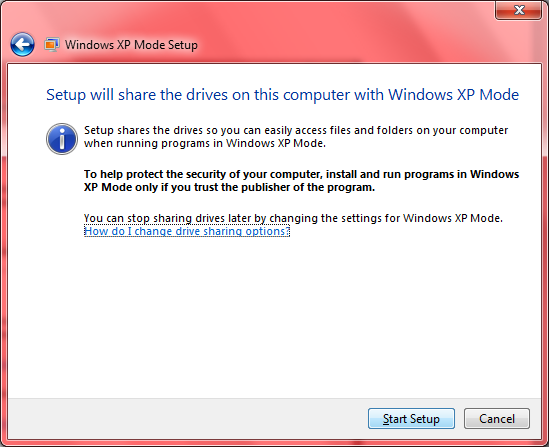
4. Start the setup to initiate the configuration.

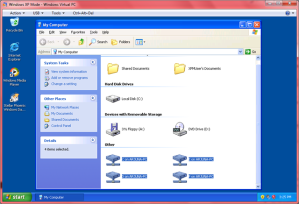
5. After the completion of the configuration WXPM will start a of shown below.

6. All your physical drives will be available on the WXPM as well so you will be able to select and install applications from either of them.

7. For the demonstration I installed “Stellar Phoenix Windows Data Recovery” software since it takes less time to setup.

8. After successfully installing the application on WXPM it will appear on your Windows 7 start menu so you will be able to invoke it directly from Windows 7.

9. As you see there is no difference to the way application is running or shown, and you will even not notice that the application is running in VPC.

Notes – Even though you don’t need, you can even connect to external networks or browse internet using the WXPM, if you do connect the VPC, remember to install a virus guard and enable the firewall for maintaining your computer safety.

Sunday, April 18, 2010

Windows Update Error

Today I faced an error when trying to install few updates for Windows. The message Windows was showing was “Windows update encountered an unknown error.”. So it was not helpful in resolving the issue.

This is happening due to either update not getting downloaded properly, getting corrupt while downloading, space issues in your hard disk, errors while applying updates, etc.

To my satisfaction one thing I did, fixed the issue. If you are also getting similar error I recommend you to first browse to your SoftwareDistribution folder inside Windows installation folder. For example I found it in “C:\Windows\SoftwareDistribution”.

Then delete all the folders in the folder (make sure the Windows Update is closed before doing this) and restart your computer.

After making sure your Windows installation partition is having enough free space (about 1 GB) try running Windows Update again. This time the updates will get installed successfully.

Wednesday, April 14, 2010

Error Installing Windows 7

Recently I tried installing Windows 7 64 bit version in to my HP Pavilion laptop, and I continuously got a problem while installing.

Installer was generating a blue screen with a message Page_Fault_in_NonPaged_Area referring to the file “wimfsf.sys” after coping files and showing the new Windows logo for about 10 seconds.

Since it is mentioning about a page fault and also I am trying with a 64 bit version of Windows I thought this is due to a problem related to hardware of my laptop, so I tried many alterations which included things like, flashing BIOS to various versions including new and old, plugging memory in different ways, installing other OSs to try setup Windows from within them, but nothing helped me to sort the issue except replacing the DVD.

Yes indeed, it was an issue with the installation media (DVD), if you also get a similar error when installing Windows 7, I suggest you to first try installing with a different media.

If you still get an error then try running Windows 7 Upgrade Advisor which can be downloaded from Microsoft. This will analyze your machine and will report you the compatibility details.

Also,

- updating your BIOS to the latest version,

- installing with only one memory module when you are having more,

- disabling special processor (virtualization) and memory (memory caching) functionalities,

- changing hard disk drive options,

will help you getting Windows installed successfully.

Monday, April 12, 2010

SQL Server Reporting Services Error - The report server cannot open a connection to the report server database. A connection to the database is required for all requests and processing. (rsReportServerDatabaseUnavailable)

Recently in one of my virtual servers I got the above error when trying to open the SQL Server Reporting Services (SSRS).

If this is happening to you I recommend checking the following things in your server.


1. Remote Connections in SQL Server.

Go to Start –> All Programs –> Microsoft SQL Server 200x –> Configuration Tools and open SQL Server Configuration Manager.

Now check whether the TCP/IP and Named Pipes are enabled in the 3 Protocol sections.

If they are disabled then enable them then check whether the remote connections are enabled using the SQL Server Management Studio by right clicking on the SQL Server (Parent node in the Object Explorer) and selecting properties.

Then go to the Connections and make sure that the Allow remote connections to this server checkbox is checked.

Then restart the SQL Server Service using the SQL Server Services section in the SQL Server Configuration Manager or by going to the machine services by Start –> Administrative Tools –> Services.


2. Check the SSRS Service Account.

Go to Start –> All Programs –> Microsoft SQL Server 200x –> Configuration Tools and open Reporting Services Configuration Manager. Then click on the Service Account section and verify its details. If you are not sure about the details it’s always good to re-enter them since there is nothing to loose.

3. Check the SSRS Database and Credentials.

Click the Database section and see whether all details are correct. This is very important since SSRS need to get connected to its SQL database to function properly. Pay good attention to validate the SQL Server Name, verify the database mentioned under Database Name exists in the specified SQL Server. If you are not sure of the existing settings just click on the Change Database button and it will open a wizard to step through.

If you already have reports in the SSRS then always try to Choose an existing report server database before Creating a new report server database since when you create a new database you will loose existing customizations you might have.

Then go to the bottom section to see the Credentials provided are correct. I am used to validate these by opening the management studio and trying to connect using the provided account. After validating the account using the management studio, to be in the safe side you can set those settings using the Change Credentials button.


4. Check your Firewall.

If the you have enabled a firewall such as Windows Firewall or a 3rd party firewall it might be blocking the functionalities required. Just try switching off the firewall, if that solves then try creating a rule for the firewall to authorize the required connections.


Hope this helps to correct the error, if not let me know some times I may be able to help.

Sunday, April 11, 2010

.Net Nullable Types

A variable of a nullable type can be used to store the normal range of values allowed by the underlying data type plus the Null. Nullable types are instances of System.Nullable.

Since reference types already supports Null, nullable types represent value type variables which supports null.

For example Nullable<bool> (or spoken like nullable of bool) can be used to store true, false and null.

There are two ways to declare a nullable variable.

Method 1


int? i; // Declaring
i = null; // Initializing

int? i = 4; // Declariong and initializing


Method 2


Nullable<int> a; // Declaring
a = 4; // Initializing

Nullable<int> a = null; // Declariong and initializing


As you see above assigning values to a nullable is same as for a normal variable. But when retrieving the value you need to be little careful.

Method 1 – Using GetValueOrDefault

GetValueOrDefault property is available for nullable variables. If the variable is null it will get the default value for the type otherwise the actual value it contains.


textBox1.Text += "Value of i - " + i.GetValueOrDefault();


Method 2 – Using variable.Value

When you are going to retrieve the value inside the variable using .Value be careful to first check whether there is actually a value in the variable, otherwise .Net will generate an InvalidOperationException with a description of “Nullable object must have a value”.


// \r\n is used to insert a new line.
if (i == null)
    textBox1.Text += "\r\n" + "i is Null";
else
    textBox1.Text += "\r\n" + "i is - " + i.Value;


or


// Environment.NewLine is equal to placing a new line or \r\n.
if (a.HasValue)
    textBox1.Text += Environment.NewLine + "a has - " + a.Value;
else
    textBox1.Text += Environment.NewLine + "a has Null";


The full code would look like the following.


  1. // Declaring Method 1
  2. int? i; // Declaring
  3. i = null; // Initializing
  4. //int? i = 4; // Declariong and initializing
  5. // Get value using GetValueOrDefault().
  6. textBox1.Text += "Value of i - " + i.GetValueOrDefault();
  7. // \r\n is used to insert a new line.
  8. if (i == null)
  9.     textBox1.Text += "\r\n" + "i is Null";
  10. else
  11.     textBox1.Text += "\r\n" + "i is - " + i.Value;
  12. // Declaring Method 2
  13. //Nullable<int> a; // Declaring
  14. //a = 4; // Initializing
  15. Nullable<int> a = 4; // Declariong and initializing
  16. // Environment.NewLine is equal to placing a new line or \r\n.
  17. if (a.HasValue)
  18.     textBox1.Text += Environment.NewLine + "a has - " + a.Value;
  19. else
  20.     textBox1.Text += Environment.NewLine + "a has Null";


The output would be,

Value of i - 0
i is Null
a has – 4

You could use the ?? operator to assign the default value for a non nullable variable while the nullable contains null as the current value.


int? Null_X = null;
int NonNull_y = Null_X ?? -1;


Friday, April 09, 2010

Features of Search Engines

How many of you know that common and popular search engines like Google and Bing are providing many other functionalities than searching?

Yes it is true there are many functionalities within them that most of us don’t know.

Following are some features, you can try these out by typing the italic text in your favorite search engine.

  1. Finding the date and the time of a place. – “Time Sri Lanka”, “time Melbourne
  2. Checking spelling of words. – “Cheking”, ”mathmatics”
  3. Finding results of arithmetic. – “(25*34)+78”, “2**5”
  4. Finding the weather if a place. – “Weather Colombo”, “weather Changi”
  5. Finding the populations of countries or popular cities. – “Population UK”, “population Sri Lanka”
  6. Converting units. – “12.5km in Meters”, “3km in inches”
  7. Stock details. – “MSFT”, “AAPL”
  8. Find similar word (Synonyms). – “~Cooking”, “~hot drinks”
  9. Finding currency values. – “1 GBP in AUD”, “89.34 AUD in USD”
  10. Finding maps. – “New York Map”, “Sydney map”
  11. Finding definitions of words. – “Define Computer”, “define language”
  12. Other than above you can find about Books, Movies, Air Line Schedules etc. But they are widely for other countries like UK, US.

While searching you can use special characters like wild cards, concatenate, subtract to help while searching. Try them out to find the results by your own.

Sunday, April 04, 2010

How to Read and Write Text

Reading and writing to text files had been made easy by .Net.

Following code will create a text file and insert 2 lines to it and will then read it and display.


  1. // System.IO is required for file handling.
  2. using System.IO;


  1. // Creating a stream writer object.
  2. // @ is used before the string to avoid the string getting broken by the /.
  3. StreamWriter stWriter = new StreamWriter(@"C:\Backup\File.txt");
  4. // Writing into the file.
  5. stWriter.Write("It is now ");
  6. stWriter.WriteLine(DateTime.Now);
  7. stWriter.WriteLine("The End");
  8. // Closing the file.
  9. stWriter.Close();
  10. // Reading the file.
  11. // Checking the availability of the file.
  12. if (File.Exists(@"C:\Backup\File.txt"))
  13. {
  14.     // Without using the @, \\ also can be used to represent \ inside of a string.
  15.     using (StreamReader stReader = File.OpenText("C:\\Backup\\File.txt"))
  16.     {
  17.         // Temporary variable.
  18.         string str = "";
  19.         while ((str = stReader.ReadLine()) != null)
  20.         {
  21.             // Assigning to a label.
  22.             label1.Text += str + "\n";
  23.         }
  24.     }
  25. }
  26. else
  27.     MessageBox.Show("Error, File cannot be found.");


Friday, March 26, 2010

SharePoint Page Types

Do you know in SharePoint there are two types of pages?

In a SharePoint site each page you see is either a ghosted page or an unghosted page.

Ghosted (Uncustomized) Pages

These are the pages stored in the severs file system but not in the database. The other important thing is these files are common to all the site collections within the SharePoint server and are generally based on the "out of the box" site definition templates. Basically they are working as template files. Ghosted pages are faster since ASP.NET parser will be used to parse them and as you might know ASP.NET parser will compile the page into an assembly on the first time it is rendered, on subsequent executions the compilation is skipped since the assembly is already there.

When ghosted pages are modified by SharePoint designer then they will become unghosted pages, and then SharePoint will start using that file in the future not the file stored in the file system. A common example for this would be the “default.master” file on the “C:\Program Files\Common Files\Microsoft Shared\web server extensions\12\TEMPLATE\Global“.

Unghosted (Customized) Pages

These are the pages which are stored on the database. Unghosted pages are specific to the SharePoint web site the page is in. If you change these files it will not affect any other site in the same SharePoint server. Unghosted pages will be parsed by the safemode parser which will not compile the pages. The only dynamic code allowed is server-side controls that are marked safe (Safe Controls, Trusted Controls).

Why Ghosting?

This allows SharePoint to,

  • Increase it’s performance by enabling caching the main site template into memory and then apply the changes that are stored in the database for the specific file.
  • Increases security by not allowing unghosted pages to run code so an attacker who injects code will not be able to crash your server.

Tuesday, March 23, 2010

Finding the IP Address of the Email Sender

Recently I was bit curios to find out whether we can find the IP address of the sender in an email. After doing some web searching I found interesting sites which describes what needs to be done.

If you like to find out the way to do this please visit and see.

http://www.johnru.com/active-whois/trace-email.html

http://aruljohn.com/info/howtofindipaddress/

Saturday, March 13, 2010

Protect HTML Files

Recently I came up with a requirement to protect a website which was created using HTML.

When searching over the internet a team member of mine found a nice software called HTML Guard.

This software is encoding the source of the site so the users will not be able to see the code behind the site. Using this tool you can even block a site to a particular domain. Even the site is downloaded it will not properly run.

The best thing is this has a free version so we can use the full set of features without paying (A small message will come on the top right corner saying the site is encoded by using the tool).

This software is by WulfSoft, thanks guys you have done a good job.

Try out yourself and see.

http://www.htmlguard.com/

Reading and Writing to Excel Files

Even though I posted similar 2 articles in 2008, the code of that article was having few errors. So thought to put more complete post on this.

The code will read an Excel file using an OleDbConnection and will write the same data back to another Excel file. This will explain how to read and write to Excel files. One thing to remember when running this code is to make sure the source Excel file is open. Otherwise you will get an error similar to “External table is not in the expected format.”

Also note that there are few connection string parameters you can use while opening Excel files.

HDR = Yes – Use when first row contains column headers.

HDR = No  - Use when first row contains data.

Excel xx.x – Use the following Table as a guide.

Parameter Value

Excel Version

Excel 12.0 Excel 2007 (Released in 2007)
Excel 11.0 Excel 2003 (Released in 2003)
Excel 10.0 Excel XP (Released in 2001)
Excel 9.0 Excel 2000 (Released in 1999)
Excel 8.0 Excel 97 (Released in 1997)


IMEX=1 – Use this when you want to treat all your data in the file as text.

For example - >

Extended Properties="Excel 12.0 Xml;HDR=YES;IMEX=1";

To make the code to work properly you need to refer the Microsoft.Office.Interop.Excel assembly by adding a reference to your project.


  1. using System;
  2. using System.Data;
  3. using System.Windows.Forms;
  4. using System.Data.OleDb;
  5. using Microsoft.Office.Interop.Excel;
  6. namespace TestApp
  7. {
  8.     public partial class Form1 : Form
  9.     {
  10.         public Form1()
  11.         {
  12.             InitializeComponent();
  13.         }
  14.         private void button1_Click(object sender, EventArgs e)
  15.         {
  16.             openFileDialog1.ShowDialog();
  17.             // Create an OLEDBConnection to connect to the Excel file.
  18.             // I'm getting the required file by using a file dialog.
  19.             // The @ symbol makes the string to contain any special characters inside the string without breaking the string.
  20.             OleDbConnection dbConnection = new OleDbConnection(@"Provider=Microsoft.Jet.OLEDB.4.0;Data Source=" + openFileDialog1.FileName.ToString() + @";Extended Properties=""Excel 8.0;HDR=Yes;""");
  21.             // Open the connection.
  22.             dbConnection.Open();
  23.             // Create a command object to work on the data.
  24.             // Note that I have given the sheet name as [Sheet1$] to retrieve data from that named sheet in the particular Excel file.
  25.             OleDbCommand dbCommand = new OleDbCommand("SELECT * FROM [Sheet1$]", dbConnection);
  26.             // Creating a data reader to read data.
  27.             OleDbDataReader dbReader = dbCommand.ExecuteReader();
  28.             // If needed you can get the position of any column (e.g. Age), this will only work if you use HDR=Yes.
  29.             int SearchingItem = dbReader.GetOrdinal("Age");
  30.             // Create the Excel Application object.
  31.             ApplicationClass ExcelApp = new ApplicationClass();
  32.             // Set the visibility of the application.
  33.             ExcelApp.Visible = true;
  34.             // Create a new Excel Workbook.
  35.             Workbook ExcelWorkbook = ExcelApp.Workbooks.Add(Type.Missing);
  36.             // Create a new Excel Sheet.
  37.             Worksheet ExcelSheet = (Worksheet)ExcelWorkbook.Sheets.Add(ExcelWorkbook.Sheets.get_Item(1), Type.Missing, 1, XlSheetType.xlWorksheet);
  38.             // Will keep the current row index. This should start from 1 since the first row is 1.
  39.             int CurrentRowIndex = 1;
  40.             try
  41.             {
  42.                 // Read through the data.
  43.                 while (dbReader.Read())
  44.                 {
  45.                     // Traverse through all the data columns.
  46.                     for (int i = 0; i < dbReader.VisibleFieldCount; i++)
  47.                     {
  48.                         ExcelSheet.Cells[CurrentRowIndex, i + 1] = dbReader.GetValue(i);
  49.                     }
  50.                     CurrentRowIndex++;
  51.                 }
  52.                 // Save the Excel sheet.
  53.                 // The @ symbol makes the string to contain any special characters inside the string without breaking the string.
  54.                 ExcelApp.Save(@"C:\Projects\Ex.xls");
  55.             }
  56.             catch (Exception ex)
  57.             {
  58.                 MessageBox.Show(ex.ToString());
  59.             }
  60.         }
  61.     }
  62. }


Friday, March 05, 2010

Project has Stopped Working

If you create a .NET application to use SQL CE database when you try to run your application on a Windows Vista or Windows 7 machine you might get an error saying your application did stop working, and the error details might show that your are having a problem with System.Data.SQLServerCE.

The reason for this is that your system is not having the SQL Server CE runtime in your machine. To fix it what you need to do is to install the Microsoft SQL Server Compact 3.5 Service Pack 1 on your system. You can download it from the following Microsoft link.

http://www.microsoft.com/downloads/details.aspx?FamilyId=DC614AEE-7E1C-4881-9C32-3A6CE53384D9&displaylang=en

Wednesday, February 17, 2010

An error shown when you try to start the SharePoint Search service

After installing the SharePoint Server when you try to start the search service you might end up with the following error.

An unhandled exception occurred in the user interface.Exception Information: OSearch (Administrator)

or

An unhandled exception occurred in the user interface.Exception Information: OSearch (UserName)

If this comes don’t panic, what you need to do is when providing the username provide it with the full domain name. For example Domain.Local\Administrator.

image

You can find the Microsoft knowledge base article here.

Windows Mobile 7

Highly awaited Windows Mobile 7 is at last showing in horizon.

Have a glance at it by visiting the following URL.

http://www.microsoft.com/presspass/presskits/windowsphone/videoGallery.aspx?contentID=mobileworldcongress2010

http://www.microsoft.com/windowsmobile/en-us/cmpn/windowsphone7series/default.mspx

http://www.windowsphone7series.com/

Microsoft is planning to release phones with Windows Mobile 7 at the end of 2010.

Sunday, February 14, 2010

How Networks Work

I found a really good video which explains how data is travelled in the network. This explains in simple words with animation about the tasks done by the following main components and more.

  • Packet
  • Router
  • Switch
  • Firewall

If anyone is interested in networking I highly recommend you to watch this.

Thursday, February 04, 2010

Making Reliable Connections in BlackBerry Applications

Recently I came up across a blog which provides valuable information on the connections we can make in a BlackBerry application.

If you are interested read more at the following URL.

http://www.localytics.com/blog/post/how-to-reliably-establish-a-network-connection-on-any-blackberry-device/

Tuesday, December 29, 2009

BlackBerry Security Permissions

If you are eager to find out about BlackBerry security permissions and ways to handle prompts following video from BlackBerry will help you in understanding the basics of it.

http://www.blackberry.com/DevMediaLibrary/view.do?name=SecurityPrompts

Further more if you are seeking ways to change application permissions using code, following link will help you to get more details of the Application Permissions class from RIM device API.

http://docs.blackberry.com/en/developers/deliverables/6022/net/rim/device/api/applicationcontrol/ApplicationPermissions.html#PERMISSION_INPUT_SIMULATION

Monday, December 28, 2009

Disabling Date-Time Changes

Do you know that you can programmatically stop the user changing the date and time of a Pocket PC device?

This is useful if your applications need to take time accurately for some reason from the device.

The following code will disable the user from accessing the date time changing settings using his Windows Mobile powered device.


  1. private void btnDisableClock_Click(object sender, EventArgs e)
  2. {
  3.     RegistryKey hklm = Registry.LocalMachine;
  4.     hklm = hklm.OpenSubKey(@"\Software\Microsoft\Clock\", true);
  5.     System.Byte[] offValue = new byte[1];
  6.     offValue[0] = 0x30;
  7.     hklm.SetValue("AppState", offValue);
  8.     lblTitle.Text = "Change Clock Status - Disabled";
  9. }


If you want to re-enable the setting, to make the user able to change the data and time use the below code.


  1. private void btnEnableClock_Click(object sender, EventArgs e)
  2. {
  3.     RegistryKey hklm = Registry.LocalMachine;
  4.     hklm = hklm.OpenSubKey(@"\Software\Microsoft\Clock\", true);
  5.     System.Byte[] offValue = new byte[1];
  6.     offValue[0] = 0x11;
  7.     hklm.SetValue("AppState", offValue);
  8.     lblTitle.Text = "Change Clock Status - Enabled";
  9. }


Saturday, December 19, 2009

Boeing 787 - DreamLiner

Boeing's newest plane 787 DreamLiner had made its first flight. As of Boeing this is a great achievement and a history changer.
View the video and lots of other details at New Air Plane and Boeing.

Sunday, December 13, 2009

Disabling Right Click

To disable right click context menu you can use one of the following methods.


Method 1 – Using attribute oncontextmenu attribute of the body tag.
By using this you can block the right click action and the context menu without using JavaScript.


  1. <body oncontextmenu="return false">


This will be useless if you need to do some action on the click. In such a case use the Method 2.


Method 2 – Using JavaScript.

Place the following JavaScript and modify the script as you need. This will just show a popup window to the user saying that Right clicking is disabled.


  1. <script language="javascript">
  2.     document.onmousedown = disableRightClick;
  3.     function disableRightClick(e) {
  4.         if (event.button == 2) {
  5.             alert("Right click is disabled.");
  6.             return false;
  7.         }
  8.     }
  9. </script>


Tuesday, December 08, 2009

Finding the Image Format

Here is a small code that I wrote to find the image format of an image.

This code will check for the raw image format of the image you select and will display in a pop up window.

Hope this helps.


  1. using System.Drawing.Imaging;


  1. private void button1_Click(object sender, EventArgs e)
  2. {
  3.     openFileDialog1.ShowDialog();
  4.     Image img = Image.FromFile(openFileDialog1.FileName);
  5.     ImageFormat imgfmt = img.RawFormat;
  6.     if (imgfmt.Equals(ImageFormat.Bmp))
  7.         MessageBox.Show(ImageFormat.Bmp.ToString());
  8.     else if (imgfmt.Equals(ImageFormat.Jpeg))
  9.         MessageBox.Show(ImageFormat.Jpeg.ToString());
  10.     else if (imgfmt.Equals(ImageFormat.Tiff))
  11.         MessageBox.Show(ImageFormat.Tiff.ToString());
  12.     else if (imgfmt.Equals(ImageFormat.Wmf))
  13.         MessageBox.Show(ImageFormat.Wmf.ToString());
  14.     else if (imgfmt.Equals(ImageFormat.Icon))
  15.         MessageBox.Show(ImageFormat.Icon.ToString());
  16.     else if (imgfmt.Equals(ImageFormat.Png))
  17.         MessageBox.Show(ImageFormat.Png.ToString());
  18.     else if (imgfmt.Equals(ImageFormat.Gif))
  19.         MessageBox.Show(ImageFormat.Gif.ToString());
  20. }


Saturday, December 05, 2009

Rapping Flight Attendant

If you have flown in aircraft's you may definitely have heard of the in flight safety announcements made by the flight attendants. But have you paid enough attention to it?
Anyway I bet that you have never listened to anything like this before.

This is David Holmes, a flight attendant of Southwest Airlines who is known as rapping flight attendant who came up with a nice idea.
Enjoy.
http://www.youtube.com/watch?v=rhMOnr0GxU8&feature=related
http://www.youtube.com/watch?v=yiXGm_TiRVQ&feature=related
http://www.youtube.com/watch?v=7P2-vEtXSug&feature=related

Tuesday, December 01, 2009

Remember the Old Days

Thought to add the following photos in remembrance of AirLanka which was Sri Lankas national carrier before being renamed to SriLankan.


Monday, November 30, 2009

Open a Port in Windows Firewall

If you tried to open a port in Windows Firewall which comes with Windows Server 2008 R2 you will find that Microsoft had given Windows Firewall a new look and feel.

At first you may feel that you are lost with the new interface, so thought to show how to open a port.

I will be creating an inbound rule opening the port 1443, which normally SQL Server is using for communications (Yes this machine is having SQL Server installed).

Go to Start -> Control Panel -> Windows Firewall.

Click Advance Settings from the left pane to bring up the Windows Firewall main screen.

Click on Inbound Rules and then right click on the same. If you only right click on this you will only see the options Refresh and Help. First click on it and then right click, now click on New Rule ….

This will bring the New Inbound Rule Wizard.

Select Port since we are going to open a port, if you need to open an application you can select the Program radio button, to create a rule based on an existing rule use Predefined radio button, use Custom to create a custom rule. Press Next to proceed.

Make sure TCP is selected and type in 1433 in the Specific local ports textbox then press Next.

Select the Allow Connection action and press next.Select all the available profiles, since I need this rule applicable to all the profiles. Otherwise you can select only the ones you need. Then click Next.

Give a name for the rule and click Finish.

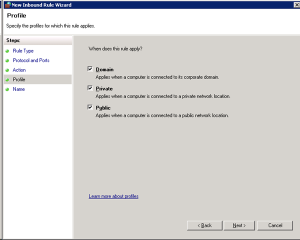
This will add your rule to the firewall.

Wednesday, November 25, 2009

Installing SharePoint 2007 on Windows Server 2008 R2

At the beginning when you try to install Microsoft Office SharePoint Server (MOSS) 2007 on Windows Server 2008 R2 it will hesitate a little. So I thought to put the steps in.

Step 1 - Download the correct Setup.

You will not be able to use your normal SharePoint Setup to install MOSS on Windows 2008 R2, if you try you will see the following message appearing continuously.

image

Download the required version from the following Microsoft URLs.

Windows SharePoint Services 3.0 with SP2 (x86)
http://www.microsoft.com/downloads/details.aspx?FamilyId=EF93E453-75F1-45DF-8C6F-4565E8549C2A&displaylang=en

Windows SharePoint Services 3.0 with SP2 (x64)
http://www.microsoft.com/downloads/details.aspx?familyid=9FB41E51-CB03-4B47-B89A-396786492CBA&displaylang=en

Step 2 – Install MOSS using the setup.

Installation will not have any hiccups if you downloaded the correct version.

Step 3 – Configure MOSS.

When trying to configure MOSS and if your SQL Server is running in another machine which has Windows Server 2008 R2 then you will sometimes get an error saying the SQL Server is not present.

Mainly the reason for this would be that, in your SQL Server machine the Windows Firewall is turned on. Easiest step is to turn it off, but if you are worried about your security then read the other article I have on enabling a port in Windows Server 2008 R2.

After correcting the SQL related issue then you will be able to complete the MOSS configuration wizard successfully.

If you get into any more issues contact me, I will try to help you out as I can.

VixML

Now you can create iPhone and iPod content without being a Objective C developer by using VixML engine.
With this you will be able to create world class iPhone content which use iPhone features with minimal coding.
The best thing is you don't need a MAC, since there is a version which works in Windows.

Read more at,
http://vixml.com/
http://vixml.viximo.com/wiki/tiki-index.php?page=What is VixML?

Tuesday, November 24, 2009

Airbus A380 - Singapore to Melbourne

Following are some nice views I captured of the Airbus A380 I flew from Singapore Changi airport to Melbourne Tullamarine airport.

Amazing Planes

If you are interested in planes like me you may enjoy the video series at YouTube on mega structures.
Following will be on Airbus A380 which is the worlds biggest aircraft.
http://www.youtube.com/watch?v=-Wr7moZuGOw&feature=related

This one is on the Boeing 747 which was an engineering marvel on 1970.
http://www.youtube.com/watch?v=sKb5ZghQSK0

Tuesday, November 17, 2009

Improving SharePoint Look and Feel

If you are thinking whether we can improve the look and feel of the SharePoint site a perfect example is the Glu Mobile site. If you visit them at http://www.glu.com you will hardly believe that it is done by SharePoint. But the truth is it is SharePoint.
If you would like to know how they did it read the following 3 articles discussing on its design and development.
http://blogs.msdn.com/sharepoint/archive/2007/06/14/moss-has-got-game-glu-mobile-s-website-www-glu-com-how-we-did-it-part-1-of-3.aspx
http://blogs.msdn.com/sharepoint/archive/2007/06/14/moss-has-got-game-glu-mobile-s-website-www-glu-com-how-we-did-it-part-2-of-3.aspx
http://blogs.msdn.com/sharepoint/archive/2007/06/14/moss-has-got-game-glu-mobile-s-website-www-glu-com-how-we-did-it-part-3-of-3.aspx

SharePoint Mobile Development

If you need to create a mobile view for a SharePoint site you will soon realise that the default mobile site created by SharePoint will not take you anywhere.
With its plain look and limited features you will not be able to do anything with the default view, so to give some thing valuable to your customer you need to do some development on the default mobile site.
To get more information on getting this done visit Microsoft.
http://msdn.microsoft.com/en-us/library/ms464268.aspx

Enabling Mobile View in a SharePoint Site

Microsoft SharePoint Server has a facility to render the site content into mobile devices as well.
In default this feature will be turned off. To enable mobile access execute the following command.

STSADM.EXE -o activatefeature -name mobilityredirect -url http://ms-sharepoint-site01/m

This will create a site under the given URL without any fancy items. It will be a plain site with only basic HTML. Whenever a mobile browser tries to access the site it will be redirected to the new mobile site.
You will be able to access the mobile sites using the URL.
http://ms-sharepoint-site01/_layouts/mobile/default.aspx
or
http://ms-sharepoint-site01/m

Friday, November 13, 2009

iPhone / iPod Worm

There is a worm spreading on iPhones/iPods which are using the default password "alpine" for SSH.
SSH is a software which allows you to connect to your device and make changes to the file system. SSH is required by some software.
This worm is created by an Australian hacker and it will search for iPhones or iPod touches in reach of the affected iPhone or touch (It will search on available networks such as mobile, wireless, etc). If it finds a device which has the default password of SSH, set to alpine it will get installed into the device, change the home screen background image and will do the same again using that device.
  • Good thing is it will not cause any harm to your device but will just change the background of the home page.
  • Bad thing is the source code of the worm is out and many other varieties of worms might appear soon. Some might be dangerous.
As a security measure change your SSH password today. You will be able to change your password using the Mobile Terminal package. Mobile Terminal can be found in Cydia under Sections. If you need help follow the link.
http://cydia.saurik.com/password.html

Wednesday, November 11, 2009

Backup a SharePoint Site

There are two methods to take a backup of a SharePoint site.
1.) Using SharePoint Central Administration
To take a site backup follow the steps below.
a. Go to the SharePoint Central Administration site by clicking,
Start -> All Programs -> Administrative Tools -> SharePoint Central Administration
b. Click on Operations.
c. Click on Perform a backup under Backup and Restore.
d. Select the site or the farm to backup the entire SharePoint farm.
e. Click on the Continue to Backup Options button on the top of the list.
f. Select the type and the location of the backup and click Ok.

2.) Using the STSADM tool.

Even though Microsoft had provided a UI method to backup a SharePoint site the best way to get it done is by the STSADM tool. If you are unfamiliar with STSADM refer the following post http://arjunachith.blogspot.com/2009/11/stsadm.html.

You will be able to use the following command to get a backup of a site using STSADM.

STSADM.EXE -o backup -url http://MySharePoint:10000/ -filename E:\Folder_Name\SiteBackup.bkp -overwrite

o - Mentions that the backup is an operation.

url - URL for the site collection that you need to backup.

filename - Path to the backup file, even a network path such as \\Machine_Name\Folder_Name\File_Name.ext can be provided.

overwrite - Will overwrite an existing back file if found in the backup location.

Instead of giving the path in the filename you can use the directory parameter to mention the location as well it is shown below.

STSADM.EXE -o backup -url http://MySharePoint:10000/ -directory E:\Folder_Name -filename SiteBackup.bkp -overwrite

directory - Location for the backup, even a network path such as \\Machine_Name\Folder_Name can be provided.

filename -The name of the backup file.

The status will be shown in the command prompt.

If you would like to know the full set of available parameters for the backup operation visit the Microsoft at http://technet.microsoft.com/en-us/library/cc263441.aspx.

Google prOgramming language - GO

Google had released a new programming language named GO.
Their one goal behind this is to increase the developer productivity and efficiency by giving them a faster compiler.
As Google says this is even capable to be used in developing system software and it is powerful than C but not than C++.
Read more on this at http://mashable.com/2009/11/10/go-google-language/.
Get Going at http://golang.org/.

Wednesday, November 04, 2009

STSADM

STSADM is a command line tool which we can use to perform administrative tasks on SharePoint Server, this is very powerful since it provides features that are not available in the Central Administration site.
You will be able to find this executable at,
%COMMONPROGRAMFILES%\microsoft shared\web server extensions\12\
For example - C:\Program Files\Common Files\Microsoft Shared\web server extensions\12\BIN


To learn more visit the following TechNet link.
http://technet.microsoft.com/en-us/library/cc261956.aspx
Following link will have the list of operations and properties.
http://technet.microsoft.com/en-us/library/cc263384.aspx

STSADM Error

Recently I faced a curios error while using the STSADM.exe command line tool.
If anyone of you are not knowing wht STSADM is please refer my earlier post with links to get more information.
However powerful STSADM is, while using it suddenly Windows might tell you that STSADM is not a valid Win32 application.
If you check the file you will also notice that the Windows icon of that exe is disappeared and also the file size is 0.
The good thing is that you will be able to get the file from another SharePoint installation and replace, then everything will start working normally.

Tuesday, November 03, 2009

Flight Simulation

After some pause I again started my flight simulation activities.
To celebrate I thought to put some nice screen captures I made on one of my flights.

Saturday, October 31, 2009

WSUS

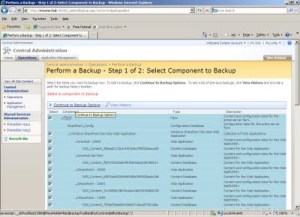
Recently I had to install and configure WSUS (Windows Server Update Services) on our company.
I feel this is a very handy way to distribute the software updates through out the company.
In configuring it the following articles was helpful to me so thought to share them with you.
This is the main Microsoft site for WSUS,
This is the main TechNet site for WSUS,
Following pages show how to configure clients,

Monday, October 05, 2009

Editing NTFS Drive Contents on Mac OS

In Mac OS if you mount a disk formatted in NTFS file system, you will be able to view the contents and even to copy contents from that disk (Read) but you will not be able to save, delete or paste (Edit) anything.
To enable editing in the disk you will be needing to install the NTFS driver.
If you are searching for a driver, download NTFS-3G Stable Read/Write Driver from NTFS-3G.

Wednesday, September 30, 2009

How to Hard Reset i-mate JASJAM

Different phone has different key combinations to perform a hard (factory) reset.
In i-mate JASJAM you need to press the 2 soft keys together while pressing the reset whole.
Then it will show options, letting you proceed or cancel the reset. Remember hard resetting will wipe all the applications and data in your device, so remember to backup everything before performing a hard reset.

Wednesday, September 23, 2009

Distributing BlackBerry Applications Over Internet

BlackBerry applications that you develop can be distributed over the internet quite easily when you know what you need to do. In this method users need to browse to the web URL and click on it so the BlackBerry will download and install the file automatically.

Step 1 - Prepare the Files
When you compile the source code of the application you will be getting a .cod file.
Check the file size of it, if the cod file is less than 55KBs then you can use it without doing anything more.
If that is larger than you need to do the following trick to make the application distributable over the internet.
  • Change the extension of the cod file to zip.
  • Unzip the zip file.

You will now see a set of cod files with names like App-1.cod, App-2.cod, App-3.cod, etc.

Step 2 - Prepare the Server
To make BlackBerry devices correctly identify and download the files you need to add or update the Multipurpose Internet Mail Extension (MIME) types in your web server. The required MIME types are as follows.
File Name Extension - MIME Type
cod - application/vnd.rim.cod
jad - text/vnd.sun.j2me.app-descriptor
jar - application/java-archive

If you need more details on how to set MIME types in different web servers please contact me, I will try to provide you with more details.

Now place the cod files we prepared in Step1 in the server.

Thursday, September 17, 2009

BlackBerry Network Diagnostic Tool

Latest BlackBerry smart phones are supporting many different network transports to enable reliable data communication between third-party applications and the Internet.

BlackBerry have provided a good tool named "Network Diagnostic Tool" which is essentially a role model that answers all these questions and is a functional diagnostic tool for testing a URL over various transports supported by the BlackBerry solutions, as well as for displaying the values of many network attributes during the test period.
You will be able to download it freely from BlackBerry knowledge base.
If you need to know more about the available transports and more in depth details on the network diagnostic tool, better visit the Article Number: DB-00684 at the BlackBerry knowledge base.

Setting APN Automatically

If you tried to create a BlackBerry application which uses internet through Direct TCP transport and needed to release it to a set of users who are using different mobile networks you may have had the problem of how you can release the application in a way that users don't have to make any setting changes to make your application get connected. The complexity here happens because different service providers (mobile networks) are using different settings (for example APN).
After some searching on the net I found one way to achieve this is by identifying the mobile network and then setting the connection properties appropriately.
The steps involved is as follows.

Step 1
Identify the network the phone is currently in.
If you need help on this go to this URL.

Step 2
Get the APN settings for your network.
The way here is to have a file with all the settings of different wireless service providers you intend to run your application on, and then compare the value returned from Step 1 and get to the particular APN.
I suggest you to keep a XML or text file with the following details of the service provider,
  • Country Name
  • MCC
  • Carrier Name
  • MNC
  • TCPAPN
  • TCPAPNUserName
  • TCPAPNPassword
  • WAPAPN
  • WAPIP
  • WAPPort
  • WAPUserName
  • WAPPassword
  • WAPSourceIP
  • WAPSourcePort
  • IsEnableWTLS
Step 3
Add the APN to the connection.
If you need help on this go to this URL.

Determining the Network

In the BlackBerry project that I am in now we are having the requirement to detect the mobile network the phone is currently in.
Basically in BlackBerry mobile network is uniquely identified by the Mobile Country Code (MCC) and the Mobile Network Code (MNC).
To get these details from your code what you have to do is to call

RadioInfo.getMCC()
and
RadioInfo.getMNC()

These will return the codes in decimal.
You can find a full list of MNC codes of the mobile phone operators and a list of country codes by following the following URLSs to Wikipedia.
http://en.wikipedia.org/wiki/Mobile_Network_Code
http://en.wikipedia.org/wiki/Mobile_Country_Code

If you need to access the BlackBerry knowledge base article describing the above process you can follow the following link.
http://www.blackberry.com/knowledgecenterpublic/livelink.exe/fetch/2000/348583/800332/1467358/How_To_-_Determine_the_MCC_and_MNC_of_the_current_network.html?nodeid=1467359&vernum=0

Sunday, September 13, 2009

Setting APN

APN or Access Point Name is a setting which needs to be set on the mobile when we need to get connected to internet using the phone.

APN changes from one mobile service provider to the other. For example Dialog will have http://www.dialogsl.com/ Rogers will have internet.com set as their APN.

But letting users set the APN manually is always not the preferred way. Recently we developed an application for BlackBerry which the user needed to get to the internet without he manually setting the APN. The application was supposed to be delivered through BlackBerry App World so manually setting APN was not an option. In a case like this what you have to do is set the APN programmatically into the connection.

String URL = “www.SomeServer.com”;
StringBuffer bfURL;
bfURL = new StringBuffer ();
bfURL.append (URL);
bfURL.append ("
;deviceside=true ;apn=internet.com");
bfURL.append ("
;tunnelauthusername=UserName;tunnelauthpassword=Password");
String FinalURL = bfURL.toString ();

In the above code I have set the Rogers APN in to this connection.

If you need more details on the parameters used or need to know about the other parameters you are eligible to use such as WapGatewayIP, WapGatewayPort, WapGatewayAPN, etc visit the following link to view full details of the connector class.

http://www.blackberry.com/developers/docs/4.2api/javax/microedition/io/Connector.html