Engine and Electrical System

Fuel System, Chassis and Body

Body and Chassis Continued

Maintenance Service Times

Engine and Electrical System
Below are the service details of a Toyota RAV4 2011, this is applicable for a two wheel drive ot four wheel drive version.
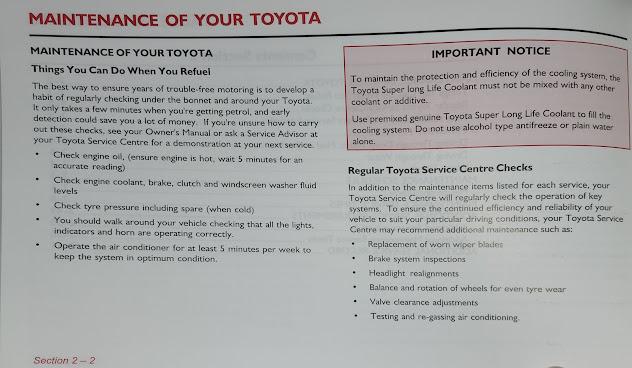
MAINTENANCE OF YOUR TOYOTA IMPORTANT NOTICE
Things You Can Do When You Refuel.
The best way to ensure years of trouble-free motoring is to develop a habit of regularly checking under the bonnet and around your Toyota. It only takes a few minutes when you're getting petrol, and early detection could save you a lot of money. If you're unsure how to carry out these checks, see your Owner's Manual or ask a Service Advisor at your Toyota Service Centre for a demonstration at your next service.
IMPORTANT NOTICE
To maintain the protection and efficiency of the cooling
system, the Toyota Super long Life Coolant must not be mixed with any other
coolant or additive.
Use premixed genuine Toyota Super Long Life Coolant to fill
the cooling system. Do not use alcohol type antifreeze or plain water alone.
Regular Toyota Service Centre Checks
In addition to the maintenance items listed for each
service, your Toyota Service Centre will regularly check the operation of key systems.
To ensure the continued efficiency and reliability of your, vehicle to suit
your particular driving conditions, your Toyota Service Centre may recommend additional
maintenance such as:
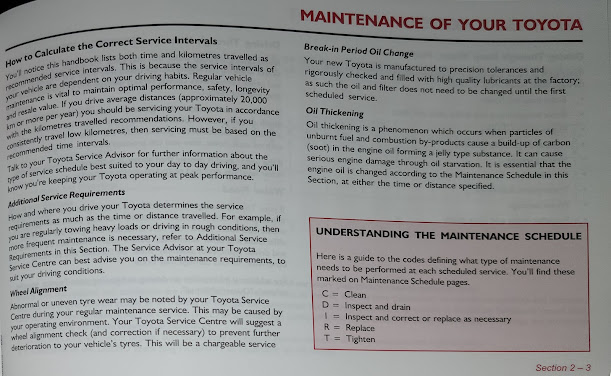
How to
Calculate the correct Service Intervals
You'll notice this
handbook lists both time and kilometres travelled as recommended service
intervals. This is because the service intervals of your vehicle are
dependent on your driving habits. Regular vehicle maintenance is vital
to maintain optimal performance, safety, longevity and resale value. If
you drive average distances (approximately 20,000 km or more per year)
you should be servicing your Toyota in accordance with the kilometres
travelled recommendations. However, if you consistently travel low kilometres,
then servicing must be based on the recommended time intervals.
Talk to your Toyota Service Advisor for further information about the type of service schedule best suited to your day to day driving, and you'll know you’re keeping your Toyota operating at peak performance.
Additional
Service Requirements
How and where you drive
your Toyota determines the service requirements as much as the time or
distance travelled. For example, if you are regularly towing heavy loads or
driving in rough conditions, then more frequent maintenance is
necessary, refer to Additional Service Requirements in this Section.
The Service Advisor at your Toyota Service Centre can best advise you on
the maintenance requirements, to suit your driving conditions.
Wheel Alignment
Abnormal or uneven tyre
wear may be noted by your Toyota Service Centre during your regular maintenance
service. This may be caused by your operating environment. Your Toyota Service
Centre will suggest a wheel alignment check (and correction if
necessary) to prevent further deterioration to your vehicle's tyres. This will
be a chargeable service.
Break-in Period Oil Change
Your new Toyota is
manufactured to precision tolerances and rigorously checked and filled with
high quality lubricants at the factory, as such the oil and filter does not
need to be changed until the first scheduled service.
Oil Thickening
Oil thickening is a
phenomenon which occurs when particles of unburnt fuel and combustion
by-products cause a build-up of carbon (soot) in the engine oil forming a jelly
type substance. It can cause serious engine damage through oil starvation. It
is essential that the engine oil is changed according to the Maintenance
Schedule in this Section, at either the time or distance specified.
UNDERSTANDING THE
MAINTENANCE SCHEDULE
Here is a guide to the
codes defining what type of maintenance needs to be performed at each scheduled
service. You'll find these marked on Maintenance Schedule pages.
C = Clean
D = Inspect and drain
I = Inspect and correct or
replace as necessary
R = Replace
T = Tighten

Driving Through Deep Water, Mud or Sand
Items such as those following require daily service when you drive through deep water, mud or sand:
Driving Through Water
Avoid driving through water that may enter the engine compartment. Water entering the engine compartment may enter the engine air intake and other components causing serious damage and or the engine to stop and not restart.
Should you need to drive through deep water, first ascertain thar the depth of the water is not above the bottom of the front bumper bar and that the surface of the ground under the water is firm and even with no deep holes, then you can proceed slowly in low gear.
If the water level is deeper than above, it is advisable to wait until the water level has dropped or to find another crossing.
Water Flood
If your Toyota is caught in a flood and is submerged over the engine do not start it or have it towed in a manner that may cause damage or unsafe operation. Water may have entered the engine, transmission. differential and other assemblies. Before your Toyota can be started and driven again, each assembly must be checked and serviced, otherwise, serious damage may occur. For additional information on driving and towing your Toyota, see the vehicle's "Owner's Manual".
It seems to be easy to replace the internal lights of your car if you would like to do it your self. Recently I did change my Halogen lights to LED. Following steps are for a 2011 Toyota RAV4, but some of the steps may be applicable to other vehicle models as well.
Vanity Lights
You can remove the vanity light by inserting a flat head screw driver or a panel remover tool from the left side of the light. If you are using a screw driver, you can use a cloth to minimise the damage caused. Be careful not to try from the right side, since the wire connections are there on the right side. So if you try forcing it out from the right side, it will break. You will get the idea from the below images.
Cargo Area Light
Cargo light is the light on the back door of the RAV4, this can be easily removed by inserting a tool from the side where the switch is located. Do not try from the other side since it will break.
Once the light assembly is removed you need to remove the plastic cover to access the light. If you are replacing the globe with a LED, remember to turn the LED to the other side, so the light will emit to the cargo area. You will be able to get a better understanding by the following pictures.
Recently I did upgrade the interior lights of my car, since there are not much articles with the steps, thought this will be helpful to the other readers.
1. Use a car trim remover tool or a flat head screwdriver to gently remove the light cover. If using a screwdriver, it is better use a cloth to reduce the damage to the plastic components.
You just need to insert the tool in the below marked areas to get it undone. Note that we re only removing the lens cover, not the entire dome light assembly. So insert the tool between the lens cover and the plastic.
2. You will be able to pull the existing bulb without much effort.
After replacing the globe, remember to check before fitting the cover.
Recently I was interested in replacing the Halogen map light bulbs with LEDs, I thought this might be useful for other readers as well if I let you know the steps to do it. Even though I did it on a Toyota RAV4 2011 model, some of the steps may be helpful to do the same on other vehicles. But be careful since if you do it wrong things might break.
It is always better to use a trim panel remover tool to reduce the damage caused by just using a flat head screw driver. If you have to use a screwdriver, use a cloth to minimise the damage.
1. Using a panel remover, flip the top and bottom of the lens covers to remove the lens covers.
Below images will show you the mechanism holding the lens cover, so you just need to insert the tool at the right location and gently tilt the tool to get it removed. For example if you insert the tool from the right or left sides and use force, then the small plastic piece will break, needing you to buy a new one.
2. Once the covers are removed you will see the light globes, here you need to be careful. To remove the globes you just need to pull the globe out from the holder. If you turn the globes then the holder will get detached. If you are not too careful the released holder will fall in.
In case you rotate the holder, very carefully rotate it back to the place, before it falls inside.
3. After taking the globe out you can put the new globe in and fit the lens cover back. remember to check the light before fixing the lens cover.
In case your holder fell inside, then you can try few ways to get the holder back.
a. Use a magnet to try to get it out.
b. Carefully use a cable to get it.
c. Remove the entire map light assembly.
Since both a. and b. will have less percentage of success, I will explain how to remove the entire assembly. Since most Toyota’s do not use screws many components are held in place by clips. Mostly they will be plastic. So you need to know where to pull / push so you are not going to break any.
To remove the map light assembly you just need to pull hard to detach the 4 plastic clips see below. It may be really hard so some tools might help.
There is a small black connector which connects the lights to the vehicle’s electricity system. This can be removed by pressing the lock and pulling.
Hope this helps you to stay out of trouble or save some hours while replacing your globes.
If you like to enjoy visiting the Australia’s largest Rose garden then you need to travel to Renmark in South Australia. The place is named Ruston’s Roses, they maintain a Rose garden of 50000 bushes in 4000 varieties. I have been there in off peak season but there were few flowers blooming so I expect it will be full of flowers in season.
To make it an interesting place for everyone Ruston’s got a small car museum as well. Till the ladies enjoy the garden gents can enjoy the cars on display. Not to mention the gift / souvenir shopping possibilities at the place. When you are tired after all that you can enjoy a light meal from the restaurant.
You will find plenty of places to park your car freely. The place is pram and disabled friendly and in off peak season admittance is free. In peak season I think they charge $5 for an adult entry. Visiting them wont be a big issue since they are open everyday of the year from 10:00 AM to 4:00 PM. Find out more by contacting them.
Address: Ruston's Roses, Moorna Street, Renmark SA 5341.
Phone: 08 8586 6191
EMail: anne@rustonsroses.com
Web: www.rustonsroses.com
Map
Few months back suddenly my Toyota refused to connect to my Samsung Galaxy S4 without any reason. Earlier I could listen to music, dial calls and answer calls without issues.
But suddenly the connection between the car and the phone broke and the worst thing is I lost entire Bluetooth screen from the car audio system (Normally I have FM1, FM2, Bluetooth and AM). I thought my audio system is malfunctioning so I went to Toyota, but they said it is a known error and Galaxy S4 is having new Bluetooth version and it is not compatible with most of the car audio systems and I will not be able to use the phone with the car. This was very disappointing to me so I asked for them for the audio system update but they said no updates are available.
Then I thought to try out few things and get it fixed by myself, good news for anyone having the same issue is I solved the issue. But it is not always reliable but 95% of times it will work.
To get your S4 (or any other new device) connected into your car audio follow the steps below, they might help you.
To over come the issue you need to configure the phone to make the connection. In my Toyota this is done by selecting the connection settings after the Bluetooth connection is made using the Bluetooth mode (screen). Because latest phones are intelligent they will detect that the car audio is having older version of Bluetooth and it will change the instruction set accordingly and start communicating with an instruction set which is recognised by the car audio, making everything back to normal again.
After making my phone to connect to the car, I could play my music, answer calls and dial calls without any issues.
Hope this will help you to get your car audio connected to your latest phone.
After disconnecting the battery for a maintenance job, I had some clueless days while trying to reset the clock in a car audio system. Even though there should be a way to set the clock in audio systems it is bit difficult to find it without the manual of the system.
My in my scenario I found it after sometime, so thought to share it since it might help someone with the same problem.
Car audio system in which I had the issue was JVC KD-S5055.

Then to set the minute value you need to press the mode change buttons located on the right side. Once you press the mode change button while on the hour changing mode you will see a message similar to “Minute-m”. Then again you can use the + and – buttons to set the minutes portion of the time.
After successfully setting both hour portion and minute portion you can press the Select button again to save the changes made to he clock.
Additionally if you need the system to show the time when the device is switched on you can press the Display button located below the Select button. This will show the current time instead of the Radio/CD/Track information.
Hope this helps.


")
")
")
")
")
")


