Showing posts with label .NET. Show all posts

Tuesday, December 05, 2017

It is an error to use a section registered as allowDefinition='MachineToApplication' beyond application level. This error can be caused by a virtual directory not being configured as an application in IIS.

Today a friend of mine started getting this error while he tried to deploy his solution to a server. This only started when ‘Precompile during publishing’ option is selected.

image

“Error 20 It is an error to use a section registered as allowDefinition='MachineToApplication' beyond application level. This error can be caused by a virtual directory not being configured as an application in IIS.”

After having a look, I identified this was caused by a temporary copy of a Web.Config file. Earlier developer created a copy of the Web.Config and placed it inside a folder named Backup within the solution. This backup config file had authentication tag (<authentication>), which is a tag that can be only used in global Web.Config file or the Web.Config file in applications root. Due to the presence of authentication tag, compiler started complaining that there is a virtual directory not configured as a application in IIS.

The solution for my friend’s issue was to simply exclude the copy of the Web.Config file from project by right clicking the file. Then the project started deploying happily.

Tuesday, June 20, 2017

Enabling .NET 3.x on Windows 8 and Up

As you may be knowing, now you do not need to separately download and install .Net framework as we used to do with the older .Net frameworks. Since it is coming with Windows, you can just go to “Turn Windows Features On or Off” screen and enable framework you are after. It is simple right?

But in one of the machines it was not that simple for me. The installation tried to download files from Windows Update and was failing mentioning that it cannot get connected to Windows Update when the machine is connected to the internet without any issues.

The solution is to use DISM (Deployment Image Servicing and Management) tool to get it installed.

First you need to find a Windows setup media, a setup DVD or an ISO downloaded will work.

Then use the below command to enable the feature using a local source. Remember to open the Command Window as an Administrator of the machine.

DISM /Online /Enable-Feature /FeatureName:NetFx3 /All /LimitAccess /Source:E:\Sources\sxs

/Online – Targets the currently active and running OS.

/LimitAccess – If some installation files are missing, this will check Windows Update for the missing files. For not to check use /LimitAccess:True.

/Source – Is the location to find the source files, E: is my virtual drive which I mounted the previously downloaded Windows ISO.

If typed correctly, there will be a progress bar showing the installation progress.

image

Monday, December 26, 2016

Open Live Writer – Plugin Not Working

While trying to setup and use the Code Plugin by Rich Hewlett I had trouble getting the plugin loaded into Live Writer. I did add the registry entry required as mentioned in the site, but still the plugin did not load.

Registry

Location - HKEY_CURRENT_USER\SOFTWARE\OpenLiveWriter\PluginAssemblies

Key - SyntaxHighlight_WordPressCom_OLWPlugIn

Value - C:\Users\Arjuna\AppData\Local\OpenLiveWriter\Plugins\SyntaxHighlight_WordPressCom_OLWPlugIn.dll

After a while I figured out that, when loading the plugin Live Writer encounters the following error.

"System.IO.FileLoadException: Could not load file or assembly 'file:///C:\Users\Arjuna\AppData\Local\OpenLiveWriter\Plugins\SyntaxHighlight_WordPressCom_OLWPlugIn.dll' or one of its dependencies. Operation is not supported. (Exception from HRESULT: 0x80131515)
File name: 'file:///C:\Users\Arjuna\AppData\Local\OpenLiveWriter\Plugins\SyntaxHighlight_WordPressCom_OLWPlugIn.dll' ---> System.NotSupportedException: An attempt was made to load an assembly from a network location which would have caused the assembly to be sandboxed in previous versions of the .NET Framework. This release of the .NET Framework does not enable CAS policy by default, so this load may be dangerous. If this load is not intended to sandbox the assembly, please enable the loadFromRemoteSources switch. See http://go.microsoft.com/fwlink/?LinkId=155569 for more information.

This is due to a security feature of .Net Framework 4 or later. Before framework 4, if a DLL is downloaded (which is created in another computer), they used to run in full trust in the zone the assembly is running, but with frameworks 4 and later, downloaded DLLs will not run by default. To make them run, simply grant the DLL full access by going to file properties and selecting the Unblock checkbox in the security section as seen in the below image. This will apply to any plugin you download from internet. Also keep in mind to do this to DLLs you trust safe. Otherwise your computer will be unsafe.

image

To troubleshoot plugin and other errors you can refer to Open Live Writer log file located in C:\Users\Arjuna\AppData\Local\OpenLiveWriter\Open Live Writer.log.

Sunday, April 12, 2015

Changing Registry Key Values using PowerShell

As you may be knowing, you can use Windows PowerShell to change registry values. In this article I am going to do five things.

I have created few registry entries to use in this example as seen below. In real world you can use whatever entries in your registry. It is always advisable to backup your registry before changing it.

clip_image002[13]

1. Set a registry key value.

To set a value you need to use the “Set-ItemProperty” cmdlet as below.

Set-ItemProperty -Path "HKLM:\Software\Test\Live" -Name "TestValue2" –Value “TestData2”

Above command will put “TestData2” in the registry key “TestValue2” located in HKEY_LOCAL_MACHINE\Software\Test\Live.


2. Read a registry key value.

Reading from the registry can be done by using the cmdlet “Get-ItemProperty”.

Below command will get the value in the “TestValue1” key.

Get-ItemProperty -Path "HKLM:\Software\Test\Live" -Name "TestValue1"


3. Using variables in PowerShell.

Here I am going to read a registry key value and put it to another registry key. This can be done using a variable. First you need to read the value into a variable using the “Get-ItemProperty” cmdlet and that value can be saved using the “Set-ItemProperty” cmdlet.


  1. # Check for the existance of the registry key.
  2. IF (Get-ItemProperty -Path "HKLM:\Software\Test\Live" -Name "TestValue1" -ea 0)
  3. {
  4.     # Fetching the value from TestValue1.
  5.     $OldValue = Get-ItemProperty -Path "HKLM:\Software\Test\Live" -Name "TestValue1"
  6. }
  7. ELSE
  8. {
  9. # Inserting a blank, if the registry key is not present.
  10.     $OldValue = ""
  11. }
  12. # Printing the value in the variable.
  13. Write-Host $OldValue.TestValue1
  14. # Setting the value to TestValue2.
  15. Set-ItemProperty -Path "HKLM:\Software\Test\Live" -Name "TestValue2" -Value $OldValue.TestValue1


4. Working with registry keys with spaces.

In case your registry keys contain spaces, you need to use double quotes in your script as seen below.


  1. # Check for the existance of the registry key.
  2. IF (Get-ItemProperty -Path "HKLM:\Software\Test\Live" -Name "Test Value 1" -ea 0)
  3. {
  4.     # Fetching the value from Test Value 1.
  5.     $OldValue = Get-ItemProperty -Path "HKLM:\Software\Test\Live" -Name "Test Value 1"
  6. }
  7. ELSE
  8. {
  9.     # Inserting a blank, if the registry key is not present.
  10.     $OldValue = ""
  11. }
  12. # Printing the value in the variable.
  13. Write-Host $OldValue."Test Value 1"
  14. # Setting the value to Test Value 2.
  15. Set-ItemProperty -Path "HKLM:\Software\Test\Live" -Name "Test Value 2" -Value $OldValue."Test Value 1"


5. Saving PowerShell commands as scripts and running them.

Both above can be saved as a PowerShell script by saving it in a file with the extension ps1. For example I did save it as “ChangeReg.ps1” in my C drive inside the folder “new”. Then the script can be run by browsing to the folder and using the command “.\ChangeReg.ps1”.

clip_image002[10]

After the script is run my registry keys looked like this.

clip_image002[3]

In case you need to retrieve values from other registry hives (locations), following table may be helpful.


Registry Hive

Abbreviation

1. HKEY_CLASSES_ROOT HKCR
2. HKEY_CURRENT-USER HKCU
3. HKEY_LOCAL_MACHINE HKLM
4. HKEY_USERS HKU
5. HKEY_CURRENT_CONFIG HKCC


In case you need to read more on “Get-ItemProperty” and “Set-ItemProperty”, use the links to visit official documentation from Microsoft TechNet.

Tuesday, July 02, 2013

HTTP Error 404.13 – Not Found – The request filtering module is configured to deny a request that exceeds the request content length.

Request Filtering

I recently got this error in one of my applications. When troubleshooting, I found my application is configured to have the default value of 30000000 Bytes for the content length, which was not sufficient for me in some of the file uploading functionalities.

Simply adding / increasing the number in the configuration file corrected this error.

Request Content Length in Bytes.

Default Value – 30000000 Bytes (~28MB)

Maximum Value – 4284229877 Bytes (3.99GB)


  1. <system.webServer>
  2.   <security>
  3.     <requestFiltering>
  4.       <requestLimits maxAllowedContentLength="100000000"></requestLimits>
  5.     </requestFiltering>
  6.   </security>
  7.   ...
  8. </system.webServer>


To obtain more information read this article.

Saturday, August 18, 2012

Handler was not added through the Sys.UI.DomEvent.addHandler method.

imageimage

Sometime back I started getting this error in all the forms in which AJAX tools were used. The thing worried me most is that there were no changes made to the project source code. Later a friend of mine found that it is happening because of the wrong AjaxControlToolkit.

As I feel this dll swap happens when a control is dragged from the Visual Studio toolbox because the toolbox is referenced to a newer version of the toolkit than the project was using.

If you are also getting this error simply delete all the AJAX related files and folders in your projects’ bin directory. Once you are done there should not be any folders such as ar, cs, de, etc. Also remove the AjaxControlToolkit.dll. Then copy the version of the toolkit dll your project was using earlier to the Bin directory. Now clean and build your project to see the error disappear.

If you are still getting the error after correctly doing all this you might be getting the error due to another reason causing the same error. Since there are many reasons for this same error you better check the internet for other reasons to find out the exact reason causing the error for you.

Thursday, August 16, 2012

Correcting AJAX Calendar Extender Popup Calendar Position

Recently I encountered a positioning error in AJAX calendar extender. When I use the calendar extender inside of other container controls the popup calendar started appearing few inches above the button. You will be able to get an idea of the problem by the following image.

image_thumb

Since I couldn’t get it fixed by changing the properties I thought to find a solution for this.

One way to correct this is by applying a CSS style sheet to change the calendar positioning manually. I found this method while searching the web. This way since you need to enter the location of the calendar you need to try several times to get the correct positioning. If you are using this method simply place the following CSS style in your page and apply the style as shown. Remember you need to change the value to suit your form.

  1. <style type="text/css">
  2.     .fromDtPos
  3.     {
  4.         left: 245px !important;
  5.     }
  6. </style>

Apply the style to your calendar extender.

  1. <cc2:calendarextender id="calExpiry" runat="server" targetcontrolid="txtExpiry"
  2.     format="dd MMM yyyy" popupbuttonid="imgExpiry" enabled="True" cssclass="ajax__calendar fromDtPos">
  3. </cc2:calendarextender>

My preferred way to do this is by using the JavaScript that I wrote below. Since you do not need to enter the position manually this will be easier. Also this code will work irrespective of the number of parent containers it is having above of the control.

Insert the below JavaScript into your page.

  1. <script type="text/javascript" language="javascript">
  2.     function showCalendar(sender, args) {
  3.         var processingControl = $get(sender._button.id); // Getting the control which triggered the calendar.
  4.         sender._popupDiv.parentElement.style.top = processingControl.offsetTop + processingControl.height + 'px';
  5.         sender._popupDiv.parentElement.style.left = processingControl.offsetLeft + 'px';
  6.  
  7.         var positionTop = processingControl.height + processingControl.offsetTop;
  8.         var positionLeft = processingControl.offsetLeft;
  9.         var processingParent;
  10.         var continueLoop = false;
  11.  
  12.         do {
  13.             // If the control has parents continue loop.
  14.             if (processingControl.offsetParent != null) {
  15.                 processingParent = processingControl.offsetParent;
  16.                 positionTop += processingParent.offsetTop;
  17.                 positionLeft += processingParent.offsetLeft;
  18.                 processingControl = processingParent;
  19.                 continueLoop = true;
  20.             }
  21.             else {
  22.                 continueLoop = false;
  23.             }
  24.         } while (continueLoop);
  25.  
  26.         sender._popupDiv.parentElement.style.top = positionTop + 'px';
  27.         sender._popupDiv.parentElement.style.left = positionLeft + 'px';
  28.     }
  29. </script>

Then call the function showCalendar on onClientShown event of the calendar extender as seen below.

  1. <cc2:calendarextender id="calExpiry" runat="server" targetcontrolid="txtExpiry"
  2.     format="dd MMM yyyy" popupbuttonid="imgExpiry" enabled="True" onclientshown="showCalendar">
  3. </cc2:calendarextender>

Both of the above methods will correct the appearance of the popup calendar of the AJAX Calendar Extender as seen below.

image_thumb1

Wednesday, August 01, 2012

HTTP Error 500.19 – Internal Server Error

Recently in one of my machines I got the above HTTP error when running an application hosted on IIS 7. The detailed error was as below.

IIS Error

“This configuration section cannot be used at this path. This happens when the section is locked at a parent level. Locking is either by default (overrideModeDefault="Deny"), or set explicitly by a location tag with overrideMode="Deny" or the legacy allowOverride="false".”

After doing some troubleshooting I was managed to get this error fixed by reinstalling ASP.Net by running the aspnet_regiis –ir command.

For more information on running the command please refer to my old article Unable to start debugging on the web server.

Wednesday, July 25, 2012

Styles missing in CalendarExtender

When you put an Ajax Calendar Extender inside of a GridView you will see the calendar without any styling on it meaning the calendar will show only the dates overlapping with other items on your form. Sometimes some dates might even be missing. See the sample appearances below.

imageimageimage

This happens because the style sheets are not loaded at the correct time due to a bug in toolkit, there are several ways to fix this.

One is to add another calendar extender outside of the update panel and keep it hidden.

Another is to disable partial rendering in the script manager. But this will slow down your site reducing the benefits gained from AJAX.

  1. <asp:ScriptManager ID="ScriptManager1" EnablePartialRendering="false" runat="server">
  2. </asp:ScriptManager>

My chosen method is to add the styles manually to the style sheet. To move forward this way simply copy the following styles which are used by the calendar extender to your style sheet.

  1. .ajax__calendar_container {padding:4px;cursor:default;width:170px;font-size:11px;text-align:center;font-family:tahoma,verdana,helvetica;}
  2. .ajax__calendar_body {height:139px;width:170px;position:relative;overflow:hidden;margin:auto;}
  3. .ajax__calendar_days, .ajax__calendar_months, .ajax__calendar_years {top:0px;left:0px;height:139px;width:170px;position:absolute;text-align:center;margin:auto;}
  4. .ajax__calendar_container TABLE {padding:0px;margin:0px;font-size:11px;}
  5. .ajax__calendar_container TD {padding:0px;margin:0px;font-size:11px;}
  6. .ajax__calendar_header {height:20px;width:100%;}
  7. .ajax__calendar_prev {cursor:pointer;width:15px;height:15px;float:left;background-repeat:no-repeat;background-position:50% 50%;background-image:url(../images/arrow-left.gif);}
  8. .ajax__calendar_next {cursor:pointer;width:15px;height:15px;float:right;background-repeat:no-repeat;background-position:50% 50%;background-image:url(../images/arrow-right.gif);}
  9. .ajax__calendar_title {cursor:pointer;font-weight:bold; margin-left:15px; margin-right:15px;}
  10. .ajax__calendar_footer {height:15px;}
  11. .ajax__calendar_today {cursor:pointer;padding-top:3px;}
  12. .ajax__calendar_dayname {height:17px;width:17px;text-align:right;padding:0 2px;}
  13. .ajax__calendar_day {height:17px;width:18px;text-align:right;padding:0 2px;cursor:pointer;}
  14. .ajax__calendar_month {height:44px;width:40px;text-align:center;cursor:pointer;overflow:hidden;}
  15. .ajax__calendar_year {height:44px;width:40px;text-align:center;cursor:pointer;overflow:hidden;}
  16.  
  17. .ajax__calendar .ajax__calendar_container {border:1px solid #646464;background-color:#ffffff;color:#000000;}
  18. .ajax__calendar .ajax__calendar_footer {border-top:1px solid #f5f5f5;}
  19. .ajax__calendar .ajax__calendar_dayname {border-bottom:1px solid #f5f5f5;}
  20. .ajax__calendar .ajax__calendar_day {border:1px solid #ffffff;}
  21. .ajax__calendar .ajax__calendar_month {border:1px solid #ffffff;}
  22. .ajax__calendar .ajax__calendar_year {border:1px solid #ffffff;}
  23.  
  24. .ajax__calendar .ajax__calendar_active .ajax__calendar_day {background-color:#edf9ff;border-color:#0066cc;color:#0066cc;}
  25. .ajax__calendar .ajax__calendar_active .ajax__calendar_month {background-color:#edf9ff;border-color:#0066cc;color:#0066cc;}
  26. .ajax__calendar .ajax__calendar_active .ajax__calendar_year {background-color:#edf9ff;border-color:#0066cc;color:#0066cc;}
  27.  
  28. .ajax__calendar .ajax__calendar_today .ajax__calendar_day {border-color:#0066cc;}
  29. .ajax__calendar .ajax__calendar_today .ajax__calendar_month {border-color:#0066cc;}
  30. .ajax__calendar .ajax__calendar_today .ajax__calendar_year {border-color:#0066cc;}
  31.  
  32. .ajax__calendar .ajax__calendar_other .ajax__calendar_day {background-color:#ffffff;border-color:#ffffff;color:#646464;}
  33. .ajax__calendar .ajax__calendar_other .ajax__calendar_year {background-color:#ffffff;border-color:#ffffff;color:#646464;}
  34.  
  35. .ajax__calendar .ajax__calendar_hover .ajax__calendar_day {background-color:#edf9ff;border-color:#daf2fc;color:#0066cc;}
  36. .ajax__calendar .ajax__calendar_hover .ajax__calendar_month {background-color:#edf9ff;border-color:#daf2fc;color:#0066cc;}
  37. .ajax__calendar .ajax__calendar_hover .ajax__calendar_year {background-color:#edf9ff;border-color:#daf2fc;color:#0066cc;}
  38.  
  39. .ajax__calendar .ajax__calendar_hover .ajax__calendar_title {color:#0066cc;}
  40. .ajax__calendar .ajax__calendar_hover .ajax__calendar_today {color:#0066cc;}
  41.  
  42. /* styles for invalid dates as defined by startDate and endDate*/
  43. .ajax__calendar .ajax__calendar_invalid .ajax__calendar_day {background-color:#ffffff;border-color:#ffffff; color:#646464; text-decoration:line-through; cursor:default;}
  44. .ajax__calendar .ajax__calendar_invalid .ajax__calendar_month {background-color:#ffffff;border-color:#ffffff; color:#646464; text-decoration:line-through; cursor:default;}
  45. .ajax__calendar .ajax__calendar_invalid .ajax__calendar_year {background-color:#ffffff;border-color:#ffffff; color:#646464; text-decoration:line-through; cursor:default;}
  46.   .ajax__calendar .ajax__calendar_invalid .ajax__calendar_today{visibility:hidden; cursor:default;}

Note that the above CSS uses the “arrow-left.gif” and “arrow-right.gif” for the previous and next buttons. If you want, you can use any other image which suits you. In case you need the originals they are below. To correctly show the previous and next buttons you need to place these images on to the “Images” folder under your project. If the folder is different in your project please change the image paths in the above CSS.

  • arrow-left.gif - arrow-left
  • arrow-right.gif - arrow-right

After doing all this remember to link the style sheet to your web page.

  1. <link href="Styles/Site.css" rel="stylesheet" type="text/css" />

If you have done everything correctly your calendar will be shown properly while residing inside of the grid.

image

Saturday, May 05, 2012

Automatically Sizing Excel Columns

Today while trying to do some formatting on Excel using .Net I came up with an error.

One of the things I tried is to make Excel columns automatically size according to the content having on them. As all of you might know we can get this done in Excel by simply double clicking on the column’s right margin. While doing this in code I got the following exception.

ExcelSheet.get_Range("A1", "E10")' threw an exception of type 'System.Runtime.InteropServices.COMException'
base {System.Runtime.InteropServices.ExternalException}: {"Exception from HRESULT: 0x800401A8"}

The code involved in generating this error is as below.

  1. (ExcelSheet.get_Range("A1", "E10")).EntireColumn.AutoFit();


Later I found the reason for this error. Error will occur when we use AutoFit () on empty cells. Because initially I did not have anything in my excel sheet I kept on getting this. So to overcome this error use the same code to auto fit the cell contents simply after the cells are populated with values.

If you cannot get AutoFit () to work the reason might be the same thing. make sure the cells you apply auto fit have some values on them.

The best thing is to use AutoFit () after all data are entered into Excel sheet.

Monday, December 05, 2011

Developing iPhone and Android Applications using C# .Net

Being a .Net developer did you think how great if you could develop applications for most popular mobile device platforms like iPhone and Android with the .Net skills you already have. If you were thinking like me then the wait is over.

Now with Mono you can create cross platform applications using your .Net framework skills. Mono is a software platform using which you can develop applications which runs on iPhones, Android devices, iPads and iPod Touches.

As per the Mono site, “The Mono Project is an open development initiative sponsored by Novell to develop an open source, UNIX version of the Microsoft .NET development platform.” If you are wondering about the name Mono, it is 'monkey' in Spanish.

You can try Mono for free by downloading the trial by going to the trial link. The good thing is after installing Mono you can use the more familiar Visual Studio to do the development using the available Mono templates.

Sunday, April 03, 2011

Menu Overlapping with Report

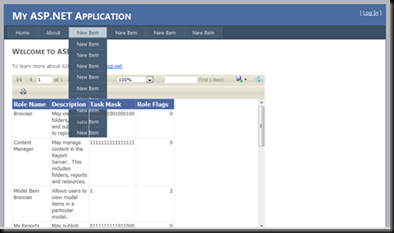
If you had lengthier menus in you ASP.Net application and had used report viewer control you may have faced the problem of report and menu overlapping when ever the report is loaded with data. For example in my sample application it appeared as below.

image

To correct this behavior you need to set the z-index for menu and report viewer using CSS class property. For this I have used the following CSS classes in the Style.CSS.

  1. /* CSS Class for the Menu. */
  2. div.menu
  3. {
  4.     padding: 4px 0px 4px 8px;
  5. }
  6.  
  7. /* CSS Class for a Menu Item. */
  8. div.menu ul
  9. {
  10.     list-style: none;
  11.     margin: 0px;
  12.     padding: 0px;
  13.     width: auto;
  14.     z-index: 1; /* Setting the control to appear on top of level 0 controls for e.g. report viewer. */
  15. }
  16.  
  17. /* CSS Class for the Report Viewer. */
  18. .report
  19. {
  20.     z-index: 0; /* Setting the control to appear below the level 1 controls for e.g. menu items. */
  21. }

To apply the CSS use a code similar to following.

Appling CSS Class to menu in master page.

  1. <asp:Menu ID="NavigationMenu" runat="server" CssClass="menu"
  2. EnableViewState="false" IncludeStyleBlock="false" Orientation="Horizontal">
  3.     <Items>
  4.         <asp:MenuItem NavigateUrl="~/Default.aspx" Text="Home"/>
  5.         <asp:MenuItem NavigateUrl="~/About.aspx" Text="About"/>
  6.         <asp:MenuItem Text="New Item" Value="New Item">
  7.             <asp:MenuItem Text="New Item" Value="New Item"></asp:MenuItem>
  8.             <asp:MenuItem Text="New Item" Value="New Item"></asp:MenuItem>
  9.             <asp:MenuItem Text="New Item" Value="New Item"></asp:MenuItem>
  10.             <asp:MenuItem Text="New Item" Value="New Item"></asp:MenuItem>
  11.             <asp:MenuItem Text="New Item" Value="New Item"></asp:MenuItem>
  12.             <asp:MenuItem Text="New Item" Value="New Item"></asp:MenuItem>
  13.             <asp:MenuItem Text="New Item" Value="New Item"></asp:MenuItem>
  14.             <asp:MenuItem Text="New Item" Value="New Item"></asp:MenuItem>
  15.             <asp:MenuItem Text="New Item" Value="New Item"></asp:MenuItem>
  16.         </asp:MenuItem>
  17.         <asp:MenuItem Text="New Item" Value="New Item">
  18.             <asp:MenuItem Text="New Item" Value="New Item"></asp:MenuItem>
  19.             <asp:MenuItem Text="New Item" Value="New Item"></asp:MenuItem>
  20.             <asp:MenuItem Text="New Item" Value="New Item"></asp:MenuItem>
  21.         </asp:MenuItem>
  22.         <asp:MenuItem Text="New Item" Value="New Item"></asp:MenuItem>
  23.         <asp:MenuItem Text="New Item" Value="New Item"></asp:MenuItem>
  24.     </Items>
  25. </asp:Menu>

Appling CSS Class to report viewer.

  1. <rsweb:ReportViewer ID="ReportViewer1" runat="server" Font-Names="Verdana" CssClass="report"
  2.     Font-Size="8pt" InteractiveDeviceInfos="(Collection)" WaitMessageFont-Names="Verdana"
  3.     WaitMessageFont-Size="14pt" Width="636px">
  4.     <LocalReport ReportPath="Report1.rdlc">
  5.         <DataSources>
  6.             <rsweb:ReportDataSource DataSourceId="ObjectDataSource1" Name="DataSet1" />
  7.         </DataSources>
  8.     </LocalReport>
  9. </rsweb:ReportViewer>


This will correct the overlapping issue as seen below.

image

Friday, November 26, 2010

Disabling Browser Back Button after Logout

Recently in an application we developed there was a requirement to stop the browser back button after user logs out of the application.

The reason behind this was to stop the security risk of another user without proper permissions peeking into the earlier users screens. If you notice in many applications if the browser back is not properly handled then after the user is logged out you can re visit the site by just pressing the browser back button. This happens because the browser shows the cached page when the back is pressed. Even if you have server side code to check for the user they will not fire since the page will load from cache.

With the limited time I found a genius idea to handle this in the internet. What this javascript does is it will always try to put the user back to the last page in the history. For example, I am having a login page and a default page which I am taking a user after he logs in. You need to place the following javascript in the default page to make the above happen.


  1. <script type="text/javascript" language="JavaScript">
  2.     window.history.forward(1);
  3. </script>


Then once a user logs out from the system and if presses the back button of the browser, when the default page loads it will put the user again to login (history forward) page which is the login page. Ultimately user needs to login again to go back to the site.

Tuesday, November 02, 2010

Sorting SharePoint Folder Contents

Recently I needed to sort the contents of a SharePoint folder, in which I used IComparer to get my task done. Following is the code I used. Hope it is helpful.

As you see below I am using the TimeCreated property of SPFile object to do the comparison, other than this you can use any other property of the SPFile object. For a list of available properties refer MSDN.


  1. // Comparer Class.
  2. public class SPFilesComparer : IComparer
  3. {
  4.     #region IComparer Members
  5.     public int Compare(object object1, object object2)
  6.     {
  7.         return new CaseInsensitiveComparer().Compare(((SPFile)object1).TimeCreated, ((SPFile)object2).TimeCreated);
  8.     }
  9.     #endregion
  10. }


  1. ArrayList fileList = new ArrayList(attachFiles);
  2. IComparer compFiles = new SPFilesComparer();
  3. // Do the sorting based on the SPFilesComparer.
  4. fileList.Sort(compFiles);
  5. foreach (SPFile attachFile in fileList)
  6. {
  7.     // Use the sorted list.
  8. }


Saturday, October 02, 2010

MaxLength property not Working in TextBox

If you are involved in coding using .Net sooner or later you will notice that when the TextMode of a TextBox is changed to MultiLine the MaxLength property will stop working. What this means is in the textbox users will be able to type as many character as they want.

When searching the web for a fix for this I found several ideas to solve this. Following is the code which I modified for my requirement. Hope this helps.

ASPX


  1. <html xmlns="http://www.w3.org/1999/xhtml">
  2. <head runat="server">
  3. <script type="text/javascript">
  4.     function RestrictLength(textBox) {
  5.         /* Get the Max Length attribute's value. */
  6.         var allowedLength = textBox.getAttribute('MaximumLength');
  7.         /* Check for the number of characters typed in by the user. */
  8.         if (textBox.value.length > allowedLength) {
  9.             /* If it is more than the allowed limit remove the additional text. */
  10.             textBox.value = textBox.value.substring(0, allowedLength);
  11.             /*  Show a message to user with the tooltip used for the textbox. */
  12.             alert("Maximum characters allowed for '" + textBox.title +"' is " + allowedLength + ".");
  13.         }
  14.     }
  15. </script>
  16.     <title></title>
  17. </head>
  18. <body>
  19.     <form id="form1" runat="server" style="vertical-align:top;">
  20.     <!-- I am binding my java script to the onkeyup event of the textbox. So each time a key
  21.     is pressed it will fire my javascript. -->
  22.     Address <asp:TextBox ID="TextBox1" runat="server" MaxLength="10"
  23.         onkeyup="RestrictLength(this);" Height="58px" TextMode="MultiLine"></asp:TextBox>
  24.     </form>
  25.     </body>
  26. </html>


ASPX.CS


  1. protected void Page_Load(object sender, EventArgs e)
  2. {
  3.     // Adding the attribute to the TextBox1.
  4.     // Note that this is different to the MaxLength property.
  5.     // Also this is not case sensitive.
  6.     TextBox1.Attributes.Add("maximumlength", "10");
  7.     // Adding a tooltip which is used in the message.
  8.     TextBox1.ToolTip = "User Address";
  9. }


The output will me something similar to the following.