Showing posts with label Word. Show all posts

Saturday, November 05, 2011

Word Field Code Samples

As I mentioned in my last post, I will list down some uses of Word field codes here. If you would like to know what they are I invite you to read my previous post on field codes.

Notes -

  • Always remember to user Ctrl + F9 to put curly braces, sorry no copy pasting, you have to type all.
  • If the codes are misbehaving, right click and click on Update Field.
1. Using Word how to greet the user according to the time of the day.
 

{ If "{ Time \@ "HH:mm" }" > "12:00" { If "{ Time \@ "HH:mm" }" > "15:00" { If "{ Time \@ "HH:mm" }" > "18:00" "Good Night" "Good Evening" } "Good Afternoon" } "Good Morning" }

image

image

2. Concatenating text and displaying in Word.

Welcome { UserName } you are reading { FileName \* MergeFormat }.

image

3. Displaying page number in odd pages and text on others in Word.

{ If { =Mod({ Page }, 2) } =1 { Page } "PTO" }

image

image

4. Using Word skipping page number on first two pages and then showing page numbers starting from number 2.

{ If { Page } < 3 "" { ={ Page } - 1 } }

image

image

5. Displaying last saved user name on the last page in Word.

{ If { Page } = { NumPages } "This { FileName } was last saved by { LastSavedBy } on {DocProperty LastSavedTime }. Document was edited for { EditTime } minutes." "" }

image

6. Displaying number of characters, words, paragraphs, pages in a Word document.

This document has { NumWords } words in { NumPages } pages.

image

This document has { NumChars } characters in { DocProperty Paragraphs } paragraphs.

image

Thursday, November 03, 2011

Field Codes in Word

When playing with Microsoft Word I found a nice feature from which we can do few more things with Word other than typing documents.

It is known as field codes. Below are some of them with their descriptions.

Field Code

Description

DocProperty Retrieves current document properties.
NumChars Retrieves the number of characters in the current document.
NumWords Retrieves the number of words in the current document.
NumPages Retrieves the number of pages in the current document.
Page Retrieves the current page number of the document.
LastSavedBy Retrieves the name of the user who saved the document last.
SectionPages Retrieves the total number of pages in the current section.
Template Retrieve the name of the title the document is based on.
Time Retrieves the current system time and you can format the time using date formats.
UserInitials Retrieves the current user’s initials.
UserName Retrieves the current user’s name.


I did mention only few field codes above to just make you start thinking the things which can be achieved by using them in your documents.

To demonstrate I will create a Word document which greets the user with his name. To do this there are 2 ways, one is easy and the other is little hard.

Method 1

1. First the easy way, just open Word, place your cursor where you need your greeting to appear and click on Insert tab to show the insert ribbon. Then click on Quick Parts and then on Field

image

2. From the field window select UserName field and choose an appropriate format from the format list and press ok.

image

This will add the following to your Word document which is responsible in showing the current user’s name.

{ USERNAME  \* Caps \* MERGEFORMAT }

3. To hide the code and display the user name right click on the code and click on Toggle Field Codes.

image

Since I did put the word Welcome in front of this the code the output appears as below.

image

If you need to change the code you can right click on the user name displayed and click on Edit Field.

Method 2

Bit difficult way of doing the same is to just type in the code without the help of Word. Since we know what to type in, the trick is to press Control key and F9 (Ctrl + F9) keys before doing anything.

To get this done just go to the place where you need the user name to appear and then press Ctrl + F9 keys. This will add two curly braces (“{  }”) onto Word (Always press Ctrl + F9, never type the braces manually since then it will not work). Then just type in the code we used earlier and it will work the same way.

Knowing the below keyboard shortcuts will ease your life.

Ctrl + F9 – Will add code insertion points to Word.

Shift + F9 – Will toggle the currently selected field code.

Alt + F9 – Will toggle all the filed codes found in the Word document.

If you find that the codes are not working as they should be, simply try right clicking on it and clicking on Update Field.

Hope this is helpful to you and later I will be putting another post with some field codes in action.

Wednesday, November 17, 2010

Sending the Same Letter to Different People with their Details

Today a friend of mine needed some help from me on sending the same letter to different people while addressing the letters differently. This can be easily achieved by using Word Mail Merge feature.

Since I am having Word 2010 installed in my machine this post will list the steps required in Word 2010.

1. To start the process type in your letter and click on Mailings on the Word 2010 ribbon.

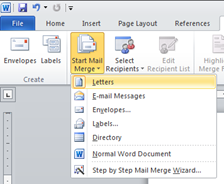
2. Click on Start Mail Merge and select Letters.

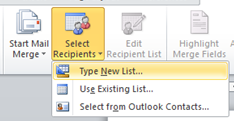
3. Then you need to select the people you need to send the letter to. To do that you have three options Type List, Use Existing List or Select from Outlook contacts. In this post I will use the first option.

4. When you click Type new List… you will get a window in which you can create a list of users with their details as shown in the following screenshot. For simplicity I will only create 2 users.

When you are done creating the list of users click ok so you will be prompted with a save window. Save it for later use since you may need the list for future use.

5. Then in your letter go to the appropriate places you need to place the differencing information, for example I need to put the address of the receiver after the text The Manager. To do so place the cursor on the required location and press on Address Block icon on the ribbon.

From the Insert Address Block window you can customize the way the address is printed on the letter. For example if you do not want to print the company name of the recipient then you can remove the checkmark on the Insert company name field. Preview pane will show you a preview of the actual data you have in your contact list. For the simplicity I will use the default options.

When you press ok you will see something similar to the following appearing in your letter, which will be the placeholder for the address block.

Following similar method but using the Insert Merge Field icon I did add the title and the last name of the recipient into the body section of the letter as you see below.

6. Preview your work by clicking Preview Results icon, by clicking the navigation buttons on the preview results pane you can navigate through your contacts to see the actual letters that will be created. For example below screenshot shows the letter for Mr. Withana with the changes for him.

7. When you are satisfied you can finish the merge with three options, in my case I will use the first option again.

As the final output of the merge I got one new document with the 2 letters addressed to the recipients i had in my contact list as shown in the following screenshot.