Showing posts with label C#. Show all posts

Saturday, May 05, 2012

Automatically Sizing Excel Columns

Today while trying to do some formatting on Excel using .Net I came up with an error.

One of the things I tried is to make Excel columns automatically size according to the content having on them. As all of you might know we can get this done in Excel by simply double clicking on the column’s right margin. While doing this in code I got the following exception.

ExcelSheet.get_Range("A1", "E10")' threw an exception of type 'System.Runtime.InteropServices.COMException'
base {System.Runtime.InteropServices.ExternalException}: {"Exception from HRESULT: 0x800401A8"}

The code involved in generating this error is as below.

  1. (ExcelSheet.get_Range("A1", "E10")).EntireColumn.AutoFit();


Later I found the reason for this error. Error will occur when we use AutoFit () on empty cells. Because initially I did not have anything in my excel sheet I kept on getting this. So to overcome this error use the same code to auto fit the cell contents simply after the cells are populated with values.

If you cannot get AutoFit () to work the reason might be the same thing. make sure the cells you apply auto fit have some values on them.

The best thing is to use AutoFit () after all data are entered into Excel sheet.
Monday, December 05, 2011

Developing iPhone and Android Applications using C# .Net

Being a .Net developer did you think how great if you could develop applications for most popular mobile device platforms like iPhone and Android with the .Net skills you already have. If you were thinking like me then the wait is over.

Now with Mono you can create cross platform applications using your .Net framework skills. Mono is a software platform using which you can develop applications which runs on iPhones, Android devices, iPads and iPod Touches.

As per the Mono site, “The Mono Project is an open development initiative sponsored by Novell to develop an open source, UNIX version of the Microsoft .NET development platform.” If you are wondering about the name Mono, it is 'monkey' in Spanish.

You can try Mono for free by downloading the trial by going to the trial link. The good thing is after installing Mono you can use the more familiar Visual Studio to do the development using the available Mono templates.

Sunday, April 03, 2011

Menu Overlapping with Report

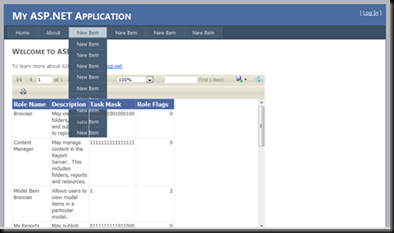
If you had lengthier menus in you ASP.Net application and had used report viewer control you may have faced the problem of report and menu overlapping when ever the report is loaded with data. For example in my sample application it appeared as below.

image

To correct this behavior you need to set the z-index for menu and report viewer using CSS class property. For this I have used the following CSS classes in the Style.CSS.

  1. /* CSS Class for the Menu. */
  2. div.menu
  3. {
  4.     padding: 4px 0px 4px 8px;
  5. }
  6.  
  7. /* CSS Class for a Menu Item. */
  8. div.menu ul
  9. {
  10.     list-style: none;
  11.     margin: 0px;
  12.     padding: 0px;
  13.     width: auto;
  14.     z-index: 1; /* Setting the control to appear on top of level 0 controls for e.g. report viewer. */
  15. }
  16.  
  17. /* CSS Class for the Report Viewer. */
  18. .report
  19. {
  20.     z-index: 0; /* Setting the control to appear below the level 1 controls for e.g. menu items. */
  21. }

To apply the CSS use a code similar to following.

Appling CSS Class to menu in master page.

  1. <asp:Menu ID="NavigationMenu" runat="server" CssClass="menu"
  2. EnableViewState="false" IncludeStyleBlock="false" Orientation="Horizontal">
  3.     <Items>
  4.         <asp:MenuItem NavigateUrl="~/Default.aspx" Text="Home"/>
  5.         <asp:MenuItem NavigateUrl="~/About.aspx" Text="About"/>
  6.         <asp:MenuItem Text="New Item" Value="New Item">
  7.             <asp:MenuItem Text="New Item" Value="New Item"></asp:MenuItem>
  8.             <asp:MenuItem Text="New Item" Value="New Item"></asp:MenuItem>
  9.             <asp:MenuItem Text="New Item" Value="New Item"></asp:MenuItem>
  10.             <asp:MenuItem Text="New Item" Value="New Item"></asp:MenuItem>
  11.             <asp:MenuItem Text="New Item" Value="New Item"></asp:MenuItem>
  12.             <asp:MenuItem Text="New Item" Value="New Item"></asp:MenuItem>
  13.             <asp:MenuItem Text="New Item" Value="New Item"></asp:MenuItem>
  14.             <asp:MenuItem Text="New Item" Value="New Item"></asp:MenuItem>
  15.             <asp:MenuItem Text="New Item" Value="New Item"></asp:MenuItem>
  16.         </asp:MenuItem>
  17.         <asp:MenuItem Text="New Item" Value="New Item">
  18.             <asp:MenuItem Text="New Item" Value="New Item"></asp:MenuItem>
  19.             <asp:MenuItem Text="New Item" Value="New Item"></asp:MenuItem>
  20.             <asp:MenuItem Text="New Item" Value="New Item"></asp:MenuItem>
  21.         </asp:MenuItem>
  22.         <asp:MenuItem Text="New Item" Value="New Item"></asp:MenuItem>
  23.         <asp:MenuItem Text="New Item" Value="New Item"></asp:MenuItem>
  24.     </Items>
  25. </asp:Menu>

Appling CSS Class to report viewer.

  1. <rsweb:ReportViewer ID="ReportViewer1" runat="server" Font-Names="Verdana" CssClass="report"
  2.     Font-Size="8pt" InteractiveDeviceInfos="(Collection)" WaitMessageFont-Names="Verdana"
  3.     WaitMessageFont-Size="14pt" Width="636px">
  4.     <LocalReport ReportPath="Report1.rdlc">
  5.         <DataSources>
  6.             <rsweb:ReportDataSource DataSourceId="ObjectDataSource1" Name="DataSet1" />
  7.         </DataSources>
  8.     </LocalReport>
  9. </rsweb:ReportViewer>


This will correct the overlapping issue as seen below.

image

Saturday, October 02, 2010

MaxLength property not Working in TextBox

If you are involved in coding using .Net sooner or later you will notice that when the TextMode of a TextBox is changed to MultiLine the MaxLength property will stop working. What this means is in the textbox users will be able to type as many character as they want.

When searching the web for a fix for this I found several ideas to solve this. Following is the code which I modified for my requirement. Hope this helps.

ASPX


  1. <html xmlns="http://www.w3.org/1999/xhtml">
  2. <head runat="server">
  3. <script type="text/javascript">
  4.     function RestrictLength(textBox) {
  5.         /* Get the Max Length attribute's value. */
  6.         var allowedLength = textBox.getAttribute('MaximumLength');
  7.         /* Check for the number of characters typed in by the user. */
  8.         if (textBox.value.length > allowedLength) {
  9.             /* If it is more than the allowed limit remove the additional text. */
  10.             textBox.value = textBox.value.substring(0, allowedLength);
  11.             /*  Show a message to user with the tooltip used for the textbox. */
  12.             alert("Maximum characters allowed for '" + textBox.title +"' is " + allowedLength + ".");
  13.         }
  14.     }
  15. </script>
  16.     <title></title>
  17. </head>
  18. <body>
  19.     <form id="form1" runat="server" style="vertical-align:top;">
  20.     <!-- I am binding my java script to the onkeyup event of the textbox. So each time a key
  21.     is pressed it will fire my javascript. -->
  22.     Address <asp:TextBox ID="TextBox1" runat="server" MaxLength="10"
  23.         onkeyup="RestrictLength(this);" Height="58px" TextMode="MultiLine"></asp:TextBox>
  24.     </form>
  25.     </body>
  26. </html>


ASPX.CS


  1. protected void Page_Load(object sender, EventArgs e)
  2. {
  3.     // Adding the attribute to the TextBox1.
  4.     // Note that this is different to the MaxLength property.
  5.     // Also this is not case sensitive.
  6.     TextBox1.Attributes.Add("maximumlength", "10");
  7.     // Adding a tooltip which is used in the message.
  8.     TextBox1.ToolTip = "User Address";
  9. }


The output will me something similar to the following.

Tuesday, July 13, 2010

Changing GridView Column Headers

If you are wondering a way to change the column header appearing in the .Net GridView control in run time then this post will help you to get it done.

For example think that you need to change the normal grid headers shown in Screen A into something like shown in Screen B.

Screen A

Screen B

I have removed few columns from the grid header and then I did add few customized column headers. The added “Edit” column and “Id” column are spanning to 2 rows, the “Temp Columns” column is spanning to 2 columns.

I think the code is self explanatory. This way you will be able to create complex gridview headers.


  1. protected void GridView1_RowCreated(object sender, GridViewRowEventArgs e)
  2. {
  3.      if (e.Row.RowType == DataControlRowType.Header)
  4.      {
  5.          // Remving the first two colummn headers.
  6.          e.Row.Cells.RemoveAt(0);
  7.          e.Row.Cells.RemoveAt(0);
  8.          // Creating the gridview row object.
  9.          GridViewRow headerGridRow = new GridViewRow(0, 0, DataControlRowType.Header, DataControlRowState.Selected);
  10.          headerGridRow.ID = "hdrGridRow";
  11.          TableCell HeaderCell;
  12.          // Creating and adding the first header cell.
  13.          HeaderCell = new TableCell();
  14.          HeaderCell.Text = "Edit";
  15.          HeaderCell.ID = "cellEdit";
  16.          HeaderCell.Font.Bold = false;
  17.          HeaderCell.HorizontalAlign = HorizontalAlign.Center;
  18.          HeaderCell.RowSpan = 2; // Spans across 2 rows.
  19.          HeaderCell.ColumnSpan = 1;
  20.          HeaderCell.BackColor = System.Drawing.Color.LightGray;
  21.          HeaderCell.BorderColor = System.Drawing.Color.White;
  22.          HeaderCell.ForeColor = System.Drawing.Color.Red;
  23.          headerGridRow.Cells.Add(HeaderCell);
  24.          // Creating and adding the second header cell.
  25.          HeaderCell = new TableCell();
  26.          HeaderCell.Text = "Id";
  27.          HeaderCell.ID = "cellId";
  28.          HeaderCell.Font.Bold = false;
  29.          HeaderCell.HorizontalAlign = HorizontalAlign.Center;
  30.          HeaderCell.RowSpan = 2;
  31.          HeaderCell.ColumnSpan = 1;
  32.          HeaderCell.BackColor = System.Drawing.Color.LightGray;
  33.          HeaderCell.BorderColor = System.Drawing.Color.White;
  34.          HeaderCell.ForeColor = System.Drawing.Color.Red;
  35.          headerGridRow.Cells.Add(HeaderCell);
  36.          // Creating and adding the third header cell.
  37.          HeaderCell = new TableCell();
  38.          HeaderCell.Text = "Temp Columns";
  39.          HeaderCell.ID = "cellTempColumns";
  40.          HeaderCell.Font.Bold = false;
  41.          HeaderCell.HorizontalAlign = HorizontalAlign.Center;
  42.          HeaderCell.RowSpan = 1;
  43.          HeaderCell.ColumnSpan = 2; // Spans across 2 columns.
  44.          HeaderCell.BackColor = System.Drawing.Color.LightGray;
  45.          HeaderCell.BorderColor = System.Drawing.Color.White;
  46.          HeaderCell.ForeColor = System.Drawing.Color.Red;
  47.          headerGridRow.Cells.Add(HeaderCell);
  48.          // Adding the header row to the gridview.
  49.          GridView1.Controls[0].Controls.AddAt(0, headerGridRow);
  50.      }
  51. }


Sunday, April 11, 2010

.Net Nullable Types

A variable of a nullable type can be used to store the normal range of values allowed by the underlying data type plus the Null. Nullable types are instances of System.Nullable.

Since reference types already supports Null, nullable types represent value type variables which supports null.

For example Nullable<bool> (or spoken like nullable of bool) can be used to store true, false and null.

There are two ways to declare a nullable variable.

Method 1


int? i; // Declaring
i = null; // Initializing

int? i = 4; // Declariong and initializing


Method 2


Nullable<int> a; // Declaring
a = 4; // Initializing

Nullable<int> a = null; // Declariong and initializing


As you see above assigning values to a nullable is same as for a normal variable. But when retrieving the value you need to be little careful.

Method 1 – Using GetValueOrDefault

GetValueOrDefault property is available for nullable variables. If the variable is null it will get the default value for the type otherwise the actual value it contains.


textBox1.Text += "Value of i - " + i.GetValueOrDefault();


Method 2 – Using variable.Value

When you are going to retrieve the value inside the variable using .Value be careful to first check whether there is actually a value in the variable, otherwise .Net will generate an InvalidOperationException with a description of “Nullable object must have a value”.


// \r\n is used to insert a new line.
if (i == null)
    textBox1.Text += "\r\n" + "i is Null";
else
    textBox1.Text += "\r\n" + "i is - " + i.Value;


or


// Environment.NewLine is equal to placing a new line or \r\n.
if (a.HasValue)
    textBox1.Text += Environment.NewLine + "a has - " + a.Value;
else
    textBox1.Text += Environment.NewLine + "a has Null";


The full code would look like the following.


  1. // Declaring Method 1
  2. int? i; // Declaring
  3. i = null; // Initializing
  4. //int? i = 4; // Declariong and initializing
  5. // Get value using GetValueOrDefault().
  6. textBox1.Text += "Value of i - " + i.GetValueOrDefault();
  7. // \r\n is used to insert a new line.
  8. if (i == null)
  9.     textBox1.Text += "\r\n" + "i is Null";
  10. else
  11.     textBox1.Text += "\r\n" + "i is - " + i.Value;
  12. // Declaring Method 2
  13. //Nullable<int> a; // Declaring
  14. //a = 4; // Initializing
  15. Nullable<int> a = 4; // Declariong and initializing
  16. // Environment.NewLine is equal to placing a new line or \r\n.
  17. if (a.HasValue)
  18.     textBox1.Text += Environment.NewLine + "a has - " + a.Value;
  19. else
  20.     textBox1.Text += Environment.NewLine + "a has Null";


The output would be,

Value of i - 0
i is Null
a has – 4

You could use the ?? operator to assign the default value for a non nullable variable while the nullable contains null as the current value.


int? Null_X = null;
int NonNull_y = Null_X ?? -1;


Monday, December 28, 2009

Disabling Date-Time Changes

Do you know that you can programmatically stop the user changing the date and time of a Pocket PC device?

This is useful if your applications need to take time accurately for some reason from the device.

The following code will disable the user from accessing the date time changing settings using his Windows Mobile powered device.


  1. private void btnDisableClock_Click(object sender, EventArgs e)
  2. {
  3.     RegistryKey hklm = Registry.LocalMachine;
  4.     hklm = hklm.OpenSubKey(@"\Software\Microsoft\Clock\", true);
  5.     System.Byte[] offValue = new byte[1];
  6.     offValue[0] = 0x30;
  7.     hklm.SetValue("AppState", offValue);
  8.     lblTitle.Text = "Change Clock Status - Disabled";
  9. }


If you want to re-enable the setting, to make the user able to change the data and time use the below code.


  1. private void btnEnableClock_Click(object sender, EventArgs e)
  2. {
  3.     RegistryKey hklm = Registry.LocalMachine;
  4.     hklm = hklm.OpenSubKey(@"\Software\Microsoft\Clock\", true);
  5.     System.Byte[] offValue = new byte[1];
  6.     offValue[0] = 0x11;
  7.     hklm.SetValue("AppState", offValue);
  8.     lblTitle.Text = "Change Clock Status - Enabled";
  9. }


Sunday, October 05, 2008

Creating an Excel Sheet using .Net

In this entry I will show how you can create a Microsoft Excel file using .Net.

// Create the Excel Application object.
ApplicationClass ExcelApp = new ApplicationClass();
// Set the visibility of the application.
ExcelApp.Visible = true;
// Create a new Excel Workbook.
Workbook ExcelWorkbook = ExcelApp.Workbooks.Add(Type.Missing);
// Create a new Excel Sheet.
Worksheet ExcelSheet = (Worksheet)ExcelWorkbook.Sheets.Add(ExcelWorkbook.Sheets.get_Item(1), Type.Missing, 1, XlSheetType.xlWorksheet);
try
{
// Loop for 10 rows.
for (int rwCount = 1; rwCount <= 10; rwCount++)
{
// Loop for 3 columns.
for (int clmCount = 1; clmCount <= 3; clmCount++)
{
ExcelSheet.Cells[rwCount, clmCount] = "This is Row - " + rwCount + " Column - " + clmCount;
}
}
// Save the Excel sheet.
// The @ symbol makes the string to contain any special characters inside the string without breaking the string.
ExcelApp.Save(@"C:\Projects\Ex.xls");
}

Accessing Data in an Excel File using .Net

In this article I will show how you can open Microsoft Excel files using .Net.
You can use OLE objects to access data in Excel files as of you are accessing SQL Server data using SQL objects.

// Create an OLEDBConnection to connect to the Excel file.
// I'm getting the required file by using a file dialog.
// The @ symbol makes the string to contain any special characters inside the string without breaking the string.
OleDbConnection dbConnection = new OleDbConnection(@"Provider=Microsoft.Jet.OLEDB.4.0;Data Source=" + openFileDialog1.FileName.ToString()+ @";Extended Properties=""Excel 8.0;HDR=Yes;""");
// Open the connection.
dbConnection.Open();
// Create a command object to work on the data.
// Note that I have given the sheet name as [Sheet1$] to retrieve data from that named sheet in the particular Excel file.
OleDbCommand dbCommand = new OleDbCommand("SELECT * FROM [Sheet1$]", dbConnection);
// Creating a data reader to read data.
OleDbDataReader dbReader = dbCommand.ExecuteReader();
// Get the position of the column Desc 1.
int SearchingItem = dbReader.GetOrdinal("Desc 1");
// Read through the data.
while (dbReader.Read())
{
// Traverse through all the data columns.
for (int i = 0; i <>
{
ExcelSheet.Cells[CurrentRowCount, i + 1] = dbReader.GetValue(i).ToString();
}
}