Friday, February 20, 2009

Offline Email in GMail

Have you checked offline GMail in action?
GMail team had developed GMail to work even when there is no internet is available.
It is a cool thing to us because we always are not connected to internet. Adding to that it is simply great since we don't have to install anything and it will work in Microsoft Internet Explorer as well.
Check it out by enabling it by going to settings page in your GMail account, click on Labs, select the Enable radio button of Offline feature and press on Save Changes button.

Then a link named Offline will appear in the top right of the GMail page. You can initiate the mail synchronization by clicking on this. It will guide you in setting up the feature.
Thursday, February 12, 2009

IE Developer Toolbar not Working

Recently I needed to install IE Developer Toolbar to get some values of some applications. But after the installation I found out that it is not displaying any information about the loaded site.
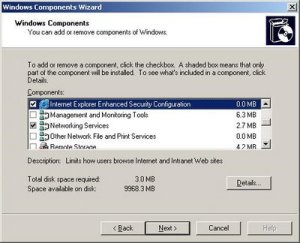
Later I got to know that IE Developer Toolbar is not working if Internet Explorer Enhanced Security Configuration is installed.
So if you are also facing the same problem go to Add / Remove Programs and open up the Windows Components wizard and uncheck Internet Explorer Enhanced Security Configuration to remove it and when the wizard is finished and after you have restarted the Internet Explorer the IE Developer Toolbar will function as usual.

Monday, January 19, 2009

Changing Execution Timeout in SharePoint

If any of the tasks that you are performing in your site takes more time than usual and if the page is timing out then one solution that you can do is to increase the execution timeout value.
To change this value you need to edit the web.config files of SharePoint and the web site.

1. Open the SharePoint web.config file located at
Drive:\Program Files\Common Files\Microsoft Shared\Web server extensions\12\TEMPLATE\LAYOUTS
(C:\Program Files\Common Files\Microsoft Shared\web server extensions\12\TEMPLATE\LAYOUTS)
using NotePad or Visual Studio.
2. Find the section and insert executionTimeout value there as shown below. 3. Save the site config file.4. Now you need to edit the web applications' web.config file. Normally this can be found under Drive:\Inetpub\wwwroot\wss\VirtualDirectories\VirtualDirectoryFolder(C:\Inetpub\wwwroot\wss\VirtualDirectories\82)using NotePad or Visual Studio. 5. Find the line maxRequestLength and add executionTimeout in to it as shown below. 6. Save the application config file.7. Do an IIS restart and then your change will be in effect.

Thursday, January 15, 2009

Changing the IIS Connection Timeout

For many reasons you might need to increase the IIS connection timeout.
The many reasons can be many time consuming processes, large transactions, slower connections, etc.
As a result if your application is timing out, one thing you can do is to increase the connection timeout.
  • To change the timeout value you need to open Internet Information Services (IIS) manager. Either type InetMgr in the Run window or click on Start -> All Programs -> Administrative Tools -> Internet Information Services (IIS) Manager.
  • In the IIS Manager expand the main node and right click on the Web Sites and click on Properties.
  • In the Web Sites Properties page give the appropriate value in the Connection timeout field under Connections section in Web Site tab and press Ok.
  • Now to make the setting take effect restart the IIS by either typing IISReset in the Run window or right clicking on the machine name and going to All Tasks and clicking on Restart IIS... in the IIS Manager.

Tuesday, January 13, 2009

Configuring Large File Uploading in SharePoint

As you have noted the maximum file size that is supported by SharePoint by default is 50MB. What if you want to upload larger files?
Luckily we can change this limit to support larger files by increasing the default upload size in SharePoint Central Administration.
1. Go to SharePoint Central Administration by clicking on Start -> All Programs -> Administrative Tools -> SharePoint x.x Central Administration.
2. Click on Shared Services Administration link on the administration home page. 3. Click on SharedServices1 (Administration site host) link in Manage this Farm's Shared Services page to open the Web Application General Settings page. 4. Find the Maximum Upload Size property and change it to the maximum upload file size you want. Note that you can put file sizes up to 2GB (2047MB). Now you will be able to upload larger files than 50MB.
But to support uploading large files you also may need to increase the default timeout value.
I will be posting the next post of mine on how to increase the timeout value.

Monday, January 12, 2009

Windows 7

Next version of Microsoft Windows is here.
It is still in beta, but in Microsoft site you can preview it and even download a beta version.
Have a look at it.
http://www.microsoft.com/windows/windows-7

Tuesday, December 30, 2008

Exception from HRESULT: 0x80040E14

Recently in SharePoint server I got an error when trying to do almost any action.
The error was Exception from HRESULT: 0x80040E14.
After sometime I did find out, that my C drive has gone out of disk space, and that caused SQL transaction log creation failure which resulted this error.
So freeing up more space on C drive solved my problem.
You will be able to get more details of the error by checking SharePoint log files.