Tuesday, August 18, 2009

Updating the OS of Blackberry 8900 Curve

Recently I needed to update the OS of the BlackBerry 8900 Curve device from 4.6.1.114 to 4.6.1.250.
To do this first you need to download the BlackBerry Desktop Manager Latest Version (5.0) and the OS required (4.6.1.250).
You can download the files required at,

Desktop Manager
and select the desktop manager software and download it.

OS
Downloading the correct OS is bit tricky. You need find the correct version for the service provider (Dialog Sri Lanka, T-Mobile, Rogers, etc...). All the available service providers are listed in the above link.

When the download is complete you will get a file similar to 8900jEastAsia_PBr4.6.1_rel378_PL4.2.0.113_A4.6.1.250_Dialog_Sri_Lanka.exe
After completing the download, first install the Desktop Manager and then run the executable (8900jEastAsia_PBr4.6.1_rel378_PL4.2.0.113_A4.6.1.250_Dialog_Sri_Lanka.exe) of the OS. That will add the OS files to a place where desktop manager can use them to update the device.

Browse to the place where the Desktop Manager is installed (C:\Program Files\Common Files\Research In Motion\AppLoader), then delete the "Vendor.xml".
Now run the "Loader.exe" to start the application loading process. Make sure your BlackBerry is connected to the computer. In the second screen you need to select the connection which your device is using (for e.g. USB).
Then after few clicks of the next button the wizard will start installing the new OS to the device.
It will take about 25 minutes to complete the updation process. While that is happening make sure that you are not pressing any buttons on the phone and as also make sure you keep the USB connection alive.
After sometime the BlackBerry will get restarted with the new OS. Enjoy.
I you are having any problems please contact me, I may be able to help you.

Monday, June 08, 2009

Configuring DB Mail to use GMail

Have you configured SQL DB Mail to use GMail to send mails?
This post shows you how to achieve it.
1. Start the SQL Server Management Studio and login as SA.
2. Expand "Management" and right click on Database Mail and click on Configure Database Mail.

3. Select the first radio button and press Next.
If DB Mail service is not started it will prompt you to enable it.4. Put a profile name, then click on Add to configure the SMTP account.
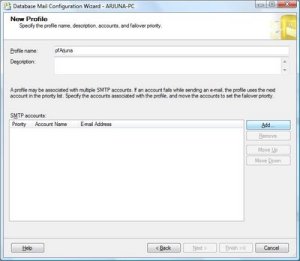
5. Click on the New Account, to create the account.
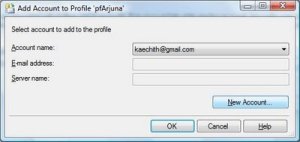
6. You need to put the account name, email address, display name, server name (smtp.gmail.com), port number (587), check the checkbox for Require secure connection (SSL) and select basic authentication as the SMTP authentication method and provide your user name and password.
When all are done press Ok.

7. Now pressing Next will bring you a screen to select the default profile. Select the newly created profile as default and click Next.
8. Using the Configure System Parameters screen you can change the parameters if required. But in this case defaults are perfect. Press Next.
9. Press the Finish button after checking the actions to create the new profile.
10. You can check whether it is properly setup by right clicking on Database Mail and Sending a Test Mail.

Wednesday, June 03, 2009

Bing - But It’s Not Google

Did you check out the new search engine from Microsoft?
If you used to use Live search you may have noted that now you are redirected to Bing, since Bing is replacing Live.
They have named it as BING and its having some few cool new things to look for.
Soon after the launch on 1st June 2009 Bing is getting bit popular at the moment in the context of search engines.
New Explorer Pane
Helps to filter the search results more or to find more related information.
Categorized Search Results
All the results will be categorized accordingly, so you will be able to find the related things easily.
Results Preview
You don't need to open the web site to view its content, Results Preview will show you a preview of the site so you can decide on it faster.
Image Search
You will be able to sort out the results fast according to things such as size, colour, layout, etc.
Video Search
One cool thing is without opening the site you can preview the video being inside of the Bing which will save lot of time.
There are much more it is better you check the rest of the features your self.
Bing
Travel
Maps
Shopping
Health
Local

Saturday, May 30, 2009

Enabling Office SharePoint Server Publishing Feature

To enable publishing features you need to enable publishing in your SharePoint site.
Go to "Site Settings" by using the "Site Actions" button.
Click the "Site Features" link in the "Site Administration" category.
Clicking the Activate button of Office SharePoint Server Publishing to enable publishing.
  • Some of you might get a message saying publishing is not enabled since Office SharePoint Server Publishing Infrastructure is not active.
This is because publishing is not enabled from the site collection level, what you need to do is select "Site collection features" from the "Site Collection Administration" category and activate the Office SharePoint Server Publishing Infrastructure feature for the entire site collection. Then you will be able to activate publishing by going to "Site features".

Changing the Default Welcome Page of a Site

Do you know that we can change the default page of a site in SharePoint?

This is done by going to "Site Settings" and accessing the "Welcome page" option under "Look and Feel" category.
  • If you cannot find a link named "Welcome page" that means you don't have Office SharePoint Server Publishing enabled on your site. If you need more help on how to enable Office SharePoint Server Publishing please feel free to read my next post.

Now browse or type the page that you want to set as the welcome page and click Ok.

Wednesday, May 20, 2009

Temporary Internet Files Location

Did you ever tried to locate the place where the temporary files of the Internet Explorer is stored?
Knowing the location is really worth if you edited a file while keeping it in the temporary folder and accidentally close the file without saving it into a proper place.
Exact same thing happen to me, even though I knew the place where it would go in a Windows version prior to Windows Vista, but surprisingly it was different in Windows Vista.
So had to struggle a bit to find it, and I was too late to recover the changes that I did to the document. But since it is here, you are not too late.
C:\Users\ArjunaC \AppData\Local\Microsoft\Windows\Temporary Internet Files\Low\Content.IE5
The trick here is the folder named 'Low' is completely hidden by Vista, even you enable, show hidden and system files and folders the folder 'Low' will not appear. But you will be able to type it and browse the contents of the folder.

Friday, February 20, 2009

Offline Email in GMail

Have you checked offline GMail in action?
GMail team had developed GMail to work even when there is no internet is available.
It is a cool thing to us because we always are not connected to internet. Adding to that it is simply great since we don't have to install anything and it will work in Microsoft Internet Explorer as well.
Check it out by enabling it by going to settings page in your GMail account, click on Labs, select the Enable radio button of Offline feature and press on Save Changes button.
Then a link named Offline will appear in the top right of the GMail page. You can initiate the mail synchronization by clicking on this. It will guide you in setting up the feature.

Thursday, February 12, 2009

IE Developer Toolbar not Working

Recently I needed to install IE Developer Toolbar to get some values of some applications. But after the installation I found out that it is not displaying any information about the loaded site.
Later I got to know that IE Developer Toolbar is not working if Internet Explorer Enhanced Security Configuration is installed.
So if you are also facing the same problem go to Add / Remove Programs and open up the Windows Components wizard and uncheck Internet Explorer Enhanced Security Configuration to remove it and when the wizard is finished and after you have restarted the Internet Explorer the IE Developer Toolbar will function as usual.

Monday, January 19, 2009

Changing Execution Timeout in SharePoint

If any of the tasks that you are performing in your site takes more time than usual and if the page is timing out then one solution that you can do is to increase the execution timeout value.
To change this value you need to edit the web.config files of SharePoint and the web site.

1. Open the SharePoint web.config file located at
Drive:\Program Files\Common Files\Microsoft Shared\Web server extensions\12\TEMPLATE\LAYOUTS
(C:\Program Files\Common Files\Microsoft Shared\web server extensions\12\TEMPLATE\LAYOUTS)
using NotePad or Visual Studio.
2. Find the section and insert executionTimeout value there as shown below. 3. Save the site config file.4. Now you need to edit the web applications' web.config file. Normally this can be found under Drive:\Inetpub\wwwroot\wss\VirtualDirectories\VirtualDirectoryFolder(C:\Inetpub\wwwroot\wss\VirtualDirectories\82)using NotePad or Visual Studio. 5. Find the line maxRequestLength and add executionTimeout in to it as shown below. 6. Save the application config file.7. Do an IIS restart and then your change will be in effect.

Thursday, January 15, 2009

Changing the IIS Connection Timeout

For many reasons you might need to increase the IIS connection timeout.
The many reasons can be many time consuming processes, large transactions, slower connections, etc.
As a result if your application is timing out, one thing you can do is to increase the connection timeout.
  • To change the timeout value you need to open Internet Information Services (IIS) manager. Either type InetMgr in the Run window or click on Start -> All Programs -> Administrative Tools -> Internet Information Services (IIS) Manager.
  • In the IIS Manager expand the main node and right click on the Web Sites and click on Properties.
  • In the Web Sites Properties page give the appropriate value in the Connection timeout field under Connections section in Web Site tab and press Ok.
  • Now to make the setting take effect restart the IIS by either typing IISReset in the Run window or right clicking on the machine name and going to All Tasks and clicking on Restart IIS... in the IIS Manager.

Tuesday, January 13, 2009

Configuring Large File Uploading in SharePoint

As you have noted the maximum file size that is supported by SharePoint by default is 50MB. What if you want to upload larger files?
Luckily we can change this limit to support larger files by increasing the default upload size in SharePoint Central Administration.
1. Go to SharePoint Central Administration by clicking on Start -> All Programs -> Administrative Tools -> SharePoint x.x Central Administration.
2. Click on Shared Services Administration link on the administration home page. 3. Click on SharedServices1 (Administration site host) link in Manage this Farm's Shared Services page to open the Web Application General Settings page. 4. Find the Maximum Upload Size property and change it to the maximum upload file size you want. Note that you can put file sizes up to 2GB (2047MB). Now you will be able to upload larger files than 50MB.
But to support uploading large files you also may need to increase the default timeout value.
I will be posting the next post of mine on how to increase the timeout value.

Monday, January 12, 2009

Windows 7

Next version of Microsoft Windows is here.
It is still in beta, but in Microsoft site you can preview it and even download a beta version.
Have a look at it.
http://www.microsoft.com/windows/windows-7