Thought to share some expensive and valuable information that might help you if you are planning to buy a vehicle. Lookout for two main things.
1. Quality of the Vehicle
2. Legal Side of the Vehicle
Although most of the things I mention in this are specific to Sri Lanka I definitely know there are similar things to check in other countries as well.
1. Quality of the Car
If you are buying a brand new vehicle this is not required because the company will give you the details technical overview and will also give you a warranty.
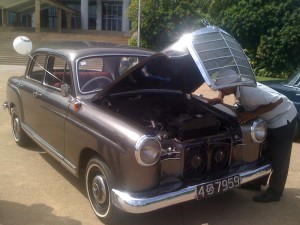
But if you are going for a used vehicle then you have to check for its quality. Anyway I am not that good in the technical side so you have to rely on the knowledge that you have or someone who knows better.
2. Legal Side of the VehicleThis is one area most people are not paying that much interest. But this is the most important side, imagine a vehicle that you buy having problems with its documents, If that happens you wont be able to transfer it to your name with ease. Sometimes you even might need to go to courts. If that happens you face the difficulty when selling as well because no one would buy a vehicle from you that you don't own. Further more I advice you to check the vehicle documents because if you buy a technically unfit vehicle you can go to a mechanic and get the vehicle repaired after spending some time and money. But if documents are not good then it will be a big issue.
So what are these documents that you have to look for?
1. Certificate of Registration (CR)This certificate will have all the details of the vehicle such as Make, Model, Year of Manufacture, Registration Number, Chassis Number, Engine Number, Present Owner, Absolute Owner, Previous Owners, Etc.
All of these are important to check, but for a successful legal transfer of ownership to you present and absolute owners are important. Always it is better to buy a vehicle from the person mentioned in the present owner field. Because the vehicle is owned by him. There are cases which people will keep vehicles with open papers.
Open Papers means that the owner will not get the vehicle transferred to his name, but he will get a set of forms filled from the seller and keep with him.
For example if Mr. ABC is buying a vehicle from Mr. STUV (Mr. STUV is the current owner in the CR). Mr. ABC will keep the transfer documents signed by Mr. STUV after doing the payments to Mr. STUV, but he will not fill them or submit them to the Department of Motor Vehicles for registration.
One advantage of open papers is the number of owners will be lesser.
One disadvantage of this is, if buyer needs to transfer the vehicle to his name he will not be guaranteed that the transfer will happen smoothly since his transferee will be an unknown person. For example in the above case if Mr. ABC is going to sell the vehicle to Mr. XYZ and if Mr. XYZ is needing to get the vehicle transferred to his name the legal transferee will be Mr. STUV who is unknown by Mr. XYZ. In which case while the transfer process is happening problems might arise.
Absolute owner - In normal case this field should be empty. If this is filled with some name that means the vehicle is on a finance or lease. In this case you cannot buy directly from the current owner. That is because when the absolute owner is superior to the current owner. So you will be needing a no objection letter from the absolute owner.
Also note in either case a company is printed under Current Owner or Absolute Owner you will be needing a no objection letter from the company in a company letter head, with the emboss seal and signed by a rightful director of the company.
2. Vehicle Identity Card (VID)All the English number registered (HE, KA, KC, ...) vehicles will have a VID. you will be requiring this VID to carry out any legal things on the vehicle (Transferring the vehicle to you).
This is only applicable to English numbered vehicles since it is issued new.
If you follow these I think you would be able to buy a vehicle and live peacefully.


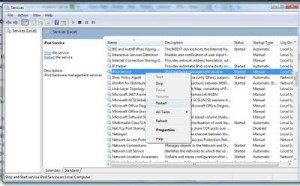


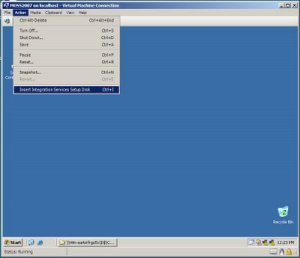
 3. Select the first radio button and press Next.
  4. Put a profile name, then click on Add to configure the SMTP account.
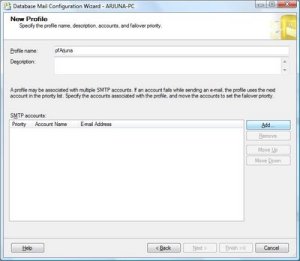 5. Click on the New Account, to create the account.
 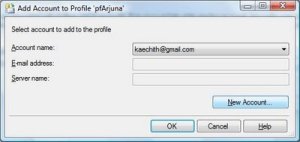 6. You need to put the account name, email address, display name, server name (smtp.gmail.com), port number (587), check the checkbox for Require secure connection (SSL) and select basic authentication as the SMTP authentication method and provide your user name and password.

 8. Using the Configure System Parameters screen you can change the parameters if required. But in this case defaults are perfect. Press Next.
  9. Press the Finish button after checking the actions to create the new profile.


 3. Save the site config file.4. Now you need to edit the web applications' web.config file. Normally this can be found under Drive:\Inetpub\wwwroot\wss\VirtualDirectories\VirtualDirectoryFolder(C:\Inetpub\wwwroot\wss\VirtualDirectories\82)using NotePad or Visual Studio. 5. Find the line maxRequestLength and add executionTimeout in to it as shown below.
 6. Save the application config file.7. Do an IIS restart and then your change will be in effect.


 3. Click on SharedServices1 (Administration site host) link in Manage this Farm's Shared Services page to open the Web Application General Settings page.
  4. Find the Maximum Upload Size property and change it to the maximum upload file size you want. Note that you can put file sizes up to 2GB (2047MB).
  Now you will be able to upload larger files than 50MB.