Saturday, June 19, 2010

Water World Kelaniya – Sri Lanka

Recently we went a trip to an aquarium which is located at Kelaniya Sri Lanka. They have named it Water World and claims that they have the largest collection of fish in South Asia.

Mainly they have 2 sections one for birds and the other for fish. If you are going to watch bird park then you need to buy a ticket of Srilankan rupees 70, if you are going for the fish section then the ticket would be 150 Srilankan rupees. You can also contact them if required by using the telephone number +94 11 5555433.

Following are some photos I took on my visit and as I feel they have some rare species on display.

Update

To help the people who whould like to visit Water World I thought to share their new phone number with the address.

Telephone -
+94 11 5555434

Address -
Water World Lanka Pvt. Ltd.,
No: 95, Biyagama Road,
Thalwatta,
Kelaniya,
Sri Lanka.

Location -


View Larger Map

Tech-Ed 2010 – Sri Lanka

In February 2010 Microsoft held Tech-Ed 2010 and we (IronOne) were the silver sponsors for the event.

It was a good event which attracted many of my friends which I didn’t meet for a long time.

In appreciation to the sponsorship Microsoft sent us a thank you cake as well. Looks delicious right?


Friday, June 18, 2010

Creating Rounded Corners

When designing web sites it always looks nicer if you could round the sharp corners, for example see below, what looks nicer to you?

Sharp Corners

Rounded Corners

My feeling is the rounded corners are better looking than the normal one. But the problem is, there is no easy way to create this. You need some Cascade Style Sheet (CSS) knowledge to do this. The easy way to round the required corners is to use the following code.


  1. <html xmlns="http://www.w3.org/1999/xhtml">
  2. <head runat="server">
  3.     <title></title>
  4.     <style type="text/css">
  5.         .CornerTopLeft
  6.         {
  7.             float: right;
  8.             width: 100%;
  9.             margin-top: 10px;
  10.             background: url(../Images/TopLeft.png) 0 0 no-repeat rgb(237,28,36);
  11.             border: 1px double #f1f1f1;
  12.         }
  13.         .CornerTopRight
  14.         {
  15.             float: right;
  16.             width: 100%;
  17.             background: url(../Images/TopRight.png) 100% 0 no-repeat;
  18.         }
  19.         .CornerBottomLeft
  20.         {
  21.             float: right;
  22.             width: 100%;
  23.             background: url(../Images/BottomLeft.png) 0 100% no-repeat;
  24.             height: 100%;
  25.         }
  26.         .CornerBottomRight
  27.         {
  28.             float: right;
  29.             width: 100%;
  30.             background: url(../Images/BottomRight.png) 100% 100% no-repeat;
  31.         }
  32.         div#Content
  33.         {
  34.             margin: 15px;
  35.         }
  36.     </style>
  37. </head>
  38. <body bgcolor="rgb(232,232,232)">
  39.     <form id="form1" runat="server">
  40.     <div class="CornerTopLeft">
  41.         <div class="CornerTopRight">
  42.             <div class="CornerBottomLeft">
  43.                 <div class="CornerBottomRight">
  44.                     <div id="Content">
  45.                         Your content here.....
  46.                         <asp:TextBox ID="TextBox1" runat="server"></asp:TextBox>
  47.                         <asp:Button ID="Button1" runat="server" Text="Button" />
  48.                     </div>
  49.                 </div>
  50.             </div>
  51.         </div>
  52.     </div>
  53.     </form>
  54. </body>
  55. </html>


The above code is self explanatory so I didn’t put any comments there. To make it work you need the following 4 images placed on your Images directory.

TopLeft.png –

TopRight.png –

BottomLeft.png –

BottomRight.png –

If I am to explain the code, the corners are curved by using 4 different DIVs and placing the above images on them. For example the following DIVs does the trick.

<div class="CornerTopLeft">
<div class="CornerTopRight">
<div class="CornerBottomLeft">
<div class="CornerBottomRight">


  1. <div class="CornerTopLeft">
  2.         <div class="CornerTopRight">
  3.             <div class="CornerBottomLeft">
  4.                 <div class="CornerBottomRight">
  5.                     <div id="Content">
  6.                         Your content here.....
  7.                         <asp:TextBox ID="TextBox1" runat="server"></asp:TextBox>
  8.                         <asp:Button ID="Button1" runat="server" Text="Button" />
  9.                     </div>
  10.                 </div>
  11.             </div>
  12.         </div>
  13.     </div>


The content you need to put in the middle should be wrapped by these DIVs. In the above code I used another DIV for placing content having the ID Content.

Inserting curved images to the corners of the DIVs are done by using a style per DIV. The CSS classes which are used to change these DIVs are as of below.


  1. <style type="text/css">
  2.         .CornerTopLeft
  3.         {
  4.             float: right;
  5.             width: 100%;
  6.             margin-top: 10px;
  7.             background: url(../Images/TopLeft.png) 0 0 no-repeat rgb(237,28,36);
  8.             border: 1px double #f1f1f1;
  9.         }
  10.         .CornerTopRight
  11.         {
  12.             float: right;
  13.             width: 100%;
  14.             background: url(../Images/TopRight.png) 100% 0 no-repeat;
  15.         }
  16.         .CornerBottomLeft
  17.         {
  18.             float: right;
  19.             width: 100%;
  20.             background: url(../Images/BottomLeft.png) 0 100% no-repeat;
  21.             height: 100%;
  22.         }
  23.         .CornerBottomRight
  24.         {
  25.             float: right;
  26.             width: 100%;
  27.             background: url(../Images/BottomRight.png) 100% 100% no-repeat;
  28.         }
  29.         div#Content
  30.         {
  31.             margin: 15px;
  32.         }
  33.     </style>


The filling of the required area is done by assiging a color at the background tag in CornerTopLeft style which will be applied to CornerTopLeft DIV.

background: url(../Images/TopLeft.png) 0 0 no-repeat rgb(237,28,36);

Note the last div#Content which was placed to style the Content DIV making the contents placed centered so the final output will be nicer.

Thursday, June 17, 2010

Sharing Screen with Multiple People

As you might know the new Skype allows us to share our desktop to another contact by only using Skype. Best things are it is free and we can share through internet. But this has a limitation which is you cannot share the screen with multiple contacts.

To overcome this I happen to find this nice Skype add-on named InnerPass Share and Collaborate which enable us to share our desktop with many people at once freely.

To get it installed go to Skype Extras Manager by clicking Tools –> Extras –> Get Extras.

Type InnerPass on the top left search box and press search.

Then on the left search results select the InnerPass Share and Collaborate add-on and install.

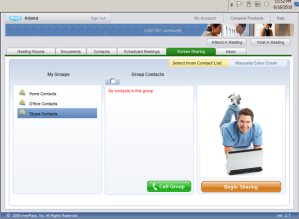
After installing you can launch InnerPass by clicking Tools –> Extras –> InnerPass Share and Collaborate. This will bring you a screen similar to the following.

You can click Get Started button to create your free InnerPass account and start using the features offered by InnerPass.

Some of the features are,

  • Managing meeting rooms.
  • Add contacts from other sources like Yahoo, Gmail, etc.
  • Schedule meetings.
  • Attend meetings.
  • Host meetings.
  • Sharing your screen.
  • Viewing others’ screens.
  • Share documents.

Friday, June 11, 2010

Selecting a Row in ASPxGridView

I found that with the flood of new possibilities with DevExpress grid view a simple functionality of selecting one row is bit hidden. After doing bit of searching in the internet I found the way and thought to share it.

The way we need to do this is by using a java script and bind that in to the RowClick event of the grid.

The java script will look like the following.

<script type="text/javascript">
        function OnRowClick(e) {
            //Unselect all rows
            dxgdSearch._selectAllRowsOnPage(false);
            //Select the row
            dxgdSearch.SelectRow(e.visibleIndex, true);
        }
</script>

Then the binding to the RowClick would be as below.

<ClientSideEvents RowClick="function(s, e) { OnRowClick(e); }"></ClientSideEvents>

The outcome of this is a grid which you can select a row.

The value of the selected row can be taken as below.

dxgdSearch.GetRowValues(dxgdSearch.FocusedRowIndex, "Customer_ID")

For example in my application I used to pass the Customer Id to the Customer.aspx form as below.


  1. Response.Redirect("~/Customer.aspx?cusID= " + dxgdSearch.GetRowValues(dxgdSearch.FocusedRowIndex, "Customer_ID"));


The full source is as of below.

Page.aspx


  1. <asp:Content ID="Content4" ContentPlaceHolderID="MainContent" runat="server">
  2.     <script type="text/javascript">
  3.         function OnRowClick(e) {
  4.             //Unselect all rows
  5.             dxgdSearch._selectAllRowsOnPage(false);
  6.             //Select the row
  7.             dxgdSearch.SelectRow(e.visibleIndex, true);
  8.         }
  9.     </script>
  10.     <dx:ASPxGridView ID="dxgdSearch" ClientInstanceName="dxgdSearch" runat="server" AutoGenerateColumns="False"
  11.         SettingsBehavior-AllowFocusedRow="True" SettingsBehavior-AllowMultiSelection="False">
  12.         <ClientSideEvents RowClick="function(s, e) { OnRowClick(e); }"></ClientSideEvents>
  13.         <Columns>
  14.             <dx:GridViewDataTextColumn Name="Id" ShowInCustomizationForm="True" VisibleIndex="1"
  15.                 Caption="Customer ID" FieldName="Customer_ID" Visible="False">
  16.             </dx:GridViewDataTextColumn>
  17.             <dx:GridViewDataTextColumn Name="Name" ShowInCustomizationForm="True" VisibleIndex="0"
  18.                 Caption="Name" FieldName="Full_Name">
  19.             </dx:GridViewDataTextColumn>
  20.             <dx:GridViewDataTextColumn Name="TelephoneNo" ShowInCustomizationForm="True" VisibleIndex="1"
  21.                 Caption="Tele. No." FieldName="Mobile_Number">
  22.             </dx:GridViewDataTextColumn>
  23.             <dx:GridViewDataTextColumn Name="EMail" ShowInCustomizationForm="True" VisibleIndex="2"
  24.                 Caption="EMail" FieldName="Email">
  25.             </dx:GridViewDataTextColumn>
  26.             <dx:GridViewDataHyperLinkColumn Name="Select" VisibleIndex="3">
  27.                 <DataItemTemplate>
  28.                     <asp:Button ID="Button1" runat="server" CommandArgument='<%# Eval("Customer_ID") %>'
  29.                         OnClick="Button1_Click" Text="Edit" />
  30.                 </DataItemTemplate>
  31.             </dx:GridViewDataHyperLinkColumn>
  32.         </Columns>
  33.         <SettingsBehavior AllowFocusedRow="True"></SettingsBehavior>
  34.         <Settings ShowGroupPanel="True" ShowFilterRow="True" />
  35.         <Settings ShowFilterRow="True" ShowGroupPanel="True"></Settings>
  36.     </dx:ASPxGridView>
  37. </asp:Content>


Page.aspx.cs


  1. protected void Button1_Click(object sender, EventArgs e)
  2. {
  3.     Response.Redirect("~/Customer.aspx?cusID= " + dxgdSearch.GetRowValues(dxgdSearch.FocusedRowIndex, "Customer_ID"));
  4. }


iPhone 4

If you are a iPhone lover then your next dream is in stores.

Apple had released iPhone 4 with many improvements.

Go and have look into it at Apple.

Thursday, June 10, 2010

Unable to start debugging on the web server

Recently a set of developers who are working in one of my projects started getting an error while trying to debug the web application under development using ASP.Net. The targeted framework was .Net 4.0 and they were using Visual Studio 2010 in 64bit machines. The problem was whenever they tried to run/debug the application they gets an error saying unable to start debugging on the web server even though there are no compile errors as shown below.

image

It gave an error HTTP Error 500.21 - Internal Server Error Handler "PageHandlerFactory-Integrated" has a bad module "ManagedPipelineHandler" in its module list when ran direct from IIS. The error page is shown below.

image_thumb[1]

Later I found the reason for this is ASP.Net 4 was not properly installed on the machine. To fix this get an administrative privileged command prompt.

image

Then type in the following,

aspnet_regiis -ir

You can find the aspnet_regiis.exe at the folder,

[Windows Dir]\Microsoft.NET\Framework64\v4.0.xxxxx

for example,

C:\Windows\Microsoft.NET\Framework64\v4.0.30319

This will register ASP.Net 4.0 in your machine, the -ir option will keep the existing applications unchanged. If you want them to be changed to use the new version use -i instead -ir.

When the installer ends type iisreset to restart the IIS service.

image

Now your applications will work fine without any complains.

Saturday, June 05, 2010

Enable Hibernation and Sleep in Windows Server 2008 R2

Normally when you install Hyper-V role in your server, it will disable sleep and hibernate facilities provided by Windows.

But you can avoid this by doing some alterations to Windows.

Hibernate and seep features are disabled when the Hyper-V service is started, so you can regain hibernate and sleep by changing the start parameter of the Hyper-V service (hvboot).

To change,

1. Open the registry editor by typing “regedit” in the run window.

Locate the key,

HKEY_LOCAL_MACHINE\SYSTEM\CurrentControlSet\Services\hvboot and then set the start value of it to 3.

Start property can hold the following values.

0

Boot (Not supported by hvboot.)

1

System

2

Auto

3

On Demand

4

Disabled

Now you will have the hibernate and sleep facilities until you start the Hyper-V services in your machine.
2. Type the following command in a command prompt window with administrative rights.
sc config hvboot start= demand
Note that there needs to be a space between the = sign and the word demand.

Enabling Hibernate in Windows

Some server versions of Windows are having the hibernate feature disabled by default. So if you need to change the hibernation do the following simple steps.

1. Click start and type “cmd” or type command in the search box.

2. Then in the search results, right click the Command Prompt and click on Run as Administrator.

3. If you are prompted by the user account control click continue.

4. Then,

To turn hibernation on in your machine type -

powercfg.exe /h on” or “powercfg.exe /hibernate on

To turn hibernation off in your machine type -

powercfg.exe /h off” or “powercfg.exe /hibernate off

5. Lastly you can exit the command prompt by typing “exit”.


Sometimes you might get an error similar to the following while trying to enable hibernation.

Hibernation failed with the following error: The request is not supported.

The following items are preventing hibernation on this system.
        An internal system component has disabled hibernation.


This means your machine is running roles or services that are disabling hibernation feature. One such a role is Hyper-V. If your version of Windows 2008 is running Hyper-V then you cannot enable hibernation. This is not an error but is deliberately done since hibernating a server running virtual machines is a very complicated and rarely requiring service in an enterprise server.

But there is a way to enable hibernation on a Hyper-V installed machine, which you will be able to find in my next article.

Monday, May 31, 2010

Changing the Shared Feature Directory in SQL Server Setup

Today when I tried to install SQL Server 2008 R2 I couldn’t change the shared feature installation directory in the setup. Both the textbox and browse button were disabled restricting me to select the desired path.

After sometime I found the cause for this. It is because there were some SQL related programs already installed in my computer, because they are there the SQL setup uses the same directory to setup the rest of the programs.

If you need to relocate the install directory then simply you need to uninstall all the SQL related programs using Programs and Features and re-run the SQL Server setup. Then the browse buttons will be active enabling you to select an alternate location.

Saturday, May 29, 2010

How to Make a Bootable Flash Drive

Recently I installed Windows using a flash (Pen/Thumb) drive, since I couldn’t get hold of a blank DVD to burn the ISO into.

It might be helpful to you as well. Because we don’t need to burn DVDs to install OSs that are coming as ISOs anymore.

Follow the steps below.

1. Find a good USB Flash drive with required space.

Make sure you have backed up all the required data in the flash drive because the flash drive will be formatted.

2. Get a command prompt by typing “cmd” in the run window.

3. Type “diskpart” and press enter.

This will open up a new window for DiskPart utility, you need to use the following commands within the diskpart utility to make the flash drive bootable.

4. In the diskpart utility select the flash drive by typing “select disk 2”.

Use extra caution when selecting the flash disk since if you select the wrong disk you will loose all data of that disk. You can use “list disk” command within the diskpart utility to list all the disks attached to your computer. Note the disk referred here is a physical disk attached to the computer not a partition.

5. Clean the disk by using the command “clean”.

6. Create a primary partition inside the flash drive by typing in “create partition primary”.

7. Select the newly created partition by using command "select partition 1”.

8. Make the selected partition active by typing in the command “active”.

9. Then you need to format the partition by using the command “format fs=fat32” inside the diskpart.

Note that we are formatting the disk using FAT32 file system.

10. Use the command “assign” to assign a drive letter for the newly formatted drive, since we are not giving a drive letter it will get the next available drive letter automatically. Then exit the diskpart utility by typing in “exit”.

11. Now we need to copy the setup files to the flash drive.

For this we can use the good old xcopy command as of below.

xcopy F:\*.* /s/e/f G:\

In the above command I am coping the contents of the drive F (which is a virtual drive created by Power ISO) to drive G which is the flash drive I created.

The meanings of the flags I used are as follows.

“xcopy F:\*.* /s/e/f G:\”

F:\ – Source Drive

*.* – All Contents

/s – Copies directories and sub directories which are not empty

/e – This will add the empty directories also so now all the directories and sub directories will be copied even though they are empty

/f  – Will show the source and destination file names while copying.

G:\ – Destination Drive

When xcopy completes you will have a flash drive which you can boot your computer, in my case I had a Windows 2008 R2 installer. You may even be able to copy the OS files to your flash drive and boot an OS with this method.

Then you may need to change your BIOS options and/or press function keys to let you boot from the flash drive.

Wednesday, May 19, 2010

Connecting to MySQL in Visual Studio 2010

If you need to access MySQL databases using Visual Studio you have to install MySQL connector into your machine.

Currently only mysql-connector-net-6.3.1 is supporting Visual Studio 2010 which is still an alpha product.

To download it, use this link and switch to Development Releases tab.