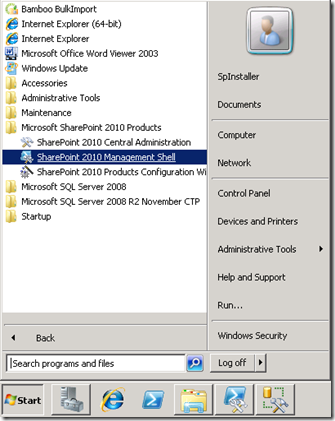
As you may be knowing, you can use Windows PowerShell to change registry values. In this article I am going to do five things.
I have created few registry entries to use in this example as seen below. In real world you can use whatever entries in your registry. It is always advisable to backup your registry before changing it.
1. Set a registry key value.
To set a value you need to use the “Set-ItemProperty” cmdlet as below.
Set-ItemProperty -Path "HKLM:\Software\Test\Live" -Name "TestValue2" –Value “TestData2”
Above command will put “TestData2” in the registry key “TestValue2” located in HKEY_LOCAL_MACHINE\Software\Test\Live.
2. Read a registry key value.
Reading from the registry can be done by using the cmdlet “Get-ItemProperty”.
Below command will get the value in the “TestValue1” key.
Get-ItemProperty -Path "HKLM:\Software\Test\Live" -Name "TestValue1"
3. Using variables in PowerShell.
Here I am going to read a registry key value and put it to another registry key. This can be done using a variable. First you need to read the value into a variable using the “Get-ItemProperty” cmdlet and that value can be saved using the “Set-ItemProperty” cmdlet.
- # Check for the existance of the registry key.
- IF (Get-ItemProperty -Path "HKLM:\Software\Test\Live" -Name "TestValue1" -ea 0)
- {
- # Fetching the value from TestValue1.
- $OldValue = Get-ItemProperty -Path "HKLM:\Software\Test\Live" -Name "TestValue1"
- }
- ELSE
- {
- # Inserting a blank, if the registry key is not present.
- $OldValue = ""
- }
- # Printing the value in the variable.
- Write-Host $OldValue.TestValue1
- # Setting the value to TestValue2.
- Set-ItemProperty -Path "HKLM:\Software\Test\Live" -Name "TestValue2" -Value $OldValue.TestValue1
4. Working with registry keys with spaces.
In case your registry keys contain spaces, you need to use double quotes in your script as seen below.
- # Check for the existance of the registry key.
- IF (Get-ItemProperty -Path "HKLM:\Software\Test\Live" -Name "Test Value 1" -ea 0)
- {
- # Fetching the value from Test Value 1.
- $OldValue = Get-ItemProperty -Path "HKLM:\Software\Test\Live" -Name "Test Value 1"
- }
- ELSE
- {
- # Inserting a blank, if the registry key is not present.
- $OldValue = ""
- }
- # Printing the value in the variable.
- Write-Host $OldValue."Test Value 1"
- # Setting the value to Test Value 2.
- Set-ItemProperty -Path "HKLM:\Software\Test\Live" -Name "Test Value 2" -Value $OldValue."Test Value 1"
5. Saving PowerShell commands as scripts and running them.
Both above can be saved as a PowerShell script by saving it in a file with the extension ps1. For example I did save it as “ChangeReg.ps1” in my C drive inside the folder “new”. Then the script can be run by browsing to the folder and using the command “.\ChangeReg.ps1”.
After the script is run my registry keys looked like this.
In case you need to retrieve values from other registry hives (locations), following table may be helpful.
| Registry Hive | Abbreviation | |
| 1. | HKEY_CLASSES_ROOT | HKCR |
| 2. | HKEY_CURRENT-USER | HKCU |
| 3. | HKEY_LOCAL_MACHINE | HKLM |
| 4. | HKEY_USERS | HKU |
| 5. | HKEY_CURRENT_CONFIG | HKCC |
In case you need to read more on “Get-ItemProperty” and “Set-ItemProperty”, use the links to visit official documentation from Microsoft TechNet.
![clip_image002[13] clip_image002[13]](https://blogger.googleusercontent.com/img/b/R29vZ2xl/AVvXsEjB_RR58ZWtQJSZMKomHZjMBz17buNdOlqz9XeW8yfuoUmTZQO42rEpbmhpEeclwaPM4Nvb9Gp_HPDRgxPIDj-PvZ732lz_g_i6dEmHFMkmJoBJls12T4gsUhyCNinPMuIAy-72rw/?imgmax=800)
![clip_image002[10] clip_image002[10]](https://blogger.googleusercontent.com/img/b/R29vZ2xl/AVvXsEi30onB57M5TFJX41QjBeqb8837_EhGKi0c5gRhzI4J3Jx8dqjv8teYS8oiBesZO690BiPTwrrHpe6pzNaXnYyoRqi-peh9YKVtz48-TYOMY-FgGKgakm0mk4BjgrTbuPaNMlPcGQ/?imgmax=800)
![clip_image002[3] clip_image002[3]](https://blogger.googleusercontent.com/img/b/R29vZ2xl/AVvXsEjHhVBF3djabaGwj3pOXrCV1bg3iSCGjtkWQ96aCVa5fQJ5HceqZTjLtT_zZrGQv-reN7TzMIKw0FPmVGpNfUOp4yqkq21mu1X5azELwiazYlHJ44nBDUTjvh62t63TK54mR6IE-Q/?imgmax=800)


