Sunday, February 27, 2011

Amazing Craft Shop Benthota – Sri Lanka

Recently when I visit my home town Benthota I happen to step into a craft shop on the way to my home thinking to buy a wooden model of an elephant. Before stepping into the shop it was appeared to me as a shop having a huge collection of animal models but I felt I am wrong after entering into the shop.

The collection was larger than I imagined, it had almost all the craft items you can possibly buy in Sri Lanka. To name some it had many different god statues, animal models, traditional masks, resting chairs, wall hangers, leather items, hand bags, shoes, African masks, etc… Since the list may go on for some time I thought to put some pictures I took of the place to give you an idea.

IMG_2343

If you are a tourist visiting Sri Lanka or if you are a Sri Lankan searching for handi/crafts I recommend you to visit this shop. You can find this shop besides the road when you are travelling from Benthota to Yathramulla.

If you need any help finding the place or buying these stuff let me know, I might be able to help you.

Monday, February 21, 2011

Saman Villas Benthota – Sri Lanka

If you are in Sri Lanka there are many places that you should visit, among them one very good and different hotel that I recommend is Saman Vilas Benthota.

Even though a friend told me that it is an amazing hotel I didn’t think that it would be such a great place until I went there. Because of its shear beauty I thought to put a post on that amazing hotel.

It is different because it will not provide you rooms but it will provide private villas for your comfort. Some of them are even having private swimming pools as well. Among the many other goodies you will get there, one thing is that you can wake up into the rising sun from your villa with a great view of the ocean. Also the food is very tasty and the presentation is also very attractive. Another specialty of the hotel is that the kitchen staff is working all 24 hours for you. If you need to have a late dinner at about 1:00 AM they are very happy to cater you without any extra payments and you only needs to ask the friendly staff.

If you would like to relax your body the best place is to go to their spa, you will be entitled to a 15 minutes free massage. If interested you can also use their library as well.

Before putting pictures I should say that it is having very nice views which are worth experiencing. No need to explain more since the following pictures that I took will prove my fact.

12

Contact them to get more details.

Hotel

Aturuwella, Benthota. Sri Lanka
Tel: +94 34 2275435, +94 34 4936200.
Fax: +94 34 2275433, +94 34 4287063.
resv@samanvilla.com

Head Office

90 Gothami Road, Colombo 08. Sri Lanka
Tel: +94 11 4866515, +94 11 2679562.
Fax: +94 11 4611049.
resv_samanvil@sltnet.lk

http://www.samanvilla.com/

Thursday, January 27, 2011

How to Allow Simple Passwords for Domain Users

Even though it is always better to use complex passwords, you may get a requirement to allow users to have simple passwords. To allow domain users to use simple passwords you need to modify the domain policy. In my following post I am using a Windows 2008 R2 machine.

1. Start Group Policy Management by clicking Start –> Administrative Tools –> Group Policy Management in your domain server or type gpmc.msc on the run window.

image

2. In the group policy management expand the forest node and then the domain node. By then you will see the domains available. Expand the domain you want the setting changed and right click on the Default Domain Policy item and select Edit. This will bring the Group Policy Management Editor.

image_thumb[16]

3. In the Group Policy Management Editor find the policy ‘Password must meet complexity requirements.’ by expanding Computer Configuration –> Policies –> Windows Settings –> Security Settings –> Account Policies and selecting Password Policy. Then right click and get the properties of the policy.

image_thumb[12]

4. To disable complex passwords select the Disabled radio button and click Apply.

image

5. To check whether the setting is really applied you can close the Group Policy Management Editor and check the settings tab at Group Policy Management.

image

Wednesday, January 26, 2011

My Wedding and Home Coming

Even though it is sometime after my wedding, I didn’t had a chance to blog about it, and suddenly thought to put a post with some pictures of that fabulous day of my life.

Wedding Day

Poruwa Ceremony

Our Wedding Cake

Parents and Us

Home Coming Day

Friday, November 26, 2010

Disabling Browser Back Button after Logout

Recently in an application we developed there was a requirement to stop the browser back button after user logs out of the application.

The reason behind this was to stop the security risk of another user without proper permissions peeking into the earlier users screens. If you notice in many applications if the browser back is not properly handled then after the user is logged out you can re visit the site by just pressing the browser back button. This happens because the browser shows the cached page when the back is pressed. Even if you have server side code to check for the user they will not fire since the page will load from cache.

With the limited time I found a genius idea to handle this in the internet. What this javascript does is it will always try to put the user back to the last page in the history. For example, I am having a login page and a default page which I am taking a user after he logs in. You need to place the following javascript in the default page to make the above happen.


  1. <script type="text/javascript" language="JavaScript">
  2.     window.history.forward(1);
  3. </script>


Then once a user logs out from the system and if presses the back button of the browser, when the default page loads it will put the user again to login (history forward) page which is the login page. Ultimately user needs to login again to go back to the site.

Sunday, November 21, 2010

How to Set the Clock in Car Audio

After disconnecting the battery for a maintenance job, I had some clueless days while trying to reset the clock in a car audio system. Even though there should be a way to set the clock in audio systems it is bit difficult to find it without the manual of the system.

My in my scenario I found it after sometime, so thought to share it since it might help someone with the same problem.

Car audio system in which I had the issue was JVC KD-S5055.

To start the resetting you need to press and hold the “Select” button for about 5 seconds. Then a message similar to “Hour-h” will be shown in the display. Once this appears use the + and – buttons located on the left to set the hour value of the time.

Then to set the minute value you need to press the mode change buttons located on the right side. Once you press the mode change button while on the hour changing mode you will see a message similar to “Minute-m”. Then again you can use the + and – buttons to set the minutes portion of the time.

After successfully setting both hour portion and minute portion you can press the Select button again to save the changes made to he clock.

Additionally if you need the system to show the time when the device is switched on you can press the Display button located below the Select button. This will show the current time instead of the Radio/CD/Track information.

Hope this helps.

Wednesday, November 17, 2010

Sending the Same Letter to Different People with their Details

Today a friend of mine needed some help from me on sending the same letter to different people while addressing the letters differently. This can be easily achieved by using Word Mail Merge feature.

Since I am having Word 2010 installed in my machine this post will list the steps required in Word 2010.

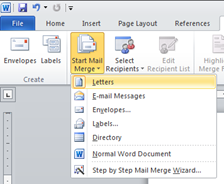
1. To start the process type in your letter and click on Mailings on the Word 2010 ribbon.

2. Click on Start Mail Merge and select Letters.

3. Then you need to select the people you need to send the letter to. To do that you have three options Type List, Use Existing List or Select from Outlook contacts. In this post I will use the first option.

4. When you click Type new List… you will get a window in which you can create a list of users with their details as shown in the following screenshot. For simplicity I will only create 2 users.

When you are done creating the list of users click ok so you will be prompted with a save window. Save it for later use since you may need the list for future use.

5. Then in your letter go to the appropriate places you need to place the differencing information, for example I need to put the address of the receiver after the text The Manager. To do so place the cursor on the required location and press on Address Block icon on the ribbon.

From the Insert Address Block window you can customize the way the address is printed on the letter. For example if you do not want to print the company name of the recipient then you can remove the checkmark on the Insert company name field. Preview pane will show you a preview of the actual data you have in your contact list. For the simplicity I will use the default options.

When you press ok you will see something similar to the following appearing in your letter, which will be the placeholder for the address block.

Following similar method but using the Insert Merge Field icon I did add the title and the last name of the recipient into the body section of the letter as you see below.

6. Preview your work by clicking Preview Results icon, by clicking the navigation buttons on the preview results pane you can navigate through your contacts to see the actual letters that will be created. For example below screenshot shows the letter for Mr. Withana with the changes for him.

7. When you are satisfied you can finish the merge with three options, in my case I will use the first option again.

As the final output of the merge I got one new document with the 2 letters addressed to the recipients i had in my contact list as shown in the following screenshot.

Saturday, November 13, 2010

Configuring SQL Server Instance for Azure Development Storage

If you have not configured Azure Development Storage to use your SQL Server, then while running your application targeted for Azure you will see an error similar to the following.

“Windows Azure Tools: Failed to initialize Development Storage service. Unable to start Development Storage. Failed to start Development Storage: the SQL Server instance ‘localhost\SQLExpress’ could not be found. Please configure the SQL Server instance for Development Storage using the ‘DSInit’ utility in the Windows Azure SDK.”

To overcome this you need to run the DSInit command using Windows Azure SDK Command Prompt.

Step 1 – Start the Windows Azure SDK Command Prompt.

Step 2 – Type DSInit /sqlinstance:. on the prompt and press enter.

The dot (.) at the end denotes the local SQL Server instance running on your machine. DSInit command details are as follows.

Syntax:

DSInit [/sqlinstance:<SQL server instance>] [/forceCreate] [/user:<Windows account name>]

Description:

Initialize the development store for usage by

Reserving http ports for the blob, table and queue services for the current user, and

Creating the database needed by the blob and queue services

Options:

sqlinstance : the name of the SQL Server instance on the local machine that should

be used for Development Storage. The default is SQLExpress.

Use "." for unnamed instance.

forceCreate : recreate the database even if it already exists.

user : user for whom ports are to be reserved. By default it is the current user.

.

After doing the configurations it will display a success screen similar to the following.

Then when you run your Azure ready application the Azure Development Storage and Azure Development Fabric will get started and notify you on your system tray as shown below.

After a while your application will also start without complaining if it is Azure ready.

Tuesday, November 02, 2010

Saving Table Changes in SQL Server 2008 R2

Have you noticed that with the default settings of SQL Server 2008 R2 you cannot use the design view to edit and save table changes which requires table to be recreated. But if you used earlier SQL Server installations you should remember that this functionality was possible. When you try to save such a table you will see an error similar to the following in SQL Server 2008 R2.

But the good news is that we can enable this functionality by going to SQL Server options.

Click Tools –> Options and expand Designers node and select ‘Table and Database Designers’.

Then uncheck the option ‘Prevent saving changes that require table re-creation’ and press OK.

Now if you try to save the table changes SQL will do the alteration without any complains.

Sorting SharePoint Folder Contents

Recently I needed to sort the contents of a SharePoint folder, in which I used IComparer to get my task done. Following is the code I used. Hope it is helpful.

As you see below I am using the TimeCreated property of SPFile object to do the comparison, other than this you can use any other property of the SPFile object. For a list of available properties refer MSDN.


  1. // Comparer Class.
  2. public class SPFilesComparer : IComparer
  3. {
  4.     #region IComparer Members
  5.     public int Compare(object object1, object object2)
  6.     {
  7.         return new CaseInsensitiveComparer().Compare(((SPFile)object1).TimeCreated, ((SPFile)object2).TimeCreated);
  8.     }
  9.     #endregion
  10. }


  1. ArrayList fileList = new ArrayList(attachFiles);
  2. IComparer compFiles = new SPFilesComparer();
  3. // Do the sorting based on the SPFilesComparer.
  4. fileList.Sort(compFiles);
  5. foreach (SPFile attachFile in fileList)
  6. {
  7.     // Use the sorted list.
  8. }


Friday, October 22, 2010

Piano + Guitar = Harpejji

Are you interested in musical instruments? If so have you seen an instrument which combines the Piano and the Guitar? It is manufactured by a company named Marcodi and is named as Harpejji. The sounds from it is truly fascinating, experience the sounds for you self by visiting their site. For people who would like to buy it the pricing and ordering details are also there in the site.

Click this link to see the event of presenting Harpejji first time to the great musician A. R. Rahman.

Saturday, October 02, 2010

MaxLength property not Working in TextBox

If you are involved in coding using .Net sooner or later you will notice that when the TextMode of a TextBox is changed to MultiLine the MaxLength property will stop working. What this means is in the textbox users will be able to type as many character as they want.

When searching the web for a fix for this I found several ideas to solve this. Following is the code which I modified for my requirement. Hope this helps.

ASPX


  1. <html xmlns="http://www.w3.org/1999/xhtml">
  2. <head runat="server">
  3. <script type="text/javascript">
  4.     function RestrictLength(textBox) {
  5.         /* Get the Max Length attribute's value. */
  6.         var allowedLength = textBox.getAttribute('MaximumLength');
  7.         /* Check for the number of characters typed in by the user. */
  8.         if (textBox.value.length > allowedLength) {
  9.             /* If it is more than the allowed limit remove the additional text. */
  10.             textBox.value = textBox.value.substring(0, allowedLength);
  11.             /*  Show a message to user with the tooltip used for the textbox. */
  12.             alert("Maximum characters allowed for '" + textBox.title +"' is " + allowedLength + ".");
  13.         }
  14.     }
  15. </script>
  16.     <title></title>
  17. </head>
  18. <body>
  19.     <form id="form1" runat="server" style="vertical-align:top;">
  20.     <!-- I am binding my java script to the onkeyup event of the textbox. So each time a key
  21.     is pressed it will fire my javascript. -->
  22.     Address <asp:TextBox ID="TextBox1" runat="server" MaxLength="10"
  23.         onkeyup="RestrictLength(this);" Height="58px" TextMode="MultiLine"></asp:TextBox>
  24.     </form>
  25.     </body>
  26. </html>


ASPX.CS


  1. protected void Page_Load(object sender, EventArgs e)
  2. {
  3.     // Adding the attribute to the TextBox1.
  4.     // Note that this is different to the MaxLength property.
  5.     // Also this is not case sensitive.
  6.     TextBox1.Attributes.Add("maximumlength", "10");
  7.     // Adding a tooltip which is used in the message.
  8.     TextBox1.ToolTip = "User Address";
  9. }


The output will me something similar to the following.