Thursday, August 04, 2016

Replacing Map Lights – Toyota RAV4 2011

Recently I was interested in replacing the Halogen map light bulbs with LEDs, I thought this might be useful for other readers as well if I let you know the steps to do it. Even though I did it on a Toyota RAV4 2011 model, some of the steps may be helpful to do the same on other vehicles. But be careful since if you do it wrong things might break.

It is always better to use a trim panel remover tool to reduce the damage caused by just using a flat head screw driver. If you have to use a screwdriver, use a cloth to minimise the damage.

image

1. Using a panel remover, flip the top and bottom of the lens covers to remove the lens covers.

Dome 1

Below images will show you the mechanism holding the lens cover, so you just need to insert the tool at the right location and gently tilt the tool to get it removed. For example if you insert the tool from the right or left sides and use force, then the small plastic piece will break, needing you to buy a new one.

imageimage

2. Once the covers are removed you will see the light globes, here you need to be careful. To remove the globes you just need to pull the globe out from the holder. If you turn the globes then the holder will get detached. If you are not too careful the released holder will fall in.

In case you rotate the holder, very carefully rotate it back to the place, before it falls inside.

3. After taking the globe out you can put the new globe in and fit the lens cover back. remember to check the light before fixing the lens cover.

image

In case your holder fell inside, then you can try few ways to get the holder back.

a. Use a magnet to try to get it out.

b. Carefully use a cable to get it.

c. Remove the entire map light assembly.

Since both a. and b. will have less percentage of success, I will explain how to remove the entire assembly. Since most Toyota’s do not use screws many components are held in place by clips. Mostly they will be plastic. So you need to know where to pull / push so you are not going to break any.

To remove the map light assembly you just need to pull hard to detach the 4 plastic clips see below. It may be really hard so some tools might help.

image

There is a small black connector which connects the lights to the vehicle’s electricity system. This can be removed by pressing the lock and pulling.

imageimage

Hope this helps you to stay out of trouble or save some hours while replacing your globes.

Monday, March 14, 2016

Port Willunga Beach – Port Willunga South Australia

While we were travelling with some of my friends, we did visit Port Willunga beach which I thought would be a good place to visit by any beach lover. It is about 45 km away from Adelaide city, which will take about 50 minutes if you are travelling by car.

There re two ways to get to the beach,

a. Go past the restaurant and head down to beach. – This is the quickest and shortest way to get to the beach. No stairs are there in this path so is wheel chair friendly.

b. Turn left before the restaurant – You need to walk for about 5 to 10 minutes depending on the pace you are walking to get to the beach and at the end there are some steps you need to go down. The short walk will reward you with the view of jetty pylons and the man made caves.

Facilities – There are toilet and shower facilities but no sitting areas, so portable table and chairs will be handy.

Port Willunga Beach

Port Willunga Beach

VIEW SLIDE SHOW
DOWNLOAD ALL

Map

Sunday, April 12, 2015

Changing Registry Key Values using PowerShell

As you may be knowing, you can use Windows PowerShell to change registry values. In this article I am going to do five things.

I have created few registry entries to use in this example as seen below. In real world you can use whatever entries in your registry. It is always advisable to backup your registry before changing it.

clip_image002[13]

1. Set a registry key value.

To set a value you need to use the “Set-ItemProperty” cmdlet as below.

Set-ItemProperty -Path "HKLM:\Software\Test\Live" -Name "TestValue2" –Value “TestData2”

Above command will put “TestData2” in the registry key “TestValue2” located in HKEY_LOCAL_MACHINE\Software\Test\Live.


2. Read a registry key value.

Reading from the registry can be done by using the cmdlet “Get-ItemProperty”.

Below command will get the value in the “TestValue1” key.

Get-ItemProperty -Path "HKLM:\Software\Test\Live" -Name "TestValue1"


3. Using variables in PowerShell.

Here I am going to read a registry key value and put it to another registry key. This can be done using a variable. First you need to read the value into a variable using the “Get-ItemProperty” cmdlet and that value can be saved using the “Set-ItemProperty” cmdlet.


  1. # Check for the existance of the registry key.
  2. IF (Get-ItemProperty -Path "HKLM:\Software\Test\Live" -Name "TestValue1" -ea 0)
  3. {
  4.     # Fetching the value from TestValue1.
  5.     $OldValue = Get-ItemProperty -Path "HKLM:\Software\Test\Live" -Name "TestValue1"
  6. }
  7. ELSE
  8. {
  9. # Inserting a blank, if the registry key is not present.
  10.     $OldValue = ""
  11. }
  12. # Printing the value in the variable.
  13. Write-Host $OldValue.TestValue1
  14. # Setting the value to TestValue2.
  15. Set-ItemProperty -Path "HKLM:\Software\Test\Live" -Name "TestValue2" -Value $OldValue.TestValue1


4. Working with registry keys with spaces.

In case your registry keys contain spaces, you need to use double quotes in your script as seen below.


  1. # Check for the existance of the registry key.
  2. IF (Get-ItemProperty -Path "HKLM:\Software\Test\Live" -Name "Test Value 1" -ea 0)
  3. {
  4.     # Fetching the value from Test Value 1.
  5.     $OldValue = Get-ItemProperty -Path "HKLM:\Software\Test\Live" -Name "Test Value 1"
  6. }
  7. ELSE
  8. {
  9.     # Inserting a blank, if the registry key is not present.
  10.     $OldValue = ""
  11. }
  12. # Printing the value in the variable.
  13. Write-Host $OldValue."Test Value 1"
  14. # Setting the value to Test Value 2.
  15. Set-ItemProperty -Path "HKLM:\Software\Test\Live" -Name "Test Value 2" -Value $OldValue."Test Value 1"


5. Saving PowerShell commands as scripts and running them.

Both above can be saved as a PowerShell script by saving it in a file with the extension ps1. For example I did save it as “ChangeReg.ps1” in my C drive inside the folder “new”. Then the script can be run by browsing to the folder and using the command “.\ChangeReg.ps1”.

clip_image002[10]

After the script is run my registry keys looked like this.

clip_image002[3]

In case you need to retrieve values from other registry hives (locations), following table may be helpful.


Registry Hive

Abbreviation

1. HKEY_CLASSES_ROOT HKCR
2. HKEY_CURRENT-USER HKCU
3. HKEY_LOCAL_MACHINE HKLM
4. HKEY_USERS HKU
5. HKEY_CURRENT_CONFIG HKCC


In case you need to read more on “Get-ItemProperty” and “Set-ItemProperty”, use the links to visit official documentation from Microsoft TechNet.

Sunday, February 01, 2015

Deleting Service Application Pools in SharePoint 2010

Recently while deleting a service application my system got unresponsive and while trying to create the service application again i constantly got the following error.

“An unhandled exception occurred in the user interface.Exception Information: An object of the type Microsoft.SharePoint.Administration.SPIisWebServiceApplicationPool named "SearchServiceApplication" already exists under the parent Microsoft.SharePoint.Administration.SPIisWebServiceSettings named "SharePoint Web Services". Rename your object or delete the existing object.”

This seems to be happening because one of the service application pools were not removed while deleting the service application. This can be removed by using PowerShell.

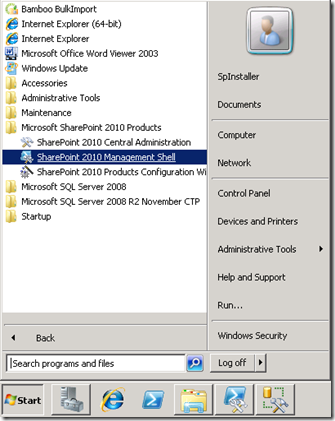
First load the SharePoint 2010 Management Shell by navigating to Start –> Microsoft SharePoint 2010 Products –> SharePoint 2010 Management Shell.

SPStartMenu

Then use the “Get-SPServiceApplicationPool” command to view all the existing service application pools.

Get-SPServiceApplicationPool

Now use the “Remove-SPServiceApplicationPool -Identity SearchServiceApplicationPoolName” command to remove the service application you want removed. If the service application pool’s name is having spaces remember to use double quotes.

Remove-SPServiceApplicationPool -Identity SearchServiceApplicationPool1

PowerShell will ask to confirm the deletion, after confirming the action, it will remove the service application pool.

Saturday, January 24, 2015

Magnetic Hill – Black Rock South Australia

If you like to experience nature’s amazing things it has to offer, one place you should not miss is the magnetic mountain in Black Rock South Australia. What is interesting in this place is that natural (magnetic) forces will take your car up the hill without the engine power.

Normally if you switch your car off, put it to neutral while at the middle of a hill and release the brake, your car will start moving downhill, but in this mountain your car will start moving up the hill. When I read about the place prior to my visit I thought it is a illusion in the eye. But after visiting the place I got amazed by seeing the way it moved my vehicle up the hill. To experience this I would encourage you to visit this mountain.

Magnetic Hill is located about 260 km from Adelaide and will take about 3 hour 30 minutes. The road to the magnetic hill is a unsealed road, but you can use a 2WD car to reach there.

Until you visit Magnetic Hill your self, enjoy me travelling up the hill while my engine is off.

Map


View Larger Map

Monday, January 05, 2015

Harben Vale Cherry Farm – Balhannah South Australia

If you like Cherries like me, another orchard you should visit is Harben Vale Cherries in Balhannah SA 5242. Located on Altmanns road, this orchard is about 100 hectares and produce Beef cattle, Potatoes and Cherries. This is a family owned farm which was with Altmann’s family for some 160 years.

They have started growing Cherries for about 10 to 12 years now and has a very open rural outlook rather than the steeper more traditional areas around Lenswood. You will find ample free parking in the property. This orchard has about 8 main Cherry varieties grown in 3 Hectares. Picking is easy since the trees are well trained and you can easily pick Cherries without using ladders.

Cherry season is a short 2 month period normally from December to January each year. Produce might even finish before the end of the season depending of the number of people visiting farms, So always call or check their web site before visiting. Current farm managers, Wayne and Julie Altman are very friendly people and they would be happy to help if you contact them.

When visiting, it is better to wear shoes in which you can easily walk on grass. Since it will be summer, hats are also recommended. Buckets will be provided to all visitor groups to pick Cherries into so you do not want to take anything for collecting what you pick. At the time I visited, they did not charge any admission fee and one kilo of Cherries were sold for $ 5. These prices can always change so I recommend you to check with the owners before picking since whatever you pick, you should buy. Since these Cherries are fresh you can keep them for few weeks without any problems, if you freeze you may even be able to keep them for few months. But I like to consume them within 2 – 3 weeks from picking.

Address : Altmanns Road, Balhannah 5242.
Phone : 04 3900 1962
EMail : wjaltman@adam.com.au
Web : http://harbenvale.com/


Map

Tuesday, April 15, 2014

Microsoft.Ace.OLEDB.12.0 Provider Not Registered

Recently while trying to import some data from Excel onto SQL on a new machine I got the following error at SQL Server Import and Export Wizard Step 2. After doing some searching found the solution is to install Office 2007 Data Connectivity Components System Driver.

image

If you need to  get it fixed use the following link to get it from Microsoft Download Center.

http://www.microsoft.com/en-us/download/details.aspx?id=23734

Sunday, January 05, 2014

Finding Number of Records in SQL Tables

By using the following query you will be able to get all the tables with at least one record in the selected database. It will be handy when you needed to get an idea of the number of records in a database. This uses two SQL Server system views, namely SysObjects and SysIndexes.


  1. SELECT sysobjects.name AS [Table Name],
  2.         MAX(sysindexes.rows) AS [Number of Records],
  3.         sysobjects.crdate AS [Created Date],
  4.         sysobjects.refdate AS [Referenced Date]
  5. FROM sysobjects
  6. INNER JOIN sysindexes ON sysobjects.id = sysindexes.id
  7. WHERE sysobjects.xtype = 'U' -- Filtering all the User Tables.
  8.     AND sysindexes.rows > 0 -- Getting all the tables having at least one reoord.
  9. GROUP BY sysobjects.name,
  10.     sysobjects.crdate,
  11.     sysobjects.refdate
  12. ORDER BY 2 DESC -- Ordering by the number of records in table.


Above query will bring the following results on the Northwind database.

image

Friday, November 01, 2013

Resetting Windows XP Mode

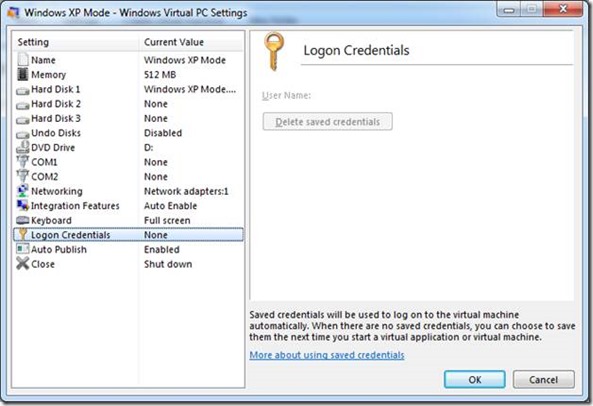
Recently I had a problem using Windows XP mode simply because the password for Windows XP mode was not working.This can happen when Windows XP mode password was changed in Windows XP Mode or when the Windows XP Mode was created from another user account to the one currently logged into the physical machine.

One way to fix this is by opening Windows XP Mode Windows Virtual PC Settings and deleting saved credentials. But in my case there were no saved credentials so my button was disabled.

clip_image002

Second way to fix this is by uninstalling Windows XP Mode and reinstalling it.

Third way is a quicker way to do this by simply cleaning the virtual machine files in folder “C:\Users\Administrator\AppData\Local\Microsoft\Windows Virtual PC\Virtual Machines”. Make sure you are only deleting the files relevant to Windows XP Mode.

clip_image002[5]

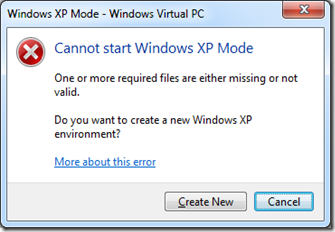
Then when you relaunch Windows XP mode, it will say that some of the required files are missing and will prompt to create a new environment. When you press “Create New” it will start the wizard to create a brand new Windows XP Mode.

clip_image001

If it generates any errors, you should try deleting the virtual machine file found in “<User Folder>\Virtual Machines”clip_image002[7]

After finishing the wizard you will get a new Windows XP Mode.

clip_image001[5]clip_image001[7]

clip_image001[21]clip_image001[19]clip_image002[9]clip_image002[14]

Tuesday, July 02, 2013

HTTP Error 404.13 – Not Found – The request filtering module is configured to deny a request that exceeds the request content length.

Request Filtering

I recently got this error in one of my applications. When troubleshooting, I found my application is configured to have the default value of 30000000 Bytes for the content length, which was not sufficient for me in some of the file uploading functionalities.

Simply adding / increasing the number in the configuration file corrected this error.

Request Content Length in Bytes.

Default Value – 30000000 Bytes (~28MB)

Maximum Value – 4284229877 Bytes (3.99GB)


  1. <system.webServer>
  2.   <security>
  3.     <requestFiltering>
  4.       <requestLimits maxAllowedContentLength="100000000"></requestLimits>
  5.     </requestFiltering>
  6.   </security>
  7.   ...
  8. </system.webServer>


To obtain more information read this article.

Friday, June 07, 2013

Ruston’s Roses – Renmark South Australia

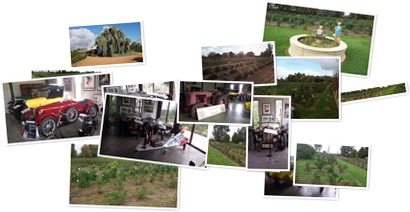
If you like to enjoy visiting the Australia’s largest Rose garden then you need to travel to Renmark in South Australia. The place is named Ruston’s Roses, they maintain a Rose garden of 50000 bushes in 4000 varieties. I have been there in off peak season but there were few flowers blooming so I expect it will be full of flowers in season.

To make it an interesting place for everyone Ruston’s got a small car museum as well. Till the ladies enjoy the garden gents can enjoy the cars on display. Not to mention the gift / souvenir shopping possibilities at the place. When you are tired after all that you can enjoy a light meal from the restaurant.

You will find plenty of places to park your car freely. The place is pram and disabled friendly and in off peak season admittance is free. In peak season I think they charge $5 for an adult entry. Visiting them wont be a big issue since they are open everyday of the year from 10:00 AM to 4:00 PM. Find out more by contacting them.

Address: Ruston's Roses, Moorna Street, Renmark SA 5341.
Phone: 08 8586 6191
EMail: anne@rustonsroses.com
Web: www.rustonsroses.com

Map


View Larger Map

Saturday, May 25, 2013

Samsung Galaxy S4 not Connecting to Car Audio Fix

Few months back suddenly my Toyota refused to connect to my Samsung Galaxy S4 without any reason. Earlier I could listen to music, dial calls and answer calls without issues.

But suddenly the connection between the car and the phone broke and the worst thing is I lost entire Bluetooth screen from the car audio system (Normally I have FM1, FM2, Bluetooth and AM). I thought my audio system is malfunctioning so I went to Toyota, but they said it is a known error and Galaxy S4 is having new Bluetooth version and it is not compatible with most of the car audio systems and I will not be able to use the phone with the car. This was very disappointing to me so I asked for them for the audio system update but they said no updates are available.

Then I thought to try out few things and get it fixed by myself, good news for anyone having the same issue is I solved the issue. But it is not always reliable but 95% of times it will work.

To get your S4 (or any other new device) connected into your car audio follow the steps below, they might help you.

  1. First we need to get the missing Bluetooth mode (screen) back in the car audio, for this I removed all the registered devices I had in the car audio.
  2. Then I registered my old Windows Mobile phone to the audio system using the settings screen (since the Bluetooth mode is not available). Any old phone like an iPhone 4G or below, Samsung Galaxy S2, Windows Mobile phones will be ok. If you get the device properly registered you will get the Bluetooth screen back when you restart the car audio system.
  3. Then register your Galaxy S4 with the car audio system, and change the connection behaviour immediately. Normally the car audio will try to connect to the phone, but since the phone is having new version of Bluetooth car audio will not recognise the commands transmitted by the phone. So the system will think there is no device.

To over come the issue you need to configure the phone to make the connection. In my Toyota this is done by selecting the connection settings after the Bluetooth connection is made using the Bluetooth mode (screen). Because latest phones are intelligent they will detect that the car audio is having older version of Bluetooth and it will change the instruction set accordingly and start communicating with an instruction set which is recognised by the car audio, making everything back to normal again.

After making my phone to connect to the car, I could play my music, answer calls and dial calls without any issues.

Hope this will help you to get your car audio connected to your latest phone.

Sunday, May 19, 2013

Mount Lofty Lookout

A place you would visit to enjoy great scenery while you are in Adelaide South Australia is the Mt. Lofty Summit Lookout. You will be able to see most of the Adelaide while being there. At 720 meters above sea level and 17 kilometers from the city is a good place to enjoy an evening.

To assist visitors there is an information centre to gather more information about the area and a restaurant (http://www.mtloftysummit.com) to enjoy a cup of tea. If you got some more time to spare you could also visit Cleland wild life park which is nearby.

Drive with care since the roads in the area are having bends, also be on alert since there are many cyclists active in the area. There s a big car park so you will find a space to park your car but it will cost (was $3 on May 2013) you since at all times parking fees do apply.

Map


View Larger Map

Wednesday, May 15, 2013

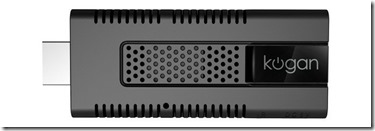
Kogan Smart TV Dongle Restarting

kogan_smart_tv_7

If you also bought Kogan Smart TV dongle and it keeps on restarting whenever you try to turn it on you might be able to fix it by reading on.

Mine always restarted, at a time when the Android robot man is in view or when Android word is shown.

I did two main things to get it to work normally.

A) Changed the power source – I found the Red LED light in the dongle was not having the brightness it used to have. After doing some testing I found the power adapter which came with the dongle was faulty, so I used another similar power adapter and immediately the restarting of the dongle became less.

Also sometimes this power limitation is caused by the connector slack between the power adapter and the cable. Try changing the cable or adjusting the orientation of the adapter. For example if the adapter is lying flat try to turn it to a side or try to put some kind of an object underneath to reduce the slack between the cable and power adapter.

B) Update the firmware in the dongle – In my dongle updating the firmware made the restarting issue almost vanish. So if you like to make the fix complete try updating the dongle by following the steps below.

Before starting the process make sure that you will not have any power outages until you complete your firmware update (for about 30 mins). If power is interrupted while the update is happening most likely you will have problems using your dongle again, it might even be bricked so be careful.

  1. Download the new version of firmware  from the following link.
  2. Find an empty USB flash drive or a Micro SD card of capacity 512MB or more.
  3. Unzip the downloaded zip file into the USB flash or the SD card. Make sure only the contents of the zip file is present on SD card or flash drive.
  4. Plug the SD card or the USB flash into the HDMI dongle.
  5. Go to Settings, find System Update then select Local Device and select either USB flash drive or the SD card.
  6. This will start the firmware update process and when completed dongle will be restarted.
  7. Then you need to do the initial configuration again for things like screen size, WiFi, accounts etc.

Hope this helps you, if you have any questions let me know I might be able to help. Some of the information about updating the firmware is thanks to a reply made by Ozzie Tigar in forums.whirlpool.net.au.

Thursday, January 31, 2013

Windows Shortcut Keys

If you are using Windows, following are some handy shortcut keys with their actions to make your life bit easy.

Key Combination

Action

Windows Key + E

Opens Windows Explorer

Windows Key + L

Locks Windows

Windows Key + F

Open Search

Windows Key + R

Open Run Window

Windows Key + D

Minimise / Restore All Applications

Windows Key + Space

Peek to Desktop

Windows Key + Home

Minimise all Applications except the current Application

Shift + F10

Right Click

Windows Key + Number Keys from 1 - 9

Activate / Show Application on Taskbar.

Windows Key + Right Arrow

Switch between different Application Layouts

Windows Key + Down Arrow

Minimize an Application

Windows Key + Up Arrow

Maximize Application

Windows Key + Shift + Up Arrow

Fit Application height to screen height

Windows Key + Shift + Right / Left Arrow

Move Applications among the connected Displays when having multiple displays.

In an Application Alt + F4

Closes the Application

At Desktop Alt + F4

Brings Shutdown Window


I did find these in Windows 7, but have not yet tested on other versions of Windows.


Monday, January 28, 2013

Dolphin Cruises – Port Adelaide South Australia

Recently after a friend of mine told me about these cruses, we went for the cruise with few families we are friends with. In Port Adelaide 2 companies are offering Dolphin cruses. Namely they are Dolphin Explorer and Port Princess Dolphin Cruises. (For contact details please read on.)

In our cruise Dolphin Explorer took 2 and half hours to take us along the Port river. The ride is comfortable since it is not going to rough sea. On the way you will see big ships which comes into port. Unfortunately on the day we went it started raining so it was bit cold. Since the big boats are having fully covered restaurants no need to worry about the weather.

When talking about Dolphins it is bit frustrating since in our cruise we only saw few Dolphins at the start. But noting on our way, sometimes this might be because of the bad weather we had on the day. Since it costs $18 for an adult with meal I think it is value for money, so we thought to have another go later some day to check out more Dolphins. Until then I will post few photos I captured to make you interested.

There are plenty of free and paid parking in the area, so not to worry on parking. You will be able to find more information including the meal menus and other costs on their web sites.


Dolphin Explorer

Port Princess
Dolphin Cruises

Address :

Dolphin Explorer
PO Box 177, Port Adelaide,
SA 5015.

Port Princess
Dolphin Cruises, Commercial Road,
Port Adelaide SA 5015.

Phone :

(08) 8447 2366

(08) 8243 2757 (04) 1881 7837

Fax :

(08) 8447 1344

EMail :

info@dolphinexplorer.com.au

Web :

http://www.dolphinexplorer.com.au

http://www.portprincess.com.au


Map


View Larger Map

Friday, January 25, 2013

Lock Windows

If you wanted to lock your Windows using a batch file it can be achieved using the following command.

rundll32.exe user32.dll, LockWorkStation

This will be handy if you need to lock your computer after a certain scheduled action. Simply place this in a bat file, and schedule the bat file to be run to get the computer locked.

I tried this on Windows 7.

Monday, January 21, 2013

Enabling Hibernate in Windows 8

If you have start using Microsoft’s latest Personal Computer (PC) Operating System (OS) Windows 8, by now you may have found it is different in some ways to it’s predecessors. One feature I am heavily using in Windows was again missing after installing this version of Windows, which is the hibernation feature.

image

So if you like hibernation shown on your power menu try doing the following.

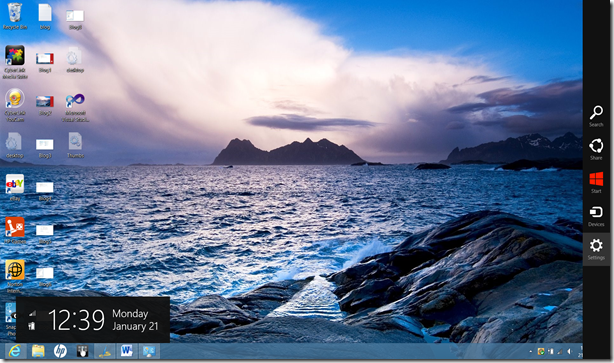
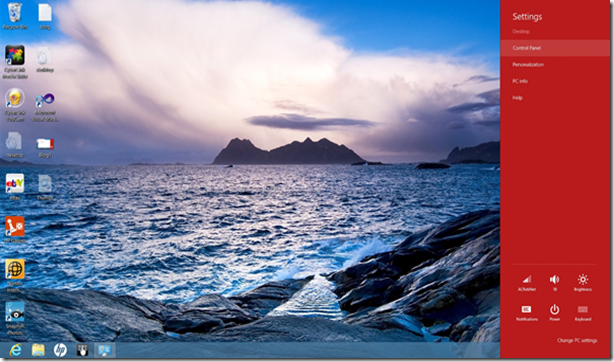
1. Move your mouse cursor to the right side of your screen to activate the quick access menu and click on Settings and then on Control Panel.

image

image

2. Then select “System and Security”.

image

3. Now select Power Options.

image

4. From the left hand navigation menu select “Choose what the power button does” or “Choose what closing the lid does”.

image

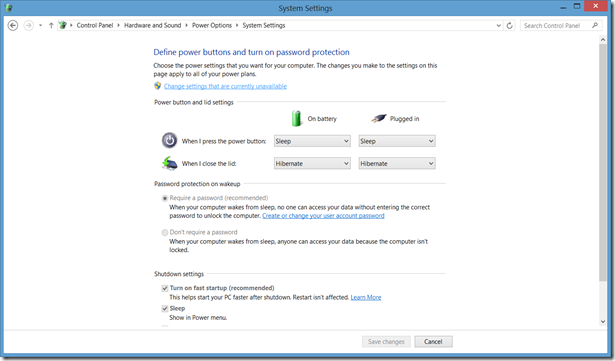
5. Now on system settings screen you need to click on “Change settings that are currently unavailable” to modify the disabled options.

image

6. Scroll down to Shutdown settings and check the box named Hibernate and click Save Changes button.

image

Now if you look at the options available in your power menu Hibernate will also be part of it.

image

If this does not bring hibernation back, please try the following as well.

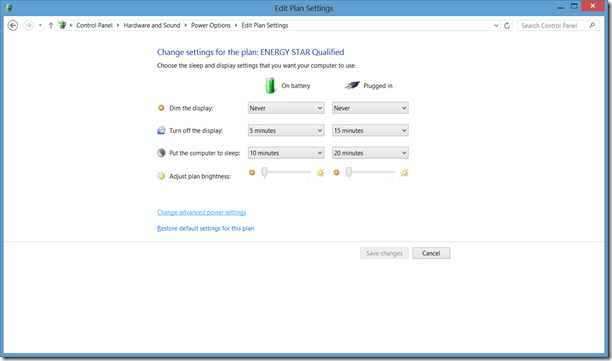
1. From the power options screen select “Change plan settings” of the active plan.

image

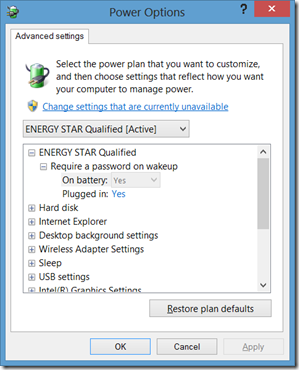
2. Then select “Change advanced power settings”.

image

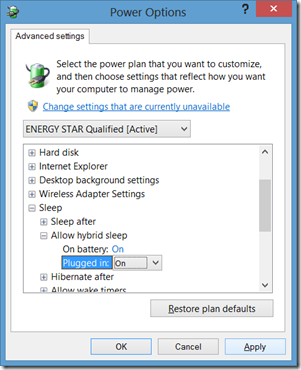
3. Now click on “Change settings that are currently unavailable”. This will list down all the features available in the system. Scroll down and expand Sleep –> Allow hybrid sleep and turn on hibernation as you want.

image

image


With these changes the “Hibernate” option should start appearing in your Power options menu.

Sunday, January 20, 2013

Aviation Museum – Port Adelaide South Australia

If you are an aviation fan you might enjoy a visit to South Australian Aviation Museum. They do have some aircrafts on display where you can get on board to have a look without a passport. This is a non profit organization managed by aviation enthusiasts. There is also a shop for you to buy related things such as model aircrafts and magazines.

Entry tickets are priced at $9 per adult and free parking is available onsite.

Address: 66 Lipson Street, Port Adelaide, SA 5015
Phone: 08 8240 1230
EMail: saam@adam.com.au
Web: http://www.saam.org.au/

Map


View Larger Map

Saturday, January 05, 2013

Marble Hill Cherry Farm – Ashton South Australia

Like to pick your own Cherries, then good place to visit is the Marble Hill Cherry farm located in Ashton SA 5137. This family operated farm is usually a pick your own farm meaning most of their produce is picked and bought by people who visit the farm in Cherry season like us.

Ashton is hill country so on your way to the farm you will encounter great scenery, also be careful and drive safe since some roads are windy and narrow.

Cherry season is a short 2 month period normally from December to January and depending on the number of people visiting Cherries might finish even before the season end, so always call or check their web site before going.

Cherry orchard has uneven ground (slope), so make sure to wear something you can easily walk in slopes and grass. Hats are also suggested. If you are travelling with young children and like to stay behind, you can stay in the scenic shed. It is having plenty of chairs. The management is also very kind, they provide free cool drinking water and ice cream for a small amount. If you like to continue cherry picking with young children then a child carrier sling is suggested.

Normally entrance fee is $ 5 and they will provide a bucket as the container to hold the Cherries you pick. Whatever amount of Cherries you pick should be payed for ($ 8 per Kilo). On your entry it is better to check the price since it change every year. Since Cherries can be kept fresh for about 2 weeks in fridge make sure to pick only the amount you want.

Address: Marble Hill Cherries, 25 Marble Hill Rd, Ashton, SA 5137.
Phone: (08) 8390 0327, 04 1136 1651
EMail: marblehillcherries@cherriessa.com.au
Web: http://www.marblehillcherries.com

Map


View Larger Map