


 d. Select the site or the farm to backup the entire SharePoint farm.
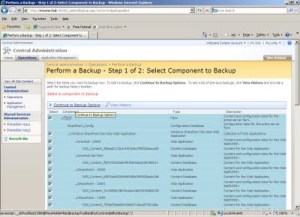

2.) Using the STSADM tool.
Even though Microsoft had provided a UI method to backup a SharePoint site the best way to get it done is by the STSADM tool. If you are unfamiliar with STSADM refer the following post http://arjunachith.blogspot.com/2009/11/stsadm.html.
You will be able to use the following command to get a backup of a site using STSADM.
STSADM.EXE -o backup -url http://MySharePoint:10000/ -filename E:\Folder_Name\SiteBackup.bkp -overwrite
o - Mentions that the backup is an operation.
url - URL for the site collection that you need to backup.
filename - Path to the backup file, even a network path such as \\Machine_Name\Folder_Name\File_Name.ext can be provided.
overwrite - Will overwrite an existing back file if found in the backup location.
Instead of giving the path in the filename you can use the directory parameter to mention the location as well it is shown below.
STSADM.EXE -o backup -url http://MySharePoint:10000/ -directory E:\Folder_Name -filename SiteBackup.bkp -overwrite
directory - Location for the backup, even a network path such as \\Machine_Name\Folder_Name can be provided.
filename -The name of the backup file.
The status will be shown in the command prompt.
If you would like to know the full set of available parameters for the backup operation visit the Microsoft at http://technet.microsoft.com/en-us/library/cc263441.aspx.
To learn more visit the following TechNet link.
http://technet.microsoft.com/en-us/library/cc261956.aspx
Following link will have the list of operations and properties.
http://technet.microsoft.com/en-us/library/cc263384.aspx


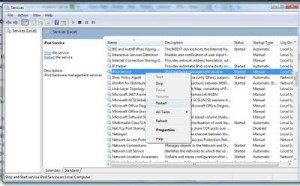
 Recently I had to install and configure WSUS (Windows Server Update Services) on our company.
You will now see a set of cod files with names like App-1.cod, App-2.cod, App-3.cod, etc.
Step 2 - Prepare the ServerAPN or Access Point Name is a setting which needs to be set on the mobile when we need to get connected to internet using the phone.
APN changes from one mobile service provider to the other. For example Dialog will have http://www.dialogsl.com/ Rogers will have internet.com set as their APN.
But letting users set the APN manually is always not the preferred way. Recently we developed an application for BlackBerry which the user needed to get to the internet without he manually setting the APN. The application was supposed to be delivered through BlackBerry App World so manually setting APN was not an option. In a case like this what you have to do is set the APN programmatically into the connection.
String URL = “www.SomeServer.com”;
StringBuffer bfURL;
bfURL = new StringBuffer ();
bfURL.append (URL);
bfURL.append (";deviceside=true ;apn=internet.com");
bfURL.append (";tunnelauthusername=UserName;tunnelauthpassword=Password");
String FinalURL = bfURL.toString ();
In the above code I have set the Rogers APN in to this connection.
If you need more details on the parameters used or need to know about the other parameters you are eligible to use such as WapGatewayIP, WapGatewayPort, WapGatewayAPN, etc visit the following link to view full details of the connector class.
http://www.blackberry.com/developers/docs/4.2api/javax/microedition/io/Connector.html
Recently I managed a project which targeted iPhone and SharePoint server. This was a project for Dimo who are the dealers for Mercedes Benz in Sri Lanka. Total software services were provided by IronOne Technologies.
When we finalized the technologies I thought that this project will be an interesting one.
But the real interesting part was on the day when I saw all the Benz models present on the day. Even though I have seen international car shows before this, this is the first time I have seen this much of cars of the same manufacturer on the same place live.
You will agree after you see the photos.


To find out the issue we had to even upgrade the BlackBerry OS and we found that in the new OS version the HorizontalFieldManager is having its default width wrong. So our textbox was hidden. We corrected it by the following change, making the sub layout always have a width that we prefer.
hfmtxtPassword = new HorizontalFieldManager() {
protected void paint(net.rim.device.api.ui.Graphics graphics) {
graphics.setBackgroundColor(Color.WHITE);
graphics.clear();
super.paint(graphics);
}
protected void sublayout(int maxWidth, int maxHeight) {
super.sublayout(278, maxHeight);
}
};

