Creating a web part for SharePoint consists of several steps.
1. Create a user control.
2. Create the web part DLL to hold the user control.
3. Add user control and web part to SharePoint and make the web part safe.
4. Add the web part to the web parts gallery.
5. Finally add the web part to the page.
Lots of steps ha, don’t worry we’ll do step by step.
1. Create a user control. a. Start Visual Studio and click on File -> New -> Web Site.
 b. Select ASP.NET Web Site as the template, select C# as the language, and give a file system location and a name (prjFirst) for the project before pressing Ok.
  c. Now we need to add a page to write our code. To do that, right click on top of the project and click on Add New Item....
d. Select Web User Control as the template, select the language as C#, give a name for the user control (ucFirst) and ensure that Place code in separate file check box is checked before pressing Ok.  e. Now you need to use the required web controls and write the code required in the appropriate files. For this demonstration I will put a label and a button only. When the button is clicked I will display a greeting message in the label.
f. After creating the controls and naming them as required I need to import Microsoft.SharePoint.dll since I am going to access SharePoint object model. To do this first we need to refer this dll. Right click on the project and click on Add Reference..., select the Browse tab and go to folder C:\Program Files\Common Files\Microsoft Shared\web server extensions\12\ISAPI and select Microsoft.SharePoint.dll to add the reference to the project. If your machine doesn’t have a SharePoint installation then you need to copy this file from a SharePoint installed machine to your machine and refer it.
g. After coding for the button click my code looks like this. 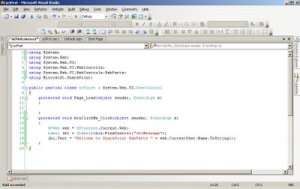 h. Now build and see if the page is having any errors. If no errors step one is done.
2. Create the web part DLL to hold the user control.
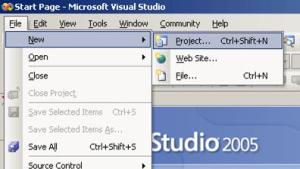
a. Start another instance of Visual Studio and click File -> New -> Project....
b. Select Class Library as the template under C# project type and give a location and a name (clFirstWebPart) before clicking Ok.

c. Right click and delete the Class1.cs file since we would like to create a new class with a meaningful name.
d. Now right click on the project and click on Add -> New Item...,

then select Class as the template and give an appropriate name (csFirstWebPart.cs) and click Add.

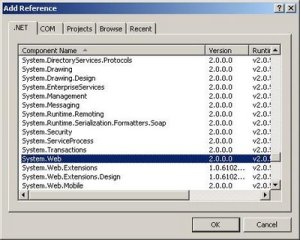
e. Now you need to refer System.Web namespace. To do so right click on project and click ok Add Reference..., then select the System.Web and click Ok.
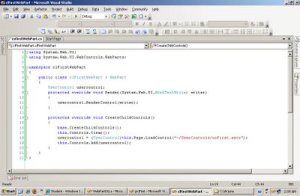
f. After inheriting the class from the WebPart override the CreateChildControls method to create a user control and load the user control we create earlier in step 1.
We are loading the user control file (ucFirst.ascx) from the SharePoint UserControls folder which we are to copy later.
g. Now build the project by right clicking on project and selecting Build. If no errors occur then that means we have completed step 2 as well.
3. Add user control and web part to SharePoint and make the web part safe.
1. Now we have a user control and a web part dll which loads the user control. In order to use this in SharePoint we need to add these to SharePoint. This has 3 tasks to be done in the SharePoint Server machine.
a. Adding User Control files.
i. Go to the location that you created the user control project in step 1 and copy the 2 files of the user control (ucFirst.ascx and ucFirst.ascx.cs). 
 ii. Go to the root folder of the web site (C:\Inetpub\wwwroot). Now find the folder named UserControls and paste the copied two files there.
  Notes –
· I’m trying to put the newly created web part to the default web application. So I am using C:\Inetpub\wwwroot\UserControls folder. If you need to use this web part then you needs to use the appropriate folder. For example if I am to use this in the web application http://ironone-ms-t01:16173/ then I have to create UserControls folder in C:\Inetpub\wwwroot\wss\VirtualDirectories\16173. To find the correct location of your web application use IIS Manager web site properties page.  · If the UserControls folder doesn’t exist you can create it there.
b. Adding Web Part DLL.
i. Go to the location that you created the web part DLL project in step 2 and copy the output DLL file (clFirstWebPart.dll) of it.  ii. Go to the root folder of the web site (C:\Inetpub\wwwroot). Now find the folder named bin and paste the copied file there.
  Notes –
· I’m trying to put the newly created web part to the default web application. So I am using C:\Inetpub\wwwroot\UserControls folder. If you need to use this web part then you needs to use the appropriate folder. For example if I am to use this in the web application http://ironone-ms-t01:16173/ then I have to create bin folder in C:\Inetpub\wwwroot\wss\VirtualDirectories\16173. To find the correct location of your web application use IIS Manager web site properties page. 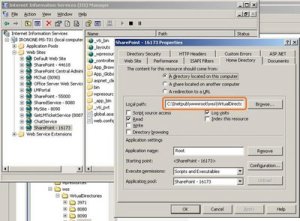 · If the bin folder doesn’t exist you can create it there.
c. Making the web part a trusted web part.
In order to use the web part we need to make the web part a trusted web part. To do this there are two ways,
1. Put an entry to the web.config file of the application.
2. Give the dll a fully trusted name and putting it to GAC.
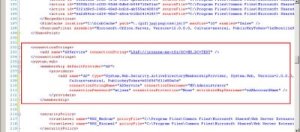
I will be using the first method. Make a backup of the web.config file located in the C:\Inetpub\wwwroot and open it. Then add an entry to the SafeControls section. The easiest way is to copy the last line and paste it at the end and changing the Assembly and the Namespace to the dlls’ name (clFirstWebPart). Save the config file and to be in safe side do an IIS reset by typing IISReset in the Run Window.
 4. Add the web part to the web parts gallery.
 a. Open an Internet Explorer and browse to the site which you need to add the web part. Then click on Site Actions -> Site Settings -> Modify All Site Settings.
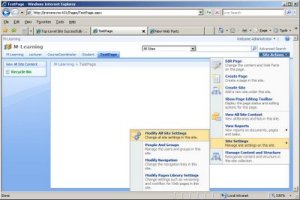
b. Click on Web Parts under Galleries in the Site Settings page to open the Web Part Gallery.

c. In the web part gallery page you will see all the added web parts. But not our one. So we need to add that here. To do this click on New button.

Note –
The files with .dwp extension are Windows SharePoint Services 2.0 web parts.
The files with .webpart are the new Windows SharePoint Services 3.0 web parts.
d. This list will have the newly added web part (clFirstWebPart.clFirstWebPart). Check the check box in front of it and click on Populate Gallery.

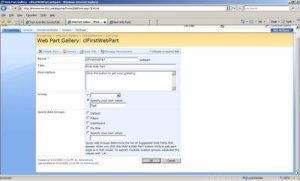
e. Now our new web part will appear in the Web Part Gallery. This is enough but it is always better to change some properties of the web part. So open up the web part property page by clicking on the Edit button.
Change the Title, Description and the Group of the web part and press Ok.

f. Remember that we need to test the web part before we add it to a web page. To do this simply click on the web part.

g. If you are also having the default settings then you will definitely get an error of request for the permission of type.... This is because we didn’t change the SharePoint trust level. To change this I will use the easy way of changing the trust level in the configuration file to full though the best way is to create a trust file.
Open the web.config file at C:\Inetpub\wwwroot and find the entry
and change the trust level to Full.  Do an IISReset and refresh the internet explorer page. Now the web part will be displayed to you.
5. Finally add the web part to the page.
Now our newly created web part is available for us to use. We’ll now add it to a page.
a. Open the required web page in the internet explorer and click Site Actions -> Edit Page to start editing mode.
 b. Now on any web part zone click ‘Add a Web Part’ button.
  c. Among all the web parts listed select the web part that we have created (First Web Part), select the check box in front of it and click the Add button.
  You will see the web part appearing on the page.
d. To finalize the page click Publish button on the page. 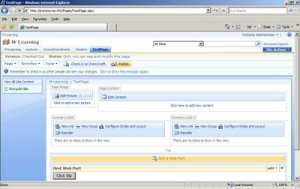 e. Click on ‘Click Me’ button and see the output.
 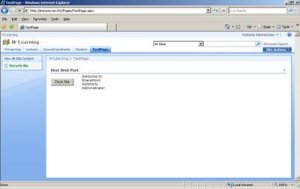 Even though adding a new web part was bit of a process, after adding doing changes to it is not that difficult. What you have to do is change the ascx and ascx.cs files and copy the new ones to the UserControls folder. I have simply changed the message to a new one using this method.
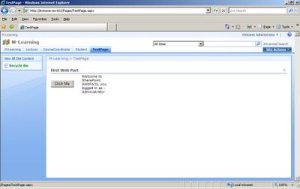

 In the Authentication Providers screen first make sure the correct web application is selected. If not, select the correct application using the drop down in the top left corner of the page.
  After selecting the correct application click on the Default zone (Please note that here I am going to change the default zones' authentication. If you are to change in another zone simply select the required zone).
  As of the result of changing the authentication providers the Web.Config file will be changed accordingly automatically. But this is not enough we need to enter the membership provider details ther in site Web.Config file and Administrator site Web.Config files.

 SharePoint Administration Site Web.Config

 As the final step you have to change the site collection administrators. For this click on Site Collection Administrators under SharePoint Site Management in Application Management.
  After verifying the selected application enter Primary Site Collection Administrator as AD:Administrator. If you want you can fill in Secondary Site Collection Administrator as well. After finishing click Ok.
 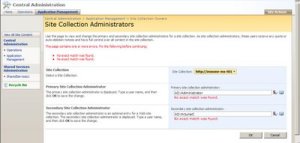 Now go back to the site and try to login, you will see that the traditional windows login page is replaced with a simple login web page. Since this login page is too simple I did some improvements to the login page and created my own one as you can see below.


