Sunday, September 21, 2008

Creating a Web Part to use with SharePoint

Creating a web part for SharePoint consists of several steps.
1. Create a user control.
2. Create the web part DLL to hold the user control.
3. Add user control and web part to SharePoint and make the web part safe.
4. Add the web part to the web parts gallery.
5. Finally add the web part to the page.
Lots of steps ha, don’t worry we’ll do step by step.

1. Create a user control.
a. Start Visual Studio and click on File -> New -> Web Site.

b. Select ASP.NET Web Site as the template, select C# as the language, and give a file system location and a name (prjFirst) for the project before pressing Ok. c. Now we need to add a page to write our code. To do that, right click on top of the project and click on Add New Item....
d. Select Web User Control as the template, select the language as C#, give a name for the user control (ucFirst) and ensure that Place code in separate file check box is checked before pressing Ok. e. Now you need to use the required web controls and write the code required in the appropriate files. For this demonstration I will put a label and a button only. When the button is clicked I will display a greeting message in the label.
f. After creating the controls and naming them as required I need to import Microsoft.SharePoint.dll since I am going to access SharePoint object model. To do this first we need to refer this dll. Right click on the project and click on Add Reference..., select the Browse tab and go to folder C:\Program Files\Common Files\Microsoft Shared\web server extensions\12\ISAPI and select Microsoft.SharePoint.dll to add the reference to the project. If your machine doesn’t have a SharePoint installation then you need to copy this file from a SharePoint installed machine to your machine and refer it.
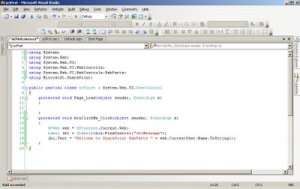
g. After coding for the button click my code looks like this. h. Now build and see if the page is having any errors. If no errors step one is done.
2. Create the web part DLL to hold the user control.
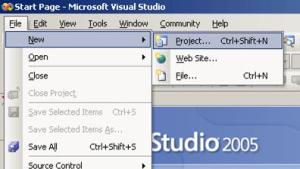
a. Start another instance of Visual Studio and click File -> New -> Project....
b. Select Class Library as the template under C# project type and give a location and a name (clFirstWebPart) before clicking Ok. c. Right click and delete the Class1.cs file since we would like to create a new class with a meaningful name.
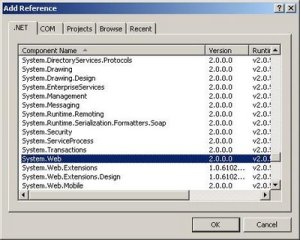
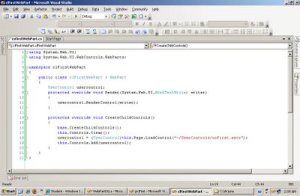
d. Now right click on the project and click on Add -> New Item..., then select Class as the template and give an appropriate name (csFirstWebPart.cs) and click Add. e. Now you need to refer System.Web namespace. To do so right click on project and click ok Add Reference..., then select the System.Web and click Ok. f. After inheriting the class from the WebPart override the CreateChildControls method to create a user control and load the user control we create earlier in step 1.
We are loading the user control file (ucFirst.ascx) from the SharePoint UserControls folder which we are to copy later. g. Now build the project by right clicking on project and selecting Build. If no errors occur then that means we have completed step 2 as well.
3. Add user control and web part to SharePoint and make the web part safe.
1. Now we have a user control and a web part dll which loads the user control. In order to use this in SharePoint we need to add these to SharePoint. This has 3 tasks to be done in the SharePoint Server machine.
a. Adding User Control files.

i. Go to the location that you created the user control project in step 1 and copy the 2 files of the user control (ucFirst.ascx and ucFirst.ascx.cs). ii. Go to the root folder of the web site (C:\Inetpub\wwwroot). Now find the folder named UserControls and paste the copied two files there. Notes –
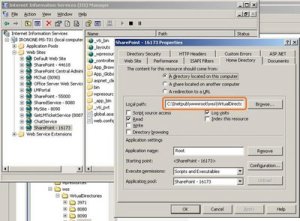
· I’m trying to put the newly created web part to the default web application. So I am using C:\Inetpub\wwwroot\UserControls folder. If you need to use this web part then you needs to use the appropriate folder. For example if I am to use this in the web application http://ironone-ms-t01:16173/ then I have to create UserControls folder in C:\Inetpub\wwwroot\wss\VirtualDirectories\16173. To find the correct location of your web application use IIS Manager web site properties page. · If the UserControls folder doesn’t exist you can create it there.
b. Adding Web Part DLL.
i. Go to the location that you created the web part DLL project in step 2 and copy the output DLL file (clFirstWebPart.dll) of it. ii. Go to the root folder of the web site (C:\Inetpub\wwwroot). Now find the folder named bin and paste the copied file there. Notes –
· I’m trying to put the newly created web part to the default web application. So I am using C:\Inetpub\wwwroot\UserControls folder. If you need to use this web part then you needs to use the appropriate folder. For example if I am to use this in the web application http://ironone-ms-t01:16173/ then I have to create bin folder in C:\Inetpub\wwwroot\wss\VirtualDirectories\16173. To find the correct location of your web application use IIS Manager web site properties page. · If the bin folder doesn’t exist you can create it there.
c. Making the web part a trusted web part.
In order to use the web part we need to make the web part a trusted web part. To do this there are two ways,
1. Put an entry to the web.config file of the application.
2. Give the dll a fully trusted name and putting it to GAC.
I will be using the first method. Make a backup of the web.config file located in the C:\Inetpub\wwwroot and open it. Then add an entry to the SafeControls section. The easiest way is to copy the last line and paste it at the end and changing the Assembly and the Namespace to the dlls’ name (clFirstWebPart). Save the config file and to be in safe side do an IIS reset by typing IISReset in the Run Window.


4. Add the web part to the web parts gallery.
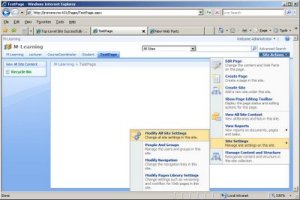
a. Open an Internet Explorer and browse to the site which you need to add the web part. Then click on Site Actions -> Site Settings -> Modify All Site Settings.
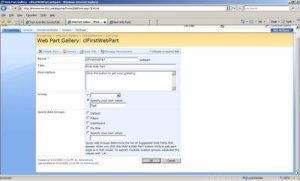
b. Click on Web Parts under Galleries in the Site Settings page to open the Web Part Gallery. c. In the web part gallery page you will see all the added web parts. But not our one. So we need to add that here. To do this click on New button. Note –
The files with .dwp extension are Windows SharePoint Services 2.0 web parts.
The files with .webpart are the new Windows SharePoint Services 3.0 web parts.
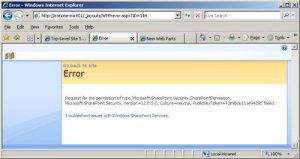
d. This list will have the newly added web part (clFirstWebPart.clFirstWebPart). Check the check box in front of it and click on Populate Gallery. e. Now our new web part will appear in the Web Part Gallery. This is enough but it is always better to change some properties of the web part. So open up the web part property page by clicking on the Edit button. Change the Title, Description and the Group of the web part and press Ok. f. Remember that we need to test the web part before we add it to a web page. To do this simply click on the web part. g. If you are also having the default settings then you will definitely get an error of request for the permission of type.... This is because we didn’t change the SharePoint trust level. To change this I will use the easy way of changing the trust level in the configuration file to full though the best way is to create a trust file.
Open the web.config file at C:\Inetpub\wwwroot and find the entry and change the trust level to Full. Do an IISReset and refresh the internet explorer page. Now the web part will be displayed to you.

5. Finally add the web part to the page.
Now our newly created web part is available for us to use. We’ll now add it to a page.
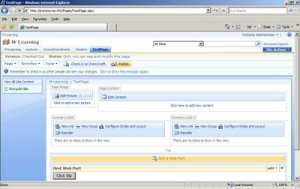
a. Open the required web page in the internet explorer and click Site Actions -> Edit Page to start editing mode.

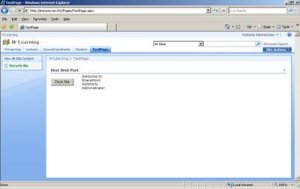
b. Now on any web part zone click ‘Add a Web Part’ button. c. Among all the web parts listed select the web part that we have created (First Web Part), select the check box in front of it and click the Add button. You will see the web part appearing on the page.
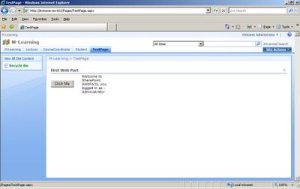
d. To finalize the page click Publish button on the page. e. Click on ‘Click Me’ button and see the output. Even though adding a new web part was bit of a process, after adding doing changes to it is not that difficult. What you have to do is change the ascx and ascx.cs files and copy the new ones to the UserControls folder. I have simply changed the message to a new one using this method.
Friday, September 19, 2008

Microsoft Live Mesh

Have you seen Microsoft's latest Live product? Its named as Live Mesh.
Live mesh is all about seamlessly connecting to people, information, devices and programs that you care about from wherever you are.
Have a Live Mesh tour to get to know more about the product by using the following link.
Interested about it? Then you better visit the Live Mesh site.

Tuesday, September 16, 2008

How to login to more than one Google Talk Session

Did you ever had the requirement to login to more than one Google accounts using Google Talk simultaneously?
I had since our office used Google accounts and I needed to be online in the official chat as well as in my personal account, and I found a way how to do it. So I thouoght it is better to share it with you.
This can be achieved by simply passing a parameter while initiating Google Talk (GTalk).

1. If you don't have a shortcut for GTalk create one by actions such as right clicking and clicking on Send To -> Desktop (create shortcut).
2. Right click on top of the created shortcut and click on Properties.
3. Type /nomutex after the googletalk.exe path in the Target field as shown below.
4. Press Ok to save the change.
5. Now start GTalk by double clicking on top of the shortcut. Now you will be able to open up many GTalk sessions and login to different accounts simultaneously.

Sunday, September 14, 2008

Windows Server 2008

 
The next version of Windows Server is here. Windows Server 2008. Check what it offers for you. By visiting Microsoft.
You can even download a trial from Microsoft.

Monday, August 11, 2008

HTML Meta Tags

Do you know what can be done with HTML Meta tags?
If not then you will also struggle when trying to do a page refresh or a redirect.
To get more details on how to please refer the following web site.
http://webdesign.about.com/od/metataglibraries/a/aa080300a.htm

Thursday, July 31, 2008

Implementing a File Download in ASP.NET

Recently I gave some help to a colleague of mine implementing a file download. So I thought of sharing it with you.
If you need to make a web site user to download a file from your site you have to use HTTPResponse.Page.Response object. By using this you will be able to make the user download numerous kinds of files to their machines. The code required is as follows.

// This defines the type of the file that you are allowing to download.
Response.ContentType = "application/vnd.ms-excel";
// Path to the file to be downloaded.
string FilePath = MapPath("Xcel.xlsx");
// Initiating the file download.
Response.WriteFile(FilePath);
Response.End();

The above code will let the user download an Excel file named Xcel. Aprt from Excel you can use other file types as well by changin the Response.ContentType to the required file type.
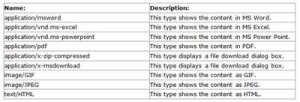
A list of available content types are as follows.

Wednesday, July 16, 2008

SQL Server Native Client Cannot be Found

Recently when I try to install SQL Server 2005 I got the following error saying that Microsoft SQL Server Native Client cannot be found. A screen shot of the error is as follows.This error is due if the SQL Server Native Client is already installed using a different edition of SQL Server.
The resolution for this is to uninstall all the SQL related stuff (specially SQL Native Client) which are installed in the computer and try the SQL installation again after doing a system restart.

Wednesday, July 02, 2008

Creating a Crossover Cable

A crossover cable is a special cable we use when we needs to connect two computers together directly. But the thing is when creating the crossover cable you have to create it properly. As of the name suggests we have to cross some cables when clipping the network cable.

The following image will show how to do the cross.

If you have additional time you can visit the following site which is a good site explaining different color code standards.
http://www.patraswireless.net/tutorial/basic%20tutorial/tut-equipemt/cable_utp.htm

If you already have an existing network cable and if you would like to make it a crossover cable, the following site will be useful since there you can change the wires (by changing the color drop down controls) as it is clipped in one end and can find out the way the other end needs to be clipped.

http://www.davidj.org/tools/cabler/cabler.html

Tuesday, June 24, 2008

Configuring Usage Reporting in SharePoint

SharePoint has a nice feature to trace the activity happening around the site. This is called Usage Reporting. Initially this is been disabled in SharePoint. To use it first you needs to enable this from several levels as follows.
1. Enable Usage Reporting from Windows SharePoint Services (WSS) level.
2. Enable Usage Reporting from Microsoft Office SharePoint Services (MOSS) level.
3. Activate Usage Reporting.
4. View Usage Reports.

1. Enable Usage Reporting from Windows SharePoint Services (WSS) level.
1)On the Central Administration home page, click Operations.
2)On the Operations page, in the Logging and Reporting section, click Usage analysis processing.
3)On the Usage Analysis Processing page, in the Logging Settings section, select Enable logging.
4)Keep the default or type a log file location and number of log files to create.
5)In the Processing Settings section, select Enable usage analysis processing, and then select a time to run usage processing.
6)Click OK.

Now we have to enable in MOSS.
2. Enable Usage Reporting from Microsoft Office SharePoint Services (MOSS) level.
1)On the Shared Services Provider (SSP) home page, in the Office SharePoint Usage Reporting section, click Usage reporting.
2)On the Configure Advanced Usage Analysis Processing page, in the Processing Settings section, click Enable advanced usage analysis processing.
3)In the Search Query Logging section, select Enable search query logging.
4)Click OK.

3. Now Activate Usage Reporting.
1)On the Site Actions menu, click Site Settings.
2)On the Site Settings page, in the Site Collection Administration section, click Site collection features.
3)On the Site Collection Features page, click the Activate button for the Reporting feature.

Now everything done. You just have to wait and see the reports when they are available.
Reports can be viewed in several places,
1)Site administrators, including administrators of the SSP administration site, can view usage reporting for their site by clicking Site usage reports in the Site Administration section of the Site Settings page.
2)Site collection administrators can view usage reporting by clicking Site collection usage reports in the Site Collection Administration section of the Site Settings page.
3)Site collection administrators for the SSP administration site can view a usage summary by clicking Usage summary in the Site Collection Administration section of the Site Settings page.
4)SSP administrators for search can view search usage reports by clicking Search usage reports in the Search section of the SSP home page.

If you would like you can go through the Microsoft TechNet site which I too referred by visiting the following link.
http://technet.microsoft.com/en-us/library/cc262541(TechNet.10).aspx

Monday, June 23, 2008

SoftLogic -> IronOne Technologies

I thought to get a bit of a change in my Carrier. So thought of leaving SoftLogic and joining IronOne Technologies.
Goodbye my SoftLogic friends, Please keep in touch.

Wednesday, May 07, 2008

Know More On Finding Stuff

Recently I came up to see an article showing how you can improve the searching capabilities while using Google. It is more towards finding things on your GMail. But definitely you will be able to use some of the skills you get on Google search as well.
Thought it would be helpful to you.
http://gmailblog.blogspot.com/2008/05/how-to-find-any-email-with-gmail-search.html

Thursday, January 17, 2008

Getting Time part only from SQL DateTime Value

Have you tried getting the time value only from a SQL DateTime value?

I have seen many people struggling with datetime fields in their programming life. Some people face problems getting the date only from datetime field. If you are one who is struggling please read my article on April 2007.

In this article I would like to mention how you can get the time only from a datetime value.

SELECT CAST(CAST(GETDATE() AS FLOAT) - FLOOR(CAST(GETDATE() AS FLOAT)) AS DATETIME)

Here what I am doing is simply casting the datetime value returned by GETDATE() into FLOAT then I am substracting the full value (value without the fractions) from that. So I will get the fraction part of the float value.

Note that when you cast a datetime value to a float, the full part represents the date and the fraction part represents the time.

2008-01-18 18:22:15.640
39463.7654587963

Then I will cast the result back to the datetime which brings me the time.

This method of casting datetime value to a float value is always handy when working with datetime values.

Friday, January 04, 2008

Inserting a Double Quote in to a String in .NET

Even though this is not new I do forget this always, so thought of putting an entry on how we can put a double quote inside of a string.

VB.NET
Dim str As String = "Example String " & """" & "This is the String with double quotes." & """"
MessageBox.Show(str)

In VB.Net you can indicate that there is a double quote in a string by using 4 double quotes ("""").

C#.NET
string str = "Example String " + "\"" + "This is the String with double quotes." + "\"";
MessageBox.Show(str);

As you will notice in C# the double quote can be represented as double quote, back slash and again using two double quotes ("\"").

The above string will be displayed as follows.

image

Friday, December 28, 2007

Microsoft Office Mobile 6.1

Microsoft has released Office Mobile 6.1. This is an upgrade to earlier versions of Office Mobile. This version will enable opening Office 2007 files in mobiles (Open XML formatted files).
Additionally it will have the following features,

• Enhanced viewing experience for charts in Excel Mobile.
• Ability to view SmartArt in PowerPoint Mobile.
• Ability to view and extract files from compressed (.zip) folders.
as Microsoft has quoted.

Download it from Microsoft using the following link.
http://www.microsoft.com/downloads/details.aspx?familyid=4b106c1f-51e2-42f0-ba32-69bb7e9a3814&displaylang=en&tm

Thursday, December 20, 2007

Try Your Flying Skills

If you would like to have fun flying aircraft's check the link below to get access flying either of Bombardier Dash 8 Q400, Boeing 737-400 or the giant in the skies Airbus A380.

http://www.creativesql.co.uk/flightgame

See how many miles that you can fly :-).
Happy Flying.

Wednesday, December 19, 2007

KITT is Back

Can you remember Knight Rider? An indestructible Black car which drives itself. It was then called Knight Industries Two Thousand (KITT).
It seems that they are going to bring back KITT to life again in TVs. This time also it will be known as KITT (Knight Industries Three Thousand). The new three thousand model will have abilities like changing colour and size. Also this will have more Artificial Intelligence (AI) making KITT the ultimate car for fighting against crime.

If everything goes smoothly new KITT will start dominating television from first quarter of 2008.

Read more at,

Monday, December 17, 2007

Adding an existing Dataset to a project - VS.NET 2003

Did you try adding an existing typed dataset to a project in Visual Studio 2003?

If you did then you may have noted that it will only add the files having the extensions .xsd (designer file) and .xsx (resource file) to the project, it will not add the .vb (class file). As a result you will not be able to use the added dataset. Also if anyone tries to add the class file again manually then it will be there as a separate class. Even though this works fine it will be misleading at a latter stage of the projects life. (In the following image you can see the 'dsDataset1.vb' file separately.)
Normally this 'dsDataset1.vb' file should come under 'dsDataset1.xsd'.

To get the dataset class file recreated in the correct location,
  • First open the dataset designer using Visual Studio (double click on the dataset).
  • Then right click on the dataset designer and select the 'Generate Dataset' menu option.
Now you will see the class ('dsDataset1.vb') file nicely located under 'dsDataset1.xsd'.

Tuesday, December 04, 2007

Detecting Whether the Application is Already Running

Recently a colegue of mine needed to know how he can determine whether his application is already running in the machine at application start.

Using this post I am going to share the solution with you all, showing how you can determine whether your application is already running in the computer. By detecting this either you can stop starting of the second instance of the application and activate the already running application for the user or you can attempt to close the earlier application and start the new one. If you does not check this then multiple applications might start and the user might complain about the application performance. Also this may cause problems occurring from locked resources.

* Visual Basic (VB)
Using VB you can easily check this by using the App object.
------------------------------------------------------------
If App.PrevInstance = True Then
MsgBox("The program '" & App.EXEName & "'is already running. Please use the running application.")
End
End If
------------------------------------------------------------

* Visual Basic .NET (VB.NET)
Using VB.NET you can do this by using Diagnostics.Process class.
------------------------------------------------------------
If Diagnostics.Process.GetProcessesByName(Diagnostics.Process.GetCurrentProcess().ProcessName).Length > 1 Then
Application.Exit()
End If
------------------------------------------------------------

Microsoft SQL Server Compact 3.5 for Windows Mobile

SQL Server CE 3.5 has been released. According to Microsoft this is having some cool features. Some of them are as follows according to Microsoft.
  • Side-by-side installation together with SQL Server 2005 Compact Edition (version 3.1)
  • Support for newer and more secure encryption algorithms
  • Additional timestamp (rowversion) data type
  • Enhanced support for Transact-SQL statements including:

- Nested query in FROM clause
- CROSS APPLY and OUTER APPLY
- CAST and DECIMAL
- SET IDENTITY INSERT
- TOP CLAUSE

To download and learn more visit Microsoft using the following URL.

http://www.microsoft.com/downloads/details.aspx?FamilyID=38ED2670-A70A-43B3-87F3-7AB67B56CBF2&displaylang=en

Tuesday, October 16, 2007

First Delivery of Airbus A380

image_thumb[4]
 
Airbus delivered its first Airbus A380 on 15th of October 2007. If anyone of you who is interested have missed the occasion you can have a look at the event by visiting the following web site.

You can watch many other multimedia content highlighting the development and launch of A380 in the same web site.

Enjoy !!!

Monday, October 08, 2007

Microsoft Flight Simulator X

I got Flight Simulator X (FSX), which is the latest version of Microsoft Flight Simulator line of products. It seems to be really high in detail, also they have improved the liveliness of the artificial world. This version has moving traffic on roads, moving ships in the sea, people are there, birds are flying, push back vehicles are there. Also they have improved the virtual cockpit a lot. Only problem is, to support all these you need a good machine with high powered processor and a good graphics card.

My earlier graphics card doesn't seems to be much comfortable with FSX, so had to buy a new graphics card as well.

But it seems to me FSX is a really good game to go for if you are a flight enthusiastic like me.
Also I am planning to start again creating some fun stuff for FSX as I did some years back for FS2004.
Visit the official web site and find out more.
There is also a trial version available from Microsoft at the following location.

Friday, October 05, 2007

Microsoft HealthVault

Microsoft HealthVault is an online service which you can use to collect, store, and share the health information critical to your family's well-being.

Above all this service is provided free by Microsoft.

Try it out by paying a visit to Microsoft.
http://search.healthvault.com/hvindex.htm?rmproc=true

Thursday, September 27, 2007

Executing .NET Applications Located on a Remote Location

Have you tried executing an application which is on a remote machine from yours. Think it like this, you have an application written in .NET (any version) and two users are there who are willing to use the application using there machines. (Please note that in this secnario all the machines are in the same network.)

The normal process is to setup your application on both machines and tell them to use. But the problem is that you are not yet finished development so constatly there will be updates to the application. So if you install in two machines, all the time you change the application you have to install the new version in both machines. (This is ok as you think because it is only two machines, but think is there are 50 users using in 50 machines.)

In this kind of a scenario, installing the application in one machine and sharing it and making the other user access the same installation can ease your life. Isn't it?

If you just try running the application from the remote location, application might not work correctly. This is because you have to set a code group for the remote application in the local machine. Then only the local .NET classes will be accessible without problem to the remote application. To configure the things follow the points.

1. Install your required application in one machine and share the application folder if possible. (It doesn't really matter whether it is shared or not. What matters is the accessibility to the folder.) Run the application from the installed machine first to make sure the application is working properly in the local environment.

2. Install the required .NET framework on all the client (user) machines. (In my scenario above, in both uiser machines.) This is because the application is actually ran on the users machine even though it is located on a remote machine.

3. Browse to the application installation folder from a client (user) machine.
Get the 'Run' window by clicking on Start -> Run. Type the machine name or IP address of the machine where your application is installed (Note that my application resides in the machine having the IP 192.168.1.165 in my LAN).If the login criteria is asked, enter them and login. It is ok even if you use the 'Guest' account to log into the system if you have access to the shared application by the guest.
4. Open the .NET Configuration window by clicking on Start -> Control Panel -> Administrative Tools -> Microsoft .NET Framework x.x Configuration.

5. Expand the 'Runtime Security Policy' node from the left hand pane. Then expand the 'Enterprise' node and finally 'Code Groups' node. Then right click on 'All_Code' and click on New....

6. Specify a Name and Description for the code group and click Next.

7. Choose the condition type of the code group as 'URL'. In the underneath URL text box type the path to the remote application folder and put a backslash and an asterisk . In my case I typed file://192.168.1.165/Bin/* (The asterisk is used to include all the items under the folder Bin into the code group that we are creating). Then press Next.

8. From the list of existing permission sets select 'LocalIntranet' and click Next. Then click Finish in the next screen to finish and setup the new code group.

9. Now the code group is created for our remote application. But to make the application really run you have to change one property in the Code Group Properties. Continue by right clicking on the new code group that we created named 'My Code Group' and selecting 'Properties'. 10. In the code group properties, check the 'Policy levels below this level will not be evaluated' check box and press 'Ok' to apply the setting.

11. Close the open .NET Configuration windows and launch the application from the share.

If any specific functionality or if the entire application is not working please contact me, I might be able to help you out of the problem.

Installing Office 2007 on Windows

Hi all,
This is my second post on installing Office 2007. The reasons behind this post are that I have seen that installing Office 2007 is a problem not only in Vista but also in all other operating systems and also to mention you a tried and tested way (by me :-)) to install Office 2007 in one shot.

As my hint above you can use this method to install Office 2007 in any operating system.
Before starting the setup I recommend you ti update windows by running Windows Update.

1. Run a Disk Cleanup on the partition that you are going to install Office by getting the drive properties by right clicking on the drive and clicking Properties.

2. Create a folder named 'Office' in one of the drives in your hard disk and copy the full contents of Office setup CD/DVD in to this folder.

3. Start the installation by double clicking on the Setup.exe.

4. Select the customized option of the setup and right click on the top node and select 'Install on first use'. This will make all the items install when you try to use them.5. Now continue with the installation.

6. If there are any problems the setup will bring up a window and tell you to browse for files that it is unable to find or sees as corrupt. If this happens to you,

i. Try pointing to the 'Office' directory that you created in the point number 2 and press Ok.

If the window again comes up then,

ii. Copy the entire folder which setup reports as having problems from the CD/DVD to the 'Office' directory again. (For example if the setup saying it is unable to process ExcelLR.cab, copy all the folders having the name Excel to the 'Office' directory again from the CD/DVD.)

iii. Point the setup again to the 'Office' directory. This time the setup will continue.

7. When the setup finishes, start one or two applications (Word, Excel, ...) and make the installer install the necessary files. If at this point it asks for any missing files, follow the same procedure as at point number 6.

8. After you have successfully opened at least two applications of Microsoft Office family of products, start the Office installer again from the 'Add or Remove Programs' section in Windows Control Panel. Select 'Add or Remove Features' and click Continue. Then choose the applications you want to run and proceed with the setup. (If the setup is asking for any missing files follow the same procedure as at point number 6.)

9. When the setup finishes successfully, you can carry out a Repair on Office by starting Office setup again from 'Add or Remove Programs' to fix any missing files.

Tuesday, September 25, 2007

Breakpoints are Not Working in Visual Studio - .NET Compact Framework (.NET CF)

Recently I had the issue while debugging a smart device application. All my breakpoints stop functioning. But if I ran the application in the device emulator the breakpoints are working fine.
So it was occurring only when I debug in an actual device (In my case Pocket PC).

After some trying I found that the problem is in the .NET CF which was installed in the Pocket PC.
To fix the thing,
1. Stop all the applications running in the Pocket PC (Do a soft restart or use the Runnning Programs tab in the System -> Memory).
2. Un install the .NET CF from the Pocket PC and soft reset the Pocket PC again.
3. Install the .NET CF in to the Pocket PC. (Also note that you can make the Visual Studio install the .NET CF by starting an application from Visual Studio.)
4. Connect the Pocket PC to the computer using Active Sync and try debugging. In most cases now the breakpoints should work.

If this did not fix the issue you will have to cold reset the Pocket PC and also I would instruct you to reinstall the SDKs (Windows Mobile 5/6 Pocket PC SDKs) if you have any installed.

Wednesday, September 12, 2007

Airbus A300
Airbus has delivered its last A300 to FedEx on 12th July 2007. This marks the closure of Airbus’ first production line and brings to a close a very special chapter of the company’s history.

To read more details and watch the first A300 being made pay a visit to Airbus.
http://www.airbus.com/en/corporate/people/company_evolution/a300/index.html
http://www.airbus.com/store/mm_repository/videos/att00010264/media_object_image_teaserA300_Airbus.swf